

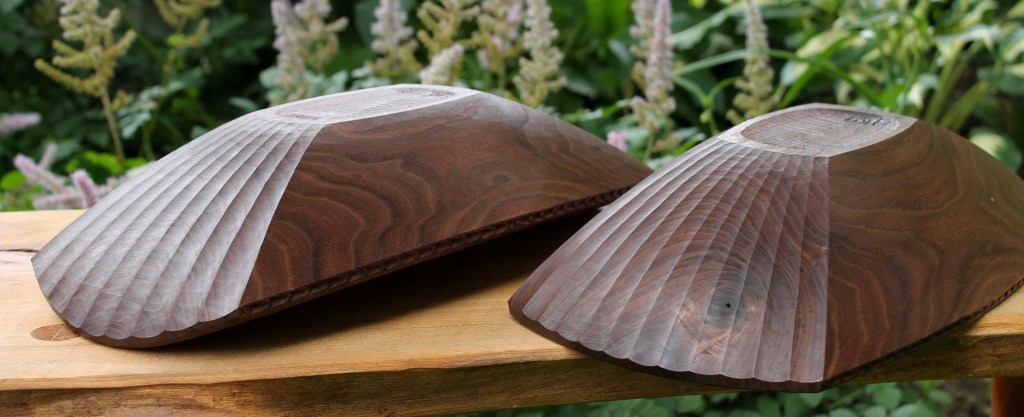
These two walnut bowls are very much alike in all aspects of their design except for the shape of the upper surface. I split both blanks from the same log. After hewing and planing both bottom surfaces flat, I gave the one an arched top and the other a flat top.

Above are both blanks. It may be more intuitive to create an arched blank when working in the “bark-up” orientation, since the arch is already there the natural form. But it can also be done with a “bark-down” (or “pith-up”?) blank, and may be a good choice for certain logs and circumstances.
Realizing that the growth rings were difficult to see on the blanks and having just discovered the feature that lets me mark on photos, I’ve indicated the growth ring pattern with the yellow lines.

Both bowls were laid out in the same way on the upper surface, in a “rectoval” shape. From the angle above, you can see the same sort of grain pattern on the inside of the hollows.

Drop down a bit and the difference made by the blank form becomes more apparent. Neither is inherently better; it’s a matter of taste, setting, and/or purpose. It’s good to have both options to be able to make the best use of a particular log.
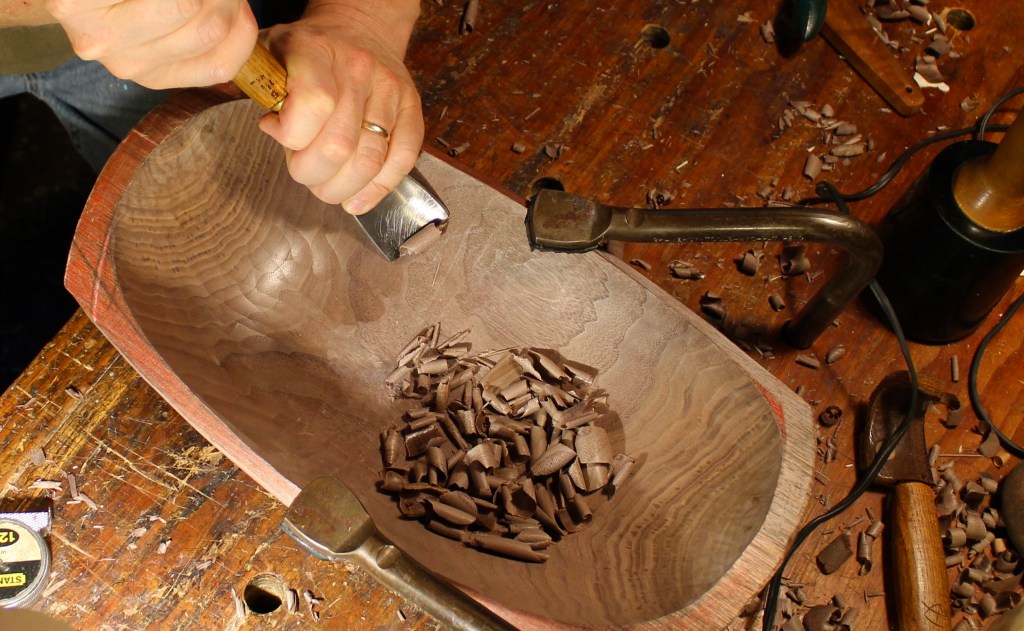
I chose to finish the interior of both bowls with a subtle texture by paring the surface with a relatively shallow gouge. In the case of this bowl, I’m using a Hans Karlsson bent gouge 150 sweep (the edge represents an arc of a circle 150mm in diameter) 45mm wide, equivalent to a #4 sweep or so, I’d say. The specific gouge doesn’t matter, but sharp does, especially when pushing an edge that wide through dry (at this stage) walnut. Even with all that pushing, two holdfasts and some rubber pads are all that’s needed. Simple and effective. I don’t know what I’d do without holdfasts.
The side panels of both bowls were finished at the bowl horse with a drawknife. I carved flutes on the end panels but I varied the number. Flat top got 12 flutes, and arch top got 9, slightly wider.
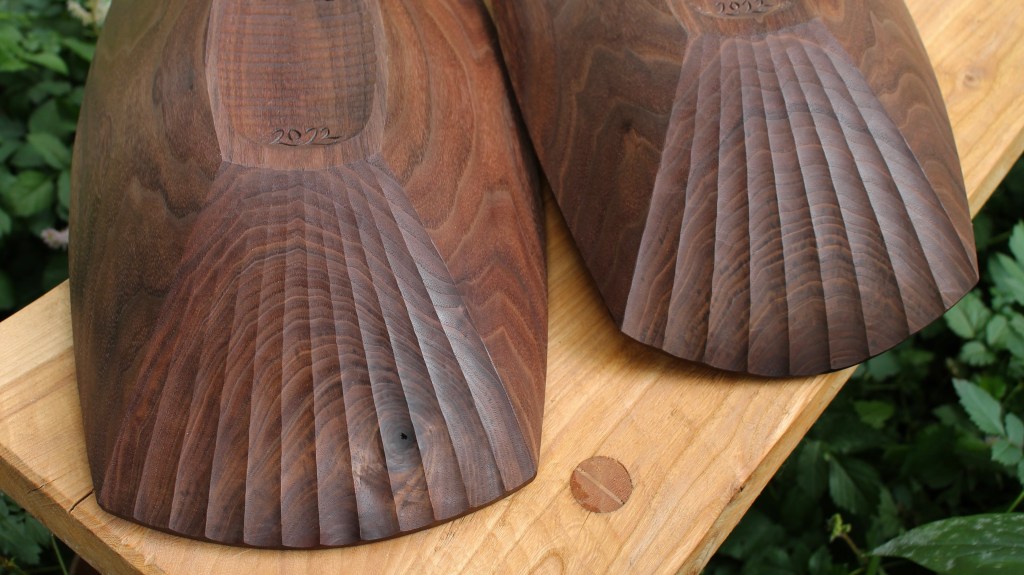
There’s a knot in the end wall of flat top. It carved easily, and I like the way the grain swirls around it.
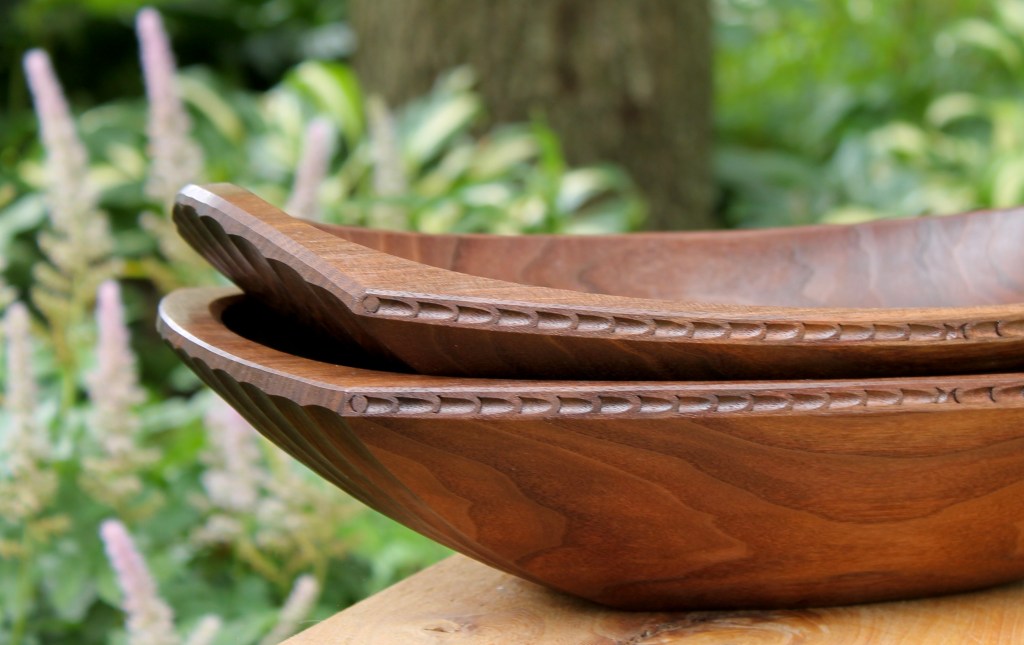
I carved the same nail-cut pattern on both bowls.

as always, beauties. If I were to to presume to choose, I think I would choose the arch top. I like its flow.
LikeLiked by 1 person
Both bowls very nice. Interesting to be able to see such a close comparison. I like both, although for slightly different reasons.
LikeLiked by 1 person
Btw. I too often use a wide 150mm radius HK giouge to finish the inside bottom of my bowls but only to smooth it, rather than texture it. And my gouge has a dog-leg stem for that purpose. So interesting to read of your use of a similarly shallow gouge.
LikeLiked by 1 person
Amazing work!
LikeLiked by 1 person
Hello David,
your work is inspiring to the point of me trying to carve some bowls on my own. I have carefully studied all of your blog and got some very much needed and essential technicalities of the process. Still I am a self taught woodworker and have no one of similar interest in the area to ask questions and compare experiences so I’ve decided to write here counting on that you would share some more secrets. To be more specific I’ve been having some problems with paring, especially handle tops and inside of the bowl around the widest point. Handles seem to have facets that can be seen and felt no matter how meticulously I work them with drawknife or just knife. How do you approach that because on your bowls tom side of handles looks perfectly smooth. Also inside of the bowl on the widest point when working across the grain seem to be a little rough to the touch no matter what I do. Could you please share some more of your technique on those?
LikeLike
Good question. Don’t hesitate to ask. The top side of my handles, or the upper rims, are typically left with very subtle facets from the drawknife. These become more evident by touch or if the light catches things just right. If the upper surface is particularly narrow, the facets may hardly exist at all. And if a bowl has a flat top, you can always use a sharp block plane on the upper surface.
Working across the grain can be difficult to get a clean cut, but it saves the trouble of trying to merge the cuts head on going with the grain in that transition area. One way or the other. Skewing the edge a bit can help (employing some of the benefits of both choices), as can making your final cuts very thin, but it is often a finicky area. Sometimes less so with a really cooperative piece of wood.
Drawknife or gouge, handle or interior, the biggest factor in getting those clean, subtle cuts is sharpness (including the geometry) of the edge. This is a level of sharpness not required in many aspects of woodworking otherwise. For all I know, your edges are already great. Make sure to avoid abrupt rounding right at the cutting edge and go to a very fine finish followed by stropping. I’ll try to do some more sharpening posts. Meanwhile, here are some posts related to your overall question, just in case you may have missed them.
Happy carving — frustrations and all! Welcome to the club.
LikeLike
Pingback: Simple Drawing Bow | David Fisher, Carving Explorations
OK, I give up, how on Earth do you do your finger-nail pattern?
Logic says a vertical stop cut and then use (I assume) the same gouge back to cut the nail in one smooth cut..
But, after a couple of hours of playing in my workshop I have to admit defeat. I just can’t get it to gently slope from one end to the other, they “blob” out losing their shape. Admittedly I was using junk wood stolen from the kindling pile so maybe that makes a difference.
Or is it just a matter of practice practice practice?
LikeLike
You’re right, Chris, in terms of the general procedure. I use the same gouge for the vertical cut and the back cut; in this case a #8 sweep 4mm wide. I have a feeling that you may be going too deep too soon. Of course, the deeper you go, the wider the cut gets. Your maximum depth, and width, should be at the end of the cut where you meet the vertical cut. You actually can achieve this with a small series of back cuts if it helps with control. You can make, for example, a back cut that begins just a quarter inch behind the vertical cut and is only about half of the final width and depth. Then follow that with one that is a little longer, wider, and deeper. Then make that one final smooth cut. Try that and see if you get a better result.
I have a little series of photos of those nail cuts in this post https://davidffisher.com/2022/01/13/new-walnut-bowl-3/
And here’s a post with lots more possibilities for nail cuts https://davidffisher.com/2021/02/27/gouge-article-and-thumbnail-cuts/
LikeLike
Thank you so much, for a start I was using a gouge nearer 10mm wide with a shallower sweep, which in hindsight was never going to end well.
LikeLike
10mm wide is fine if you have a wider band on the bowl, but the shallower sweep can be a problem, as you’ve discovered. Stick with a #8 or #9 for most of these nail cuts. They can be scaled up in width as much as you want.
LikeLike
Pingback: Merging Cuts in the Hollow | David Fisher, Carving Explorations