
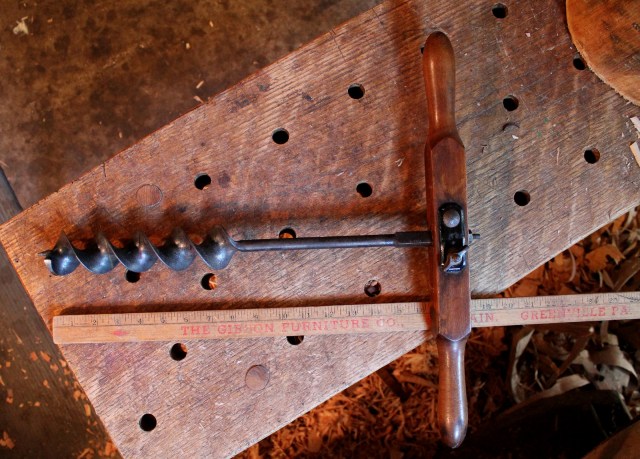
To bore the initial hole in a shrink pot, I use an auger, typically this two-inch diameter T-handle auger. I found mine at flea market years ago. Large augers like this aren’t rare, but there are a few things to keep in mind when choosing one for boring into hardwood end grain.
The image below shows the edge configuration of this auger. There are many variations that will do the job well. This style has no scoring spurs, and for cutting into end grain none are needed. (This auger performs well on side grain as well, as when boring out timber frame mortises.) The two horizontal cutting edges slice wood from the bottom of the hole and the vertical cutting lips clean up the sides. The lead screw is not too aggressive and not too fine. If the threads were more widely spaced, it would take a deeper bite, maybe too much to expect in end grain. If the lead screw were too fine, it might not grip enough in end grain to pull the auger into the piece. In any case, more forward force is usually required to keep the screw engaged in end grain.

It would be tough to turn a two inch auger bit with a brace; much more torque can be applied with a t-handle auger. And like most tools, if it’s sharp it’s a pleasure to use. Sharpening is pretty straightforward. Auger bit files do a nice job, but lacking one, you may also get by with a narrow diamond paddle or a slip stone.

Remove material from the upper side of both cutters. I only use a light touch with the fine diamond paddle on the lower side to remove any burr.
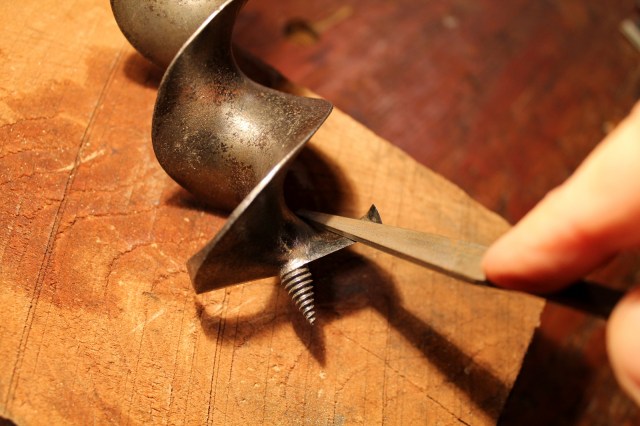
Do the same with the vertical edge, keeping the junction well-formed and honed.
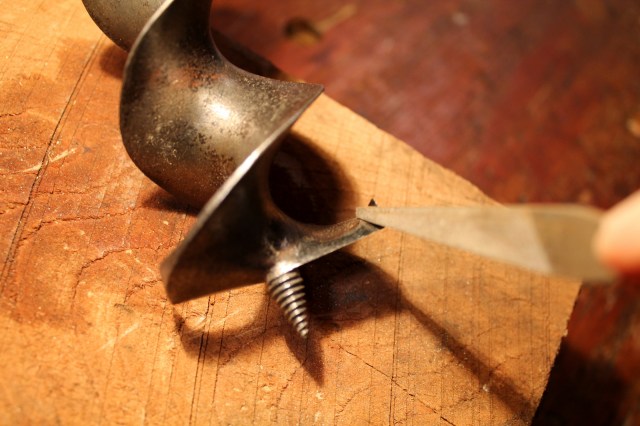
Here, I am ever-so-lightly removing the burr from the outside of the cutter. The most common problem I’ve seen on used auger bits of all sizes is sharpening that has been done on the outside edges. These edges cut the hole and establish the diameter. If the edges are rounded inward, a smaller diameter is cut and the rest of the bit can jam as it tries to follow into the narrow opening.

Here are three lengths of a cherry log that will become shrink pots. I still have to broaden the hollows (which I’ll probably make oval to use the natural shape of the rings in these pieces). The auger just provides a start. A narrower auger can be used. It will just leave more material to be removed otherwise. I usually leave the piece long for ease of holding in a vise. I bore a hole a little beyond what I need, saw off a length, then continue boring. I repeat the sequence until I bore through the last chunk.

I recorded a little video footage while I bored these a couple days ago; just simply the sights and sounds of the auger boring into cherry end grain:
I have some other posts about shrink pots. Just click “shrink boxes” in the category list to the right.

David,
Thank you for the information and video. The sound really makes it. I was trying my hand at a “shrink tube” the other night with a soft maple branch from my yard with a 1″ auger in my brace. The drilling went pretty well, but the inside of the hole was pretty shredded looking. Have you had that happen? Is this a wood or a bit issue? I’m not sure what I can use to get in there to clean it up without making the hole overly large for the branch. Thanks for any insight.
LikeLike
It could be the auger, the character of the wood, or both. But the auger you are using could probably use some tuning up. For most shrink pots, it doesn’t matter because so much wood will be removed beyond the hole itself, but since you are making a long “shrink tube”, maybe try cleaning up the torn fibers with a long rat-tail rasp or something like that if things are beyond the reach of a knife.
LikeLiked by 1 person
Thank you for the quick reply. Never thought of my rasps. I’ll take a fresh look at the auger. It seems like the more I sharpen something, the sharper I can get it. While most of my woodworking is “square,” seeing your bowls (and other things) and reading your posts have helped expand what’s possible and beautiful in woodworking.
LikeLike
David,
Did you do anything to the little screw on the tip to sharpen those threads. I notice the threads on mine seems a bit rounded and dull.
Emil
LikeLike
Emil, depending on the size of the threads, try a triangular file or a course diamond stone paddle. I know they make acutely angled files for sharpening Japanese saws as well. That might work.
LikeLike
I forgot to get check the notify box! Thanks for the tip!
Hey is the paddle in your picture the fine or extra fine paddle, David?
LikeLike
Green is extra fine, but fine would work for the threads.
LikeLike
David, I know this is an old blogpost, but I’ve been inspired to try my hand at a shrink pot. I’ve been stopped by my 2″ auger. I cannot get it to bite with any strength. I’ve scoured the web for all any ideas on what I could be missing. I’ve flattened and reshaprened the wavy leading edge, keeping the edges parallel. I’ve taken needle files to the screw threads. What I really need is a photo of a working auger to study the geometry of it. I mean, it can’t be that complicated, right?
LikeLike
Liza, it can be a challenge for an auger to work in the end grain, so don’t be discouraged. The detailed photos I’ve included in the blog post are probably the best I can get of my auger. If you want to email some photos of your auger bit, I’d be happy to let you know if I see a problem. Even with clean threads, the auger may simply not have prominent-enough threads to bite in the end grain orientation. Remember, you can also begin with a smaller hole than 2″, could even be 1″. Then you can widen the hole from there with gouges and/or knives. Recently, I’ve heard good things about these Wood Owl bits, especially their ease of cutting. https://www.leevalley.com/en-ca/shop/tools/power-tool-accessories/drill-bits/75748-wood-owl-bits Haven’t tried them yet myself. You could drive them with a 1/2″ power drill or with a wide-sweep brace with this adapter https://taytools.com/collections/tools-drilling-boring-auger-bits/products/woodowl-11-piece-set-3-8-to-1-by-1-16ths-x-7-1-2-tricut-ultra-smooth-auger-bits They have longer bits here https://taytools.com/products/woodowl-18-ultra-smooth-tri-cut-auger-boring-bits Again, haven’t tried them yet, and it may not be time yet to give up on your existing auger.
LikeLike
Pingback: Before I Forget… A Few Things | David Fisher, Carving Explorations
Pingback: Boring Shrink Pots | David Fisher, Carving Explorations