
Don’t worry, the title doesn’t refer to a new snack trend. It’s that time of year when, like many woodworkers, I try to get a few gifts finished in time. One of them is a set of three kitchen spoons from a branch from a sentimentally special maple tree. They required a single butterfly on each handle.

I started sketching some possibilities, beginning with the rounded forms to the upper left of the page above. I was thinking about using a combination of gouge chips, but I could tell just from the sketches that I was on the wrong track. So I looked at some photos of butterflies, as live ones are in short supply around here this time of year. You’d think I’d have known what a butterfly looks like. Like everyone, I’ve looked at plenty and snapped a few photographs. But I had never drawn one, so I had just looked without seeing. It’s that way with a lot of things for me.
The little sketch in the lower left of the page is a simple distillation of the butterfly forms I was checking out. It struck me that I might be able to represent the butterfly effectively with some simple triangular chip cuts. The idea developed with the sketches on the right side, followed by a test on a scrap board, then onto the spoon handles.

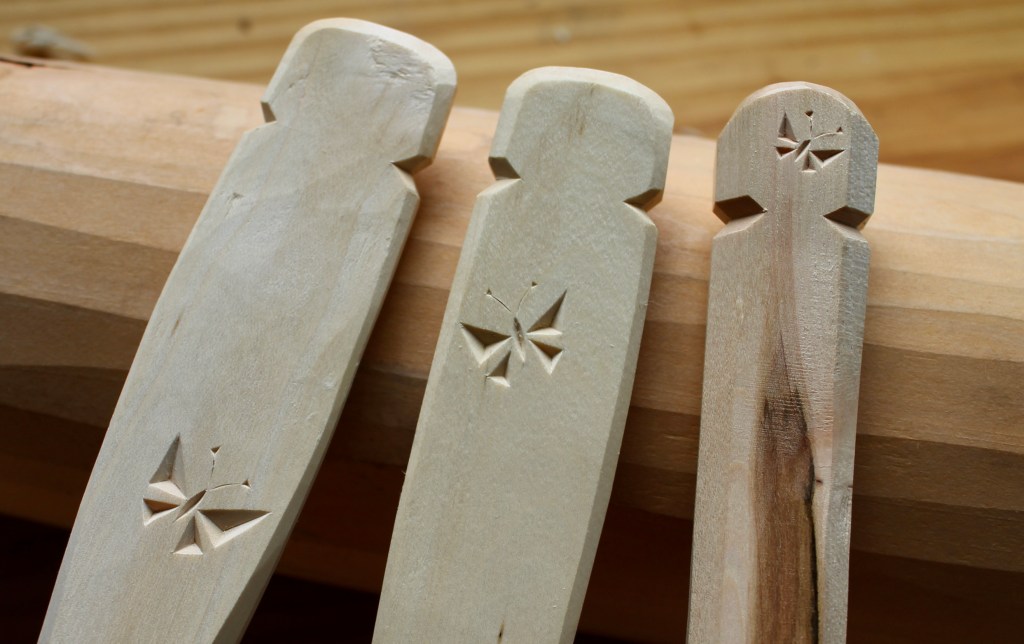
There’s a close-up above. Very simple to carve. Four three-sided chip cuts represent the wings. The body is formed with two curved cuts with the tip of the knife. The antennae are each just scored with the knife-tip drawn along shallowly in the wood (with no wood removed). Then a couple very small three-sided chips for the clubs at the end of the antennae. Many variations would be possible with subtle changes to the angles, relative size of the wings, and so on.

Ready for oil. With a week to spare!

You make some amazing stuff, my dude.
While I can figure how you did one side of the triangular cuts, I can’t figure how you accomplished the relief cut at the base of the shape. Is that done with a knife or a chisel?
I love everything. Thanks for sharing your work.
LikeLike
All of the cuts were done with a knife. The wings were each done with three cuts, each cut the same idea. The body is done by just making a curved cut with the tip of the knife, deepest at the center of the line, lifting out as it nears the ends. The knife is angled so that the cuts meet in the center to release the chip.
LikeLike
Lovely design Dave, as usual! Thanks for the details provided, I was wondering how you did it :). BTW Did you use just one knife and, if so, was it your trusty pen knife? 🙂
LikeLike
Yes, Tony, I just used my penknife, but a different blade than I use for lettering. I use the pen blade for lettering, which has an edge that curves up at the end. For cutting chips like these, I use the other small blade, with a straight edge with the end angling down to it (a “coping blade” shape). It functions like any other chip carving knife, and I have a couple of those too. It’s just that the pocket knife is always right there in my pocket. The slideshow at the end of this post provides a good look at the blade I’m speaking of: https://davidffisher.com/2021/06/17/small-side-panel-cherry-bowl/
LikeLike
well done simplification–
LikeLiked by 1 person
Nicely Done
LikeLiked by 1 person
The butterflies are perfect, but the top of one of the handles need to be improved before oiling.
LikeLiked by 1 person
There is beauty is apparantly simple things. You continue to find it, as is demonstrated here. Thank you, thank you.
geoff
LikeLiked by 1 person
I would more info, instruction on how the utensils were actually carved. Was the rough form achieved with electric tools?
LikeLike
I’ve got you covered, Richard. I’ve written several posts that discuss how I carve spoons. I’ll list a few below that would be fitting for you to check out. In short, no, I don’t use electric tools to shape my spoons. I prefer to use axe, adze, and knives. But to each his own.
LikeLike
Love the butterfly David. I have tried chip carving but it didn’t grab my heart, however I do like the idea of using chip carving techniques to add a small bit of pizzaz to a carved object.
LikeLiked by 1 person
I think you’d love Jogge Sundqvist’s new book “Karvsnitt”. It’s a chip carving book, but it diverges from the strict geometric patterns found in some others. It’s as unique as Jogge himself. Full of possibilities and inspiration for taking it in your own direction. Check it out: https://lostartpress.com/products/karvsnitt-carving-pattern-color-in-the-slojd-tradition
LikeLike
Hi Dave. Great detail with simple shapes, I like it. Curious about the purpose of the bottom spoon in that photo. Flipper? Stirrer? “Keep away from my pie hand smacker?”
LikeLiked by 1 person
Hi Phil. Good question about that odd utensil, and good guesses. All of the above are correct, I’d say! I’ve not made that shape before, but it just resulted from the limitations of the material. I was given just a short straight branch piece from a maple tree that had been taken down (one that was special to someone). I was able to get the two spoons out of it: a deeper serving spoon and a cooker/stirrer. I was able to stretch the thin bit I had left to make that paddle shape. It does curve upward some along its length. I’m thinking it can be used for all the things you mentioned, plus maybe also reaching into steep containers and scraping the sides, and that sort of thing. Flipper, spatula, scraper, thwacker!
LikeLike