

My limited photography knowledge and equipment means that I simply focus on taking advantage of good light when it’s available. Most of the shots I take are in the workshop, just from whatever light is coming through the south-facing windows. If there’s no good natural light at the moment, I wait for another moment.
A couple days ago, we had a bright winter day. This time of year, the sun is low in the sky and casts lovely shadows. The birds were singing, calling me outside to take some shots of a bird bowl I just finished. I had some fun propping it up in trees and such; seeing how the light played on it in different situations.
Before we return to that, here are a few shots of the early stages of this bowl. The sapwood on the cherry tree had begun to decay while still standing, but the heartwood was still solid and fresh.

Above is what it looked like when I split out a big crook. This is all above the pith, and the missing upper portion became a spoon.

A little further along. The split surface was naturally hollow toward the middle, with the “wings” raised up more at the widest part of the body.

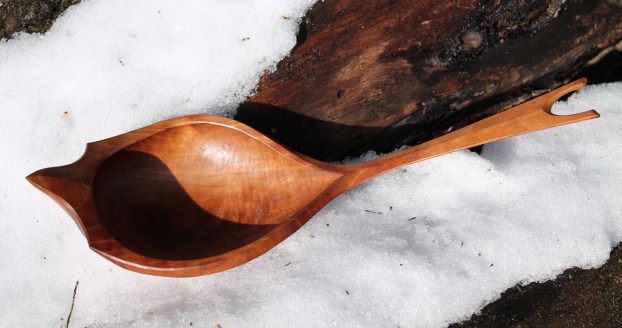
There it is at the end of the green carving stage.
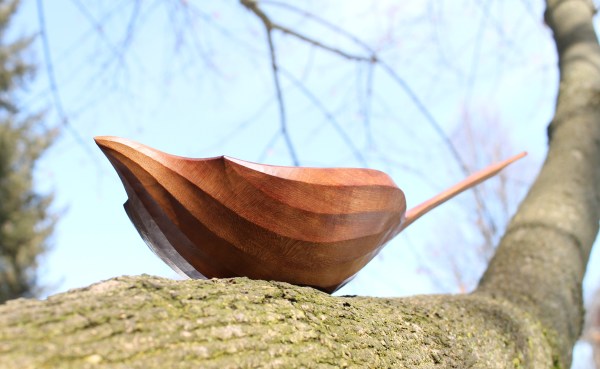
I could have come back to it a week or two later, but other things intervened and it ended up being well over a year until I finally returned to it. I refined the shape and surfaces, which took much longer than the green carving stage. There it is finished, above, perched on a branch. Here are a few more photos of this one from my time outside playing with light and shadow:


Lots of creatures were soaking up the winter sun that day. Here’s my buddy just outside the shop window enjoying some seeds.

Thanks for sharing the process
LikeLiked by 1 person
Wonderful to see the transformation from a piece of wood to the finished product. Also the ability to see that end product within the raw wood is astounding.
LikeLiked by 1 person
Wow. Beautiful.
LikeLiked by 1 person
Yet another beautiful bird!!!
This really intensifies my wanting to search for crooks.
No need to apologize, David, for your photography. You are doing it exactly right. Many people have commented about how much they enjoy your photos. Me too. Your bowl designs show that you have the artist’s eye for appealing design. I believe that your eye for design is just as important, maybe more so, than knowing how to handle a sharp implement.
It’s the same with photography. Having that eye for design, composition, lighting. etc. is often more important than the technology or the price of one’s equipment. I am the son of a professional photographer who made images with mechanical cameras, film, paper, and chemicals. I had a superb education about photographic technology then, and since, but know that finding a pleasing image is far more than technology.
By the way, I’m a huge fan of “available light” photography, just the kind you used in this post. Natural light is the best, and you used it well.
( If you please, I can clutter up your comments with a few simple and inexpensive photography ideas for those days, or weeks, when the gods of light are not cooperating. )
LikeLiked by 1 person
Thanks very much for sharing those thoughts, Bob. You must have some great memories of working with your father. While I’m more likely to keep it simple in terms of equipment, I certainly won’t turn away your offer to share some ideas in case I head in that direction some day. I’m always willing to learn, plus it is sure to benefit others as well. Thanks again.
LikeLike
These ideas are for those days when natural light isn’t favorable and you just have to make some photos. … when you can’t wait for that bright day, or can’t get outside to use all the wonder of nature. …and they don’t require a lot of technology or expense.
We’ll turn to simple, low-cost, artificial light. One can spend mounds and mounds of money on expensive “studio lights,” but let’s use the simple clamp light instead. At less than 10 bucks apiece, most of us probably already have a couple. Two are enough for decent light, but up to 4 in some cases.
Stands? Studio lights often come with special purpose, tripod based stands, adding more to their cost. Well… most of us already have stands: simple kitchen chairs, ladder-backs, welsh, etc. Clamp lights can be attached to the chair in lots of heights and positions. (Use a dishcloth as a pad under the clamps for those nicely finished chairs.)
The basic idea is to illuminate your object with two lights that (1) provide enough light and (2) cancel out shadows. Generally, that’s 2 lights facing from the front of the object at 30-45 degrees. (No, don’t get out the protractors. Play around for the best appearance.)
———–
Set ups:
Indoor settings are tough because there’s usually a lot of “background noise,” stuff showing up in the image that you might not want, or maybe not even notice since we’re so used to the setting.
As an aside, there is a woodworker who writes nearly every day and makes what he calls his “glamour shots” in his workshop with all manner of distracting clutter in the backgrounds. The distractions greatly reduce the glamour of his creations.
You usually do a very good job of this in your own shop. My basic advice is to look through the camera and be very very selective about what’s in the background. Remove background annoyances if you can, or move to another setting.
For a “catalog” shot, one that has no other distractions and might really be intended to look like it is in a product catalog, consider setting up on a small table (an end table you already have) covered with a simple neutral color cloth. Behind the table, hang a bed sheet, window blind, or even some butcher paper taped to a wall. (May need some more ladder-back chairs to hang the backdrop from.) Bingo, instant studio.
When dad was shooting portraits, he sometimes used a very wide pull-down blind as a backdrop. Think 8 foot wide window blind. Then, he lighted it from below and behind the model with another light. Just position a 3rd clamp light on the floor pointing up and shining against the backdrop. it produces a nice soft back light that knocks out yet more harsh shadows.
Lastly… sometimes an overhead light softens the last of the shadows. Grab another clamp light and a friend to hold it up where you want it. 🙂
———–
Light bulbs:
As bright as possible is the usual recommendation. Yet, be aware that brighter means harsher shadows, and sometimes too much is too much. Edison was good enough for over a century, but our most recent LED lights have finally gotten bright. They were too expensive and too weak for a long time. I like outdoor spotlight bulbs for their brightness whether tungsten or LED. Being “thrifty,” I’ve stayed away from halogen and others.
You might have noticed, today’s bulbs come in varying color ranges, usually expressed as temperatures. We can get into long discussions about that alone, so I’ll say my preference is for “daylight” color ranges (5000-6500k), just like that bright winter day. I don’t have the money, time, interest in investing in the latest technology that manages LED lamp colors. Trying to keep it simple and inexpensive.
Note: there’s a downside to “daylight” color with some indoor photography settings. If the setting is a typical furnished room and you’re trying to show off that furniture, 5000-6500k lighting will be too blue. Scale back to the 3000-4000k range.
———–
another aside: Recent shots on my own blog were made on a small table with a continuous strip of butcher paper taped to a wall, draped down from the back and turning gently to become the table cloth. Two clamp lights using simple 100w bulbs. A third, top light, would have made them better yet.
———–
Camera stuff? Maybe for another time. There’s a LOT we can do with simple cameras, and now even with the cameras in cell phones. Answer with the word “bokeh” if you and to read more of my jabbering.
LikeLiked by 1 person
Thanks for all of the tips and advice, Bob. Very helpful to many folks I’m sure. I also appreciate the link to your blog post. That’s a beautiful bowl and the necklace is executed crisply and fits the bowl well. Really nice step-by-step photos too.
LikeLiked by 1 person
Those flutes!
LikeLiked by 1 person
I’ve been carving bowls for 15+ years. I often leave the interior with tooled surfaces and sand smooth the outside. Curved surfaces under handles and at times edges can be troublesome.
You do gorgeous work with your bowls both inside and outside and usually with exotic touches. I was wondering what sanding systems you use to finish your pieces?
On Thu, Feb 20, 2020 at 21:23 David Fisher, Carving Explorations wrote:
> Dave Fisher posted: ” My limited photography knowledge and equipment means > that I simply focus on taking advantage of good light when it’s available. > Most of the shots I take are in the workshop, just from whatever light is > coming through the south-facing windows. If there” >
LikeLike
Hi Erv. Like just about all of my bowls, the bowl in this post has not been touched by sandpaper or any sanding system. All of the surfaces, inside and out, are straight from the carving edge. I don’t say that pridefully at all, but just as a matter of explaining how it was done. To sand or not is just another choice in design and/or how one wishes to work. In some special circumstances, usually just with certain bird designs, I decide that the design and wood calls for a smoothed surface. Here is one example from not long ago: https://davidffisherblog.wordpress.com/2019/11/28/thankful-for-birds-and-trees/ In those circumstances, I use a relatively thin, flexible card scraper followed by rubbing with some very fine grits of regular sandpaper sheets. Lots of possibilities.
LikeLike