
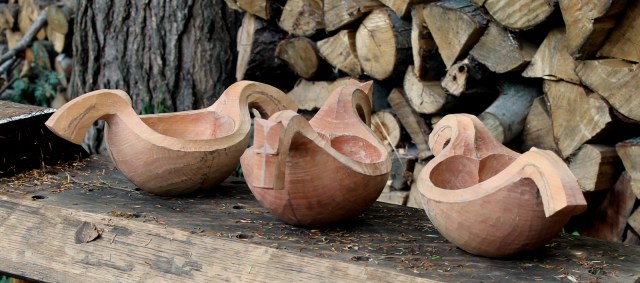
I’ve had some ale bowl requests on the backburner for far too long now, so while I had some cooperative cherry around I decided to rough out three at once. That makes it sound much more straightforward than it is. I’ve already written over a dozen posts about ale bowls, including some featuring these dragon and horse designs, but maybe there are a couple fresh thoughts to share from this latest exploration.
As can be seen in the top photo, these three are just in the rough right now, at the end of the green carving stage. It’s always a relief to get them to this point where I can confirm the resolution of the design. There’s still plenty of room for refinement, but the various curves and surfaces are established. At this point, I can sense that it may actually all come together harmoniously.
It makes me think of an excerpt from the book Emil Milan: Midcentury Master:
“Don’t make a potato” was a design mantra that Emil repeated throughout his courses. The curves, bumps, and hollows of a potato are resolved too, Emil would say, just not in an aesthetically pleasing way. It is just an amorphous lump. The difference between a potato and a work of sculpture lies in the areas where the curves and planes come together. Properly resolved, two intersecting areas of a three-dimensional work will create a line that is visually prominent in the final piece. If that line creates a pleasing curve, the piece will look aesthetically refined and “sculptural.” If not, it will look like a potato.
Who wants to make an ale potato? Avoiding it, begins with removing big bits of wood in the right places early on. I saw shoulder cuts across the grain of the cylindrical blank (with no pith remaining), then split away material on both sides of the central bit for the head — like forming a tenon.

Then after some more chopping and sawing things start to become slightly recognizable, but still quite blocky.

After shaping the outside some more, I start removing material to form the deep hollow of the bowl. I hack out a little bit with an adze, but quickly have to switch to gouges. A standard long-bent gouge won’t reach in there, so much of the hollowing is done with a spoon-bent gouge. This one is a #8 sweep.

Here’s one way to hold the bowl for hollowing. Hand screw clamp held upright in the vise. The bottom of the bowl can be supported on the bench itself or, as in the photo below, by a stick extending beyond the bench. It’s many cuts and thin chips. I’ll finish the hollowing with hook knives.

After some drying, it will be time for lots of refinement and finishing cuts and, hopefully, they won’t look like potatoes.

And now we know. I have wondered how you got these bowl types started, being so different from your others. Having become familiar with your art I think refined sculpture is a given. After all, potatoes are for the fry pan, mashed or baked in foil.
LikeLiked by 2 people
Thank you so much for sharing your knowledge and your work flow. This will help me immensely.
LikeLiked by 1 person
You say potato, I say ale bowl. I love the step by step Dave!
LikeLiked by 1 person
What a beautiful process! Your work is incredible! Photos, explanations extra great! Thanks. Harper
LikeLiked by 1 person
Thank you, Harper! I’m excited to know that you’re visiting the blog.
LikeLike
Love the great analogy with the potato visual. Some insight from myself who is between (and closer to a) novice and a master carver, the learning process/ early work started out as the visually potato shaping rounding out and chipping away every surface. (bowls and spoons) Reviewing the final basic shape, I did not understanding the why, the these objects appeared crude, amateurish or lack of any design other than function. This is a great perspective for those learning the process. Thanks Tom
LikeLike
Hi Tom. I’ve seen you swing an axe, and you didn’t make a potato. Thanks for sharing your thoughts on Emil’s analogy. Great to hear from you.
LikeLike
Pingback: Before-and-After Dragon | David Fisher, Carving Explorations
Hi Dave, can I get some clarification on the second photo: preparing the blank. Is it the case that the cylindrical blank you show is formed from half a log, and not a whole log with a flattened segment? Otherwise, how can the pith be excluded? I hope my question makes sense.
LikeLike
Makes perfect sense, and you’re right, Phil. The blank does not include the pith.
LikeLike
By the way, an ale bowl video would be great in Fine Woodworking.
LikeLiked by 1 person
Dave,
I love your ale bowls. Any advice on how you shape the cylindrical blank to begin the process? I’m uncertain about the process to find the center on both ends of the blank too. I know I will need to get it marked correctly before beginning to remove the wood for the heads. Thanks.
LikeLiked by 1 person
Hi Charles. First make sure you have no pith in the piece, that you’ve split the log into halves or quarters or whatever. You will be laying out the cylinder on that piece. The center of the blank on both ends will be wherever you say it is. You are simply going to strike a circle on both ends of the billet. When you remove the wood outside those circles, connecting them with straight surfaces between, you’ll have a cylinder. Ideally, those cylinder walls will run true to the grain perfectly, but that’s not super critical. If both circles touch just under the bark, for example, and you line up the focal points visually with the grain, then you’ll be in good shape. I hope that answers your question. Let me know if I can clarify or follow up on more. Happy carving!
LikeLike
Hello David
-Before you put your bowls away for drying do you seal the end grains with wax/ log end sealer?
– Do you ever use Pentacryl to slow the drying in pieces with knots, difficult grain?
Thank you
LikeLike
Hi Andras,
No, I don’t seal them with anything other than sometimes rubbing a bar of beeswax or paraffin wax on the end grain of the handles if I’m particularly concerned. I usually just rely on wrapping in textiles to slow the drying.
I have no experience with Pentacryl at all, but I’d be interested to hear about the results if you try it.
LikeLike