
The wood for most of what I make comes from trees that grow within a few miles of my house, which is more than enough to make me happy. I’m fortunate to live in an area with so many diverse species flourishing all around me. Acacia Koa isn’t one of them. In fact, Koa only grows in one place far away: Hawaii.
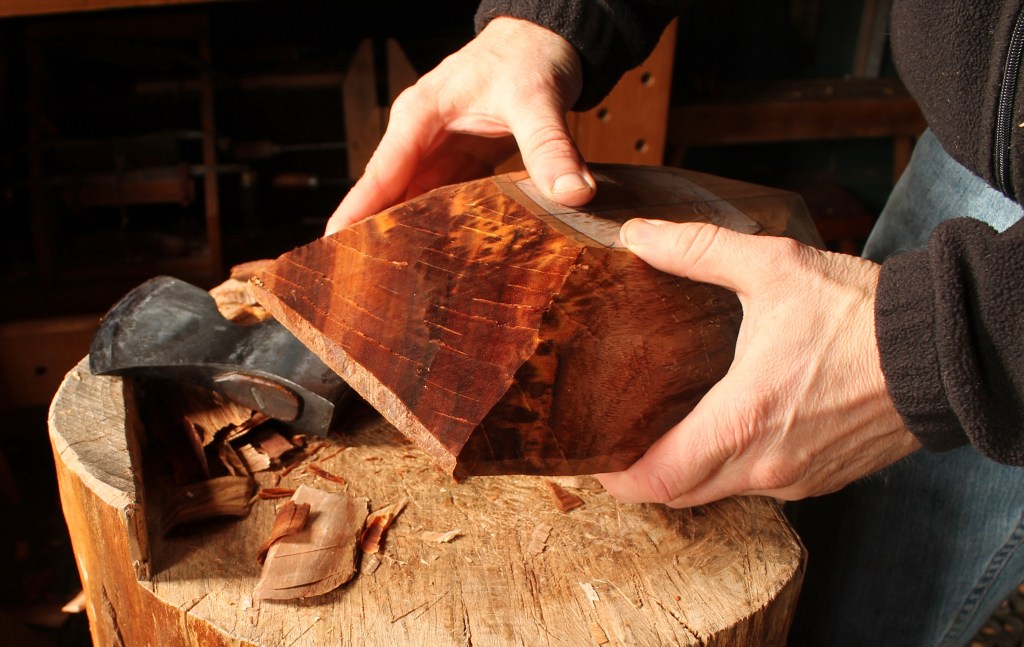
One day two unexpected boxes showed up on my porch, each containing a block of green koa wood wrapped tightly in trash bags. I did some research on koa lumber and realized I must have been a better boy than I had thought.

There is an interesting chapter about koa in the book Around the World in 80 Trees, by Jonathan Drori, a beautifully crafted book with lovely illustrations by Lucille Clerc. Drori discusses the rich history of koa in Hawaiian culture. It was the wood of choice for the ocean-going canoes that could be 100 feet (30 meters) long. Chiefs would commission a team led by an expert canoe-builder called the kahuna, to carve the vessel with stone adzes from a single trunk. This bowl doesn’t even make me a tiny kahuna.

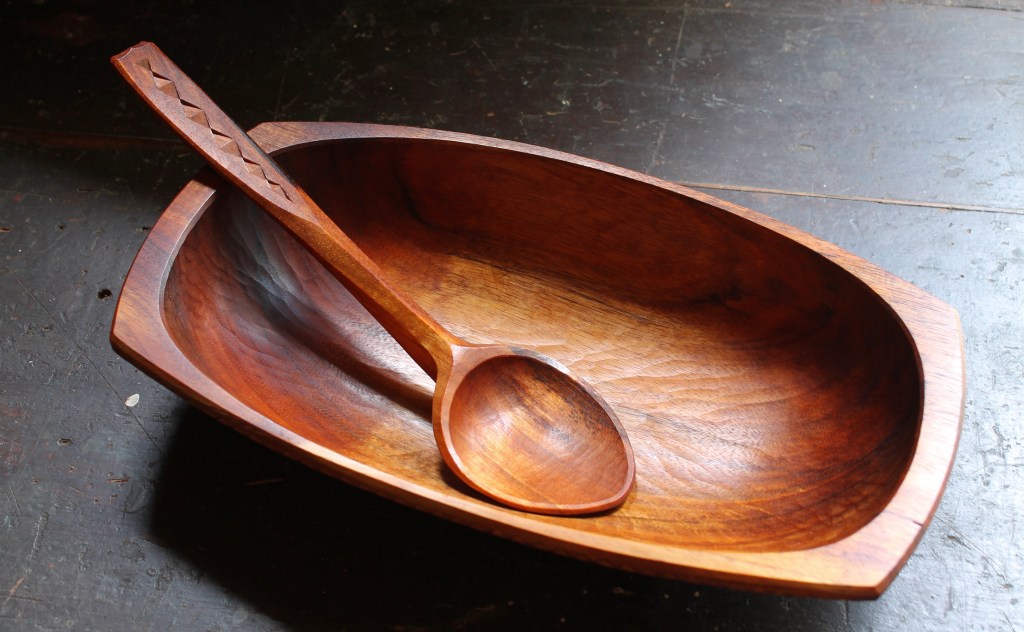
Since I had, essentially, a 14″ x 8″ x 3″ plank to work with, I decided to make the most of it and keep the top flat. I have been calling this shape a “rectoval,” and I assumed that wasn’t a “real” term. But I just googled it, and what do you know — cookie cutters. Turns out, it’s even a hashtag on Instagram with five posts! (Yes, I know what an Instagram is.) But I digress. The hollowing went well. Working with koa seemed similar to cherry or walnut to me, although there were some areas of reversing grain and figure to deal with.

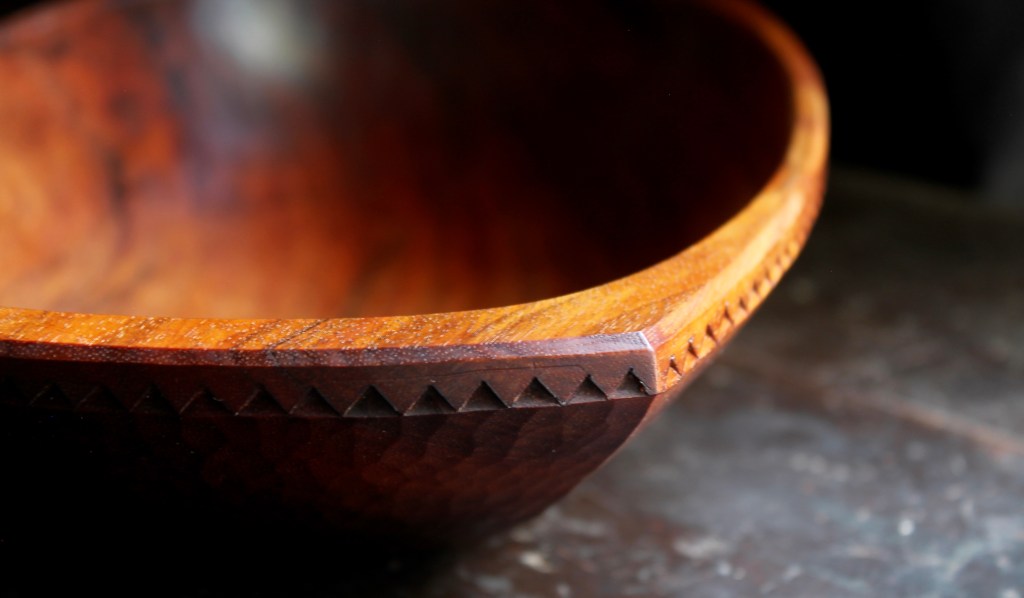
To maximize the hollow, I went with no extended handles. Care must be taken to avoid blowout at the rim especially when hewing any handle-less bowl. A sharp axe makes a big difference, but the main thing is to avoid chopping all the way to the upper rim of the bowl (which is face down on the chopping block in the photo above). With no wood below it for support, especially if part of the bowl is lifted off the block, a chunk of wood can split off along the short grain near the rim. To avoid that, I begin by rough hewing the sides first, then I chop away most of the end material, leaving maybe a 1/2″ of the end grain below the rim untouched.
Above, you can see the results. The rounded final form of the end is under there somewhere, but that is not my concern right now. Removing the bulk of that wood makes the next step, shaping the curve of the end of the bowl, possible.
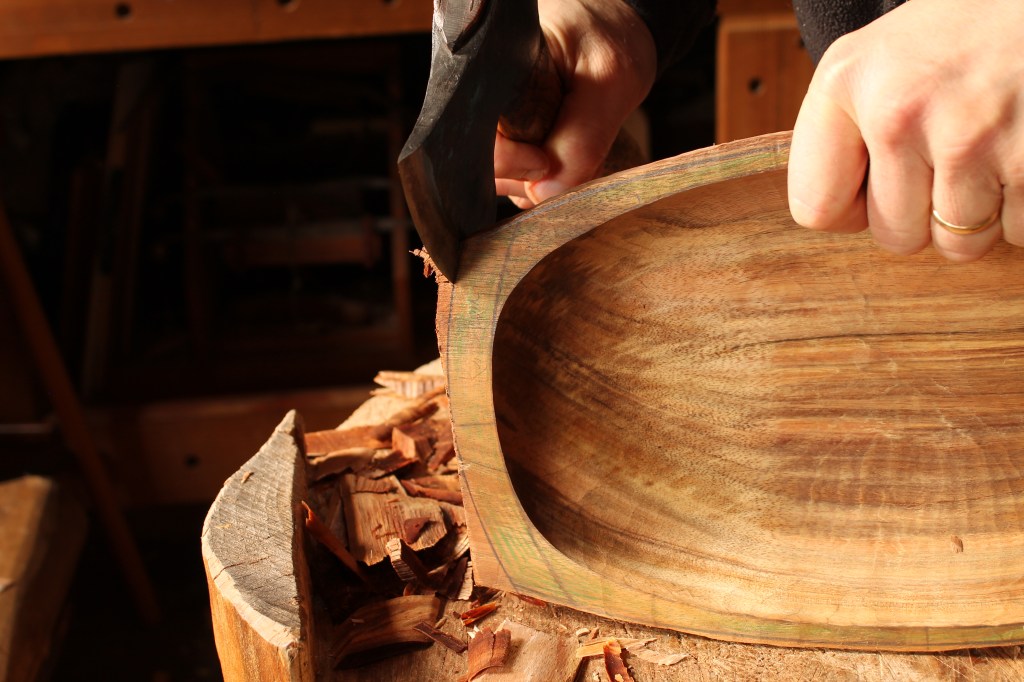
A sharp axe handles this well. Once you get the cut going, the left bevel just continues to register against the newly cut surface, stroke after stroke, making it easier than it may look. Stop at the center line, then flip the bowl up to do the other side. Cutting like this keeps the fibers supported and prevents blowout. If you don’t feel comfortable doing this with an axe, you can get close with a saw, then trim to the line with a spokeshave.
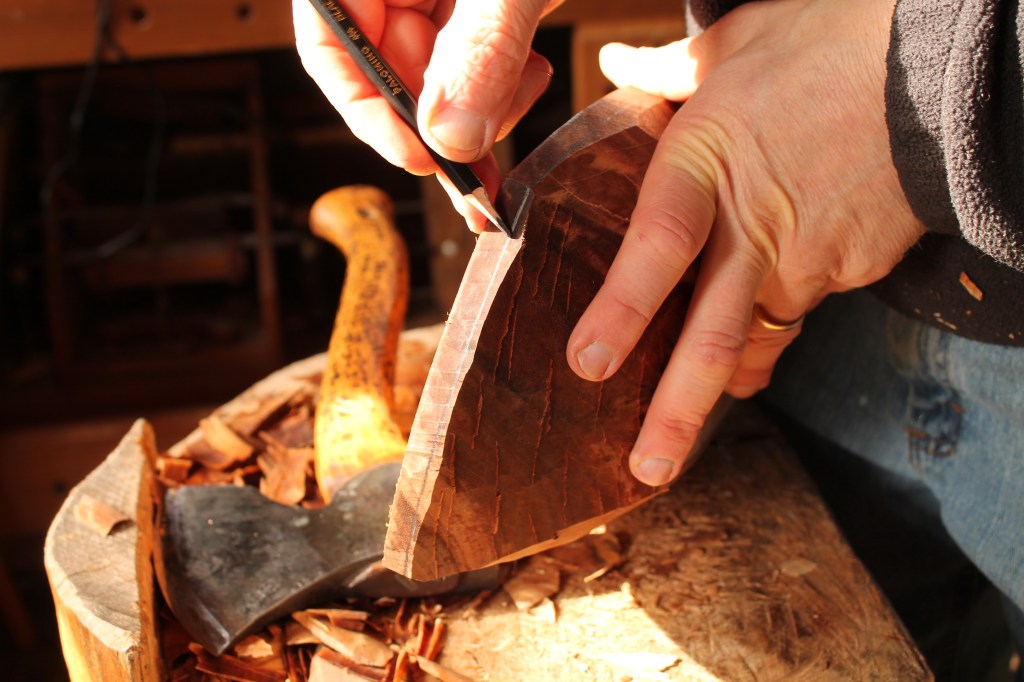
Now that the final end surface is established, I’m marking a line below the rim where I want the lower end wall to stop. This leaves me a narrow band below the rim for some chip carving, but I could go right up to edge of the top surface with no problems now. A drawknife and/or spokeshave can do the final shaping of the exterior walls.
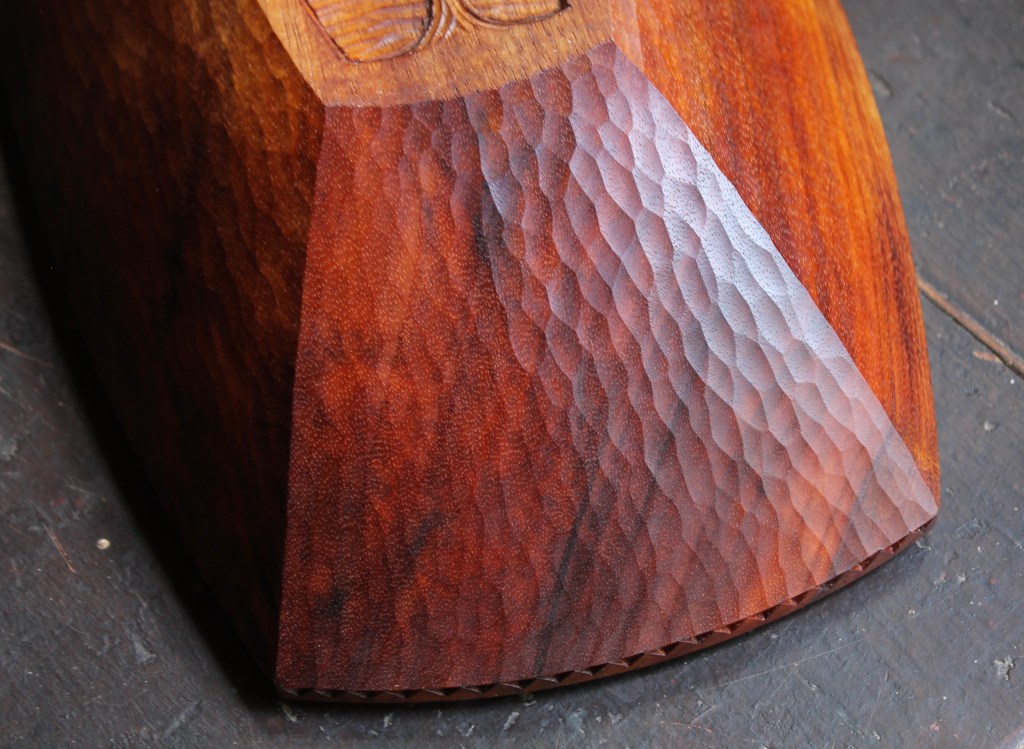
Above is a shot of the final end wall. The surface texture and chip carving were executed after drying.
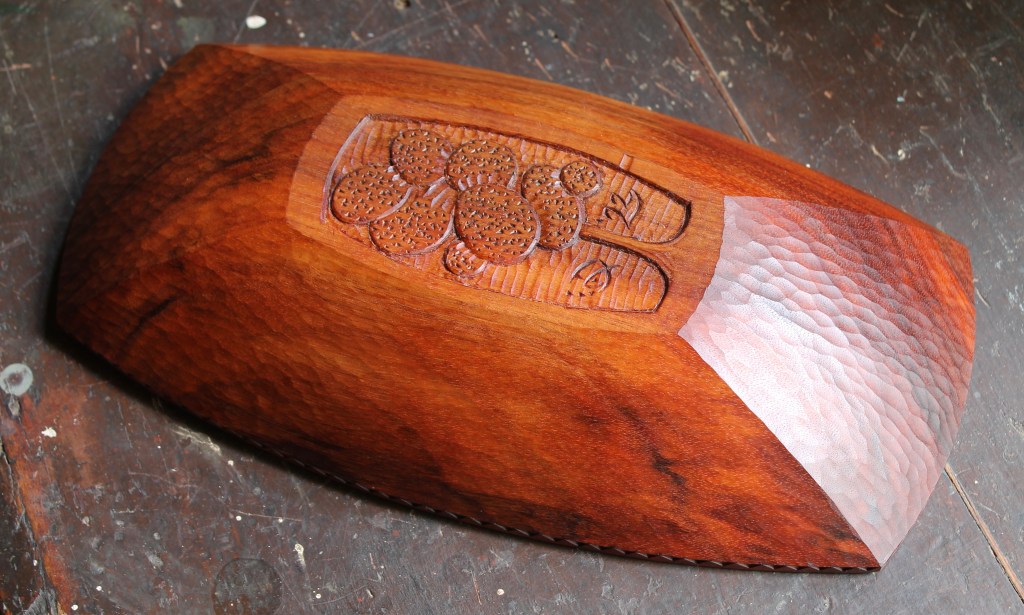
I had just enough thickness at the foot to do this fun little tree in shallow relief.

holy cow–or I should say holy koa
LikeLiked by 1 person
Yes, you should, Marie!
LikeLike
Just an exquisite piece Dave. I really like Koa but it is hard to find. The two best attributes are the texturing and the tree relief in the base. Your extra attention to these details did this wood proud!!!!
LikeLiked by 1 person
Thanks, Skip!
LikeLike
Lovely bosl. Good article. Thanks 🙂
LikeLike
Thanks, Tony. Happy carving!
LikeLike
Wow! Is this a commissioned piece?
LikeLike
No, I announced it as available for purchase yesterday in the original post. After it sold, I updated the post by removing that announcement. Thanks.
LikeLike
So was the delivery a complete surprise? Nice to have good friends in Hawaii.
I have a question about the thickness of the handles. Without carving out under the handles as you typically do, were you concerned that leaving the wood thicker at the ends could result in splitting?
Although I’ve tried shaping the handles with an ax, I found that using a drawknife, after removing the bulk of wood with an ax, gets me where I want to go without having to “redesign”. Beautiful piece.
Hope you’re enjoying your summer.
LikeLike
Yep, Gene, a much better surprise than is usually in the mail!
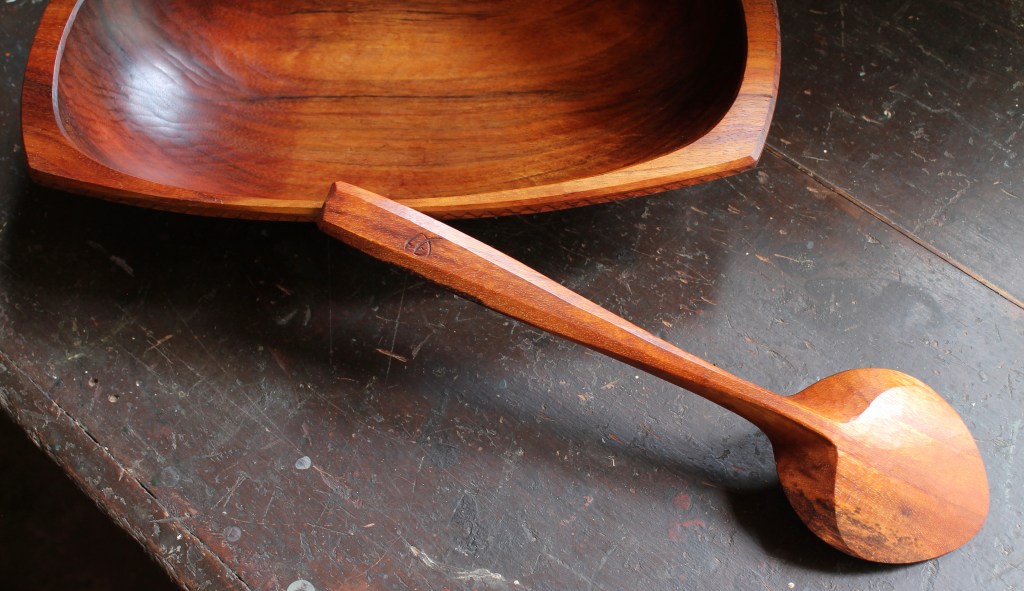
In this design, there really are no handles, so to speak. So, if anything, there is much less thickness at the ends, especially at the rim. The sketch in this post should clarify my explanation: https://davidffisher.com/2022/01/13/new-walnut-bowl-3/ The sketch shows the end wall thickness as consistent from rim to foot, but I usually make it little thicker at the rim compared to midway down.
Good point regarding use of the drawknife. Definitely a good choice for following up on the axe work. Happy carving up there! Summer is good!
LikeLike
Is the foot on the bottom 1/3 of the width and 1/3 of the length at is widest?
LikeLike
Not on this one. In the hollow, I brought the walls down relatively steeply and formed a broader floor. Thus, the foot needed to be wider and longer in response to the shape of the hollow. The foot is about 3″ x 6″.
LikeLike