

Limits encourage creativity. This is evident in many aspects of life, such as when a resourceful home cook manages to create a splendid meal from the few things left in the cupboard. Or when an aging athlete expertly adapts his game in consideration of new physical realities.

The limits in this case were established by a rough walnut log from my neighbor. Good neighbors are important. And we’ve been fortunate to have really good ones since we moved into this house nearly a quarter century ago. So a couple weeks ago, when neighbor Mark Cianci brought me some walnut logs from a tree that had stood behind his motel, the motel built by his father over fifty years ago, I wanted to make the best of it for a little gift.

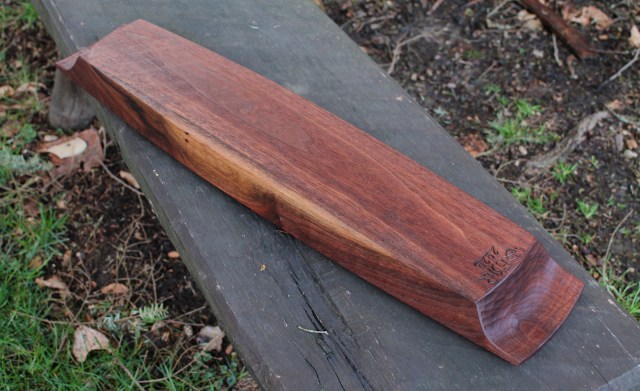
The two photos above are actually the other side of the log from which I carved the bowl, or I guess it’s more of a tray. The tree had been standing dead. The sapwood had rotted in many spots, the wood was dry and cracks had been migrating in from the outside.

Once I hewed out the bit of twist and got down to some sound wood, it was clear this was going to be a long slender bowl. I shaved the blank with a gentle arch across the top and started to lay out the shape of the bowl with some long arcs forming the sides. I drew these by flexing a metal yardstick and tracing along it. Forgot to take photos of that.

With a bottom this long, I had to make extra sure it was truly flat, so as I progressed with a hand plane, I checked for twist with winding sticks, sighting across the edges from a kneeling position to check for parallel. Mine are just a couple leftover lengths of stock molding with the edge of one darkened with a sharpie for contrast.

I hogged away most of the material from the interior with an adze, then started to form the corners of the interior. To chop the dry end grain, I dusted off a heavy 1/2″ mortise chisel I had rescued years ago.

Nothing fancy here, just trying to get the bulk of the material out of the corners.

The same for the junction of the interior side walls and bottom. You can see the marks resulting from working with the #8 or 9 gouge (keeps the corners from digging in) downward from the line above, then across the grain from the side to eventually meet and form the corner running the length of the interior. After the general shape was there, I switched to a gouge of a more gentle sweep and continued paring all of these surfaces and tidying up the junctions, leaving a bottom of a 1/4 inch thickness, or so.

After laying out lines on the bottom reflecting the shape of the top and the taper of the interior side walls, it was pretty simple to remove the material from the outer walls with a drawknife. The smooth surface contrasts with the textured interior.

I made two sawcuts at each end to remove the majority of the wood from beneath the handles (sort of making a chunky rabbet), then finished by sculpting with a gouge.
After carving some chamfers to ease the edges, I played around on a practice board with a few gouges, then quickly added the family name on the handles. This is just a combination of some simple gouge chips; straight down for the initial cut, then follow with an angled back cut to take out a crescent chip. The Cs are from a #8 20mm gouge. The A and N are from a #6 20mm gouge. The I’s are from a #6 14mm, dotted with a little #9.

Here are a few more photos of the finished piece:

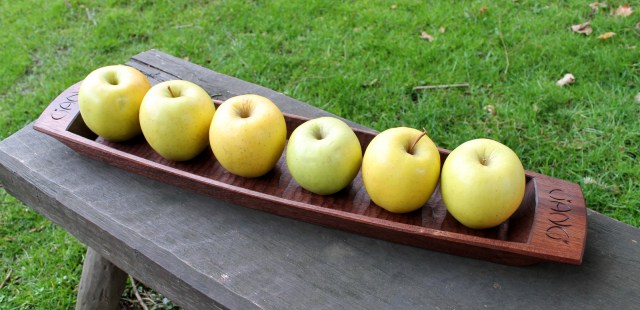
The dimensions are 24 1/2″ long, 5 1/2″ wide, and 1 5/8″ high. The size of those giant apples makes the scale a bit deceptive. Finish is pure linseed (flaxseed) oil.

After I was done and measured everything, it struck me that you could make this same piece from a two foot chunk of 2×6. So, if you have one laying around, have at it. you don’t need an adze, and you can easily adapt what tools you have available.


Absolutely beautiful work.
LikeLiked by 1 person
Extraordinary once again, David. What a an amazing gift!
LikeLiked by 1 person
This is beau. Your great skill and creativity is almost surpassed by your ability to explain the process. I love getting your posts. Stay well and keep on creating. EST wishes.
LikeLiked by 1 person
Beautiful lines Dave.
LikeLiked by 1 person
Like that!
Reminds me I have some persimmon and pecan boards.
Dried, which particularly could be near impossible for the persimmon.
Brute force required, maybe even some electrity, but the visions are dancing in my head.
LikeLiked by 1 person
Dry persimmon! The stuff used for wooden golf club heads? Go for it, Jed. You guys are tough down south.
LikeLike
Beautiful work, and I love your description of process. I’m inspired to give bowl-making another go. Lord knows I have enough logs in poor shape like the walnut you worked with.
LikeLiked by 1 person
well I’d say you did a mighty fine job–
LikeLiked by 1 person
Excellent piece. I’ve made almost the exact tray bit with pecan. Keep up.
LikeLike
Huh?
LikeLike
Excellent. Great piece of wood too.
LikeLiked by 1 person
I’m really a printmaker but have done some spoon carving and would love to do more so I find your posts fascinating and inspirational. Stay safe 😊
LikeLiked by 1 person
Thanks. Funny, I’d love to do make more prints! Can we see some of yours? Best wishes with the spoons.
LikeLike
It’s always interesting to see how you salvage wood from the fire. 🙂
Beautiful results as always, and I’m struck with those very even chamfers.
Thanks for the inspiration!
LikeLiked by 1 person
Thanks Bob. the chamfers on those long edges were done with the block plane. Worked well for this shape.
LikeLike
Sweet guinea pig of Winnipeg (Hermes of Futurama quote)! That is a beautiful bowl/tray!!
LikeLiked by 1 person
Love the exclamation!
LikeLike
Another sweet one David!
LikeLiked by 1 person
Thanks, Tony. I hope Spring is around the corner way up there.
LikeLike
1/4 inch bottom, handles that look to be 1/4 or 3/8. How thick are the side walls and the end grain end walls?
Curious about this from a movement point of view.
Thanks,
Mike
LikeLike
Mark has the tray now, but I think the side walls were about 3/8″ at the center, gradually thickening to 1/2″ or so near the handles. The end grain walls are pretty vertical, so I left them around 3/4″ or so. This wood was already dry, so I wasn’t concerned much with movement — and walnut is stable relative to most species. If I were starting with green wood, I certainly would have left all a little thicker during the green carving stage, then gone down to the final thicknesses and flatness of the bottom after drying and movement had occurred.
LikeLike
Dave,
Another excellent project that highlights your talent!
Also a superb of “passing it on” and saying thank you for the great neighbor and wood.
Keep these jewels coming
LikeLiked by 1 person
Love it! Sleek form, great textures, and what a great way to “try” my hand a letter carving.
LikeLiked by 1 person
Another interesting and unusual bowl form – beautiful. You get some good woods, cherry and walnut. The Walnut looks great.
.We have been in lock down for a couple of weeks now. I have done only a little bowl work so far but I am currently working on the second of 2 Chis Schwarz Saw Benches – taking an old English design back to England! Building some basic carpentry skills.
LikeLiked by 1 person
Wonderful bowl Dave. I have been trying one that is similar, my problem was getting the inside bottom finished, I can’t manage to get it smoothed out. Using #7 bent gouge. How do you go about getting the bottom flat.
LikeLike
It was just a #5 (25mm width) bent gouge, Steve. I just concentrated on running it flat across the bottom. A #7 would do the same thing, but just leave a more pronounced texture. It would also be a little more challenging to get the corners of the bottom and side wall to be quite as clean.
LikeLike