

I carved these two walnut bowls from a radially-split piece of fresh black walnut, but the design is well suited to be carved from any 2″ thick plank of wood. Compared to my usual Bowl from a Plank, I guess these are “BFAP: Short and Stout.” I drew a simple page of plans for laying out this bowl and added it to my Make a Bowl from a Plank materials. Thanks to all of you who have purchased already; the new plan is there for you now.
Before I go on, I’ll mention that these two bowls are available for purchase; more on that later.
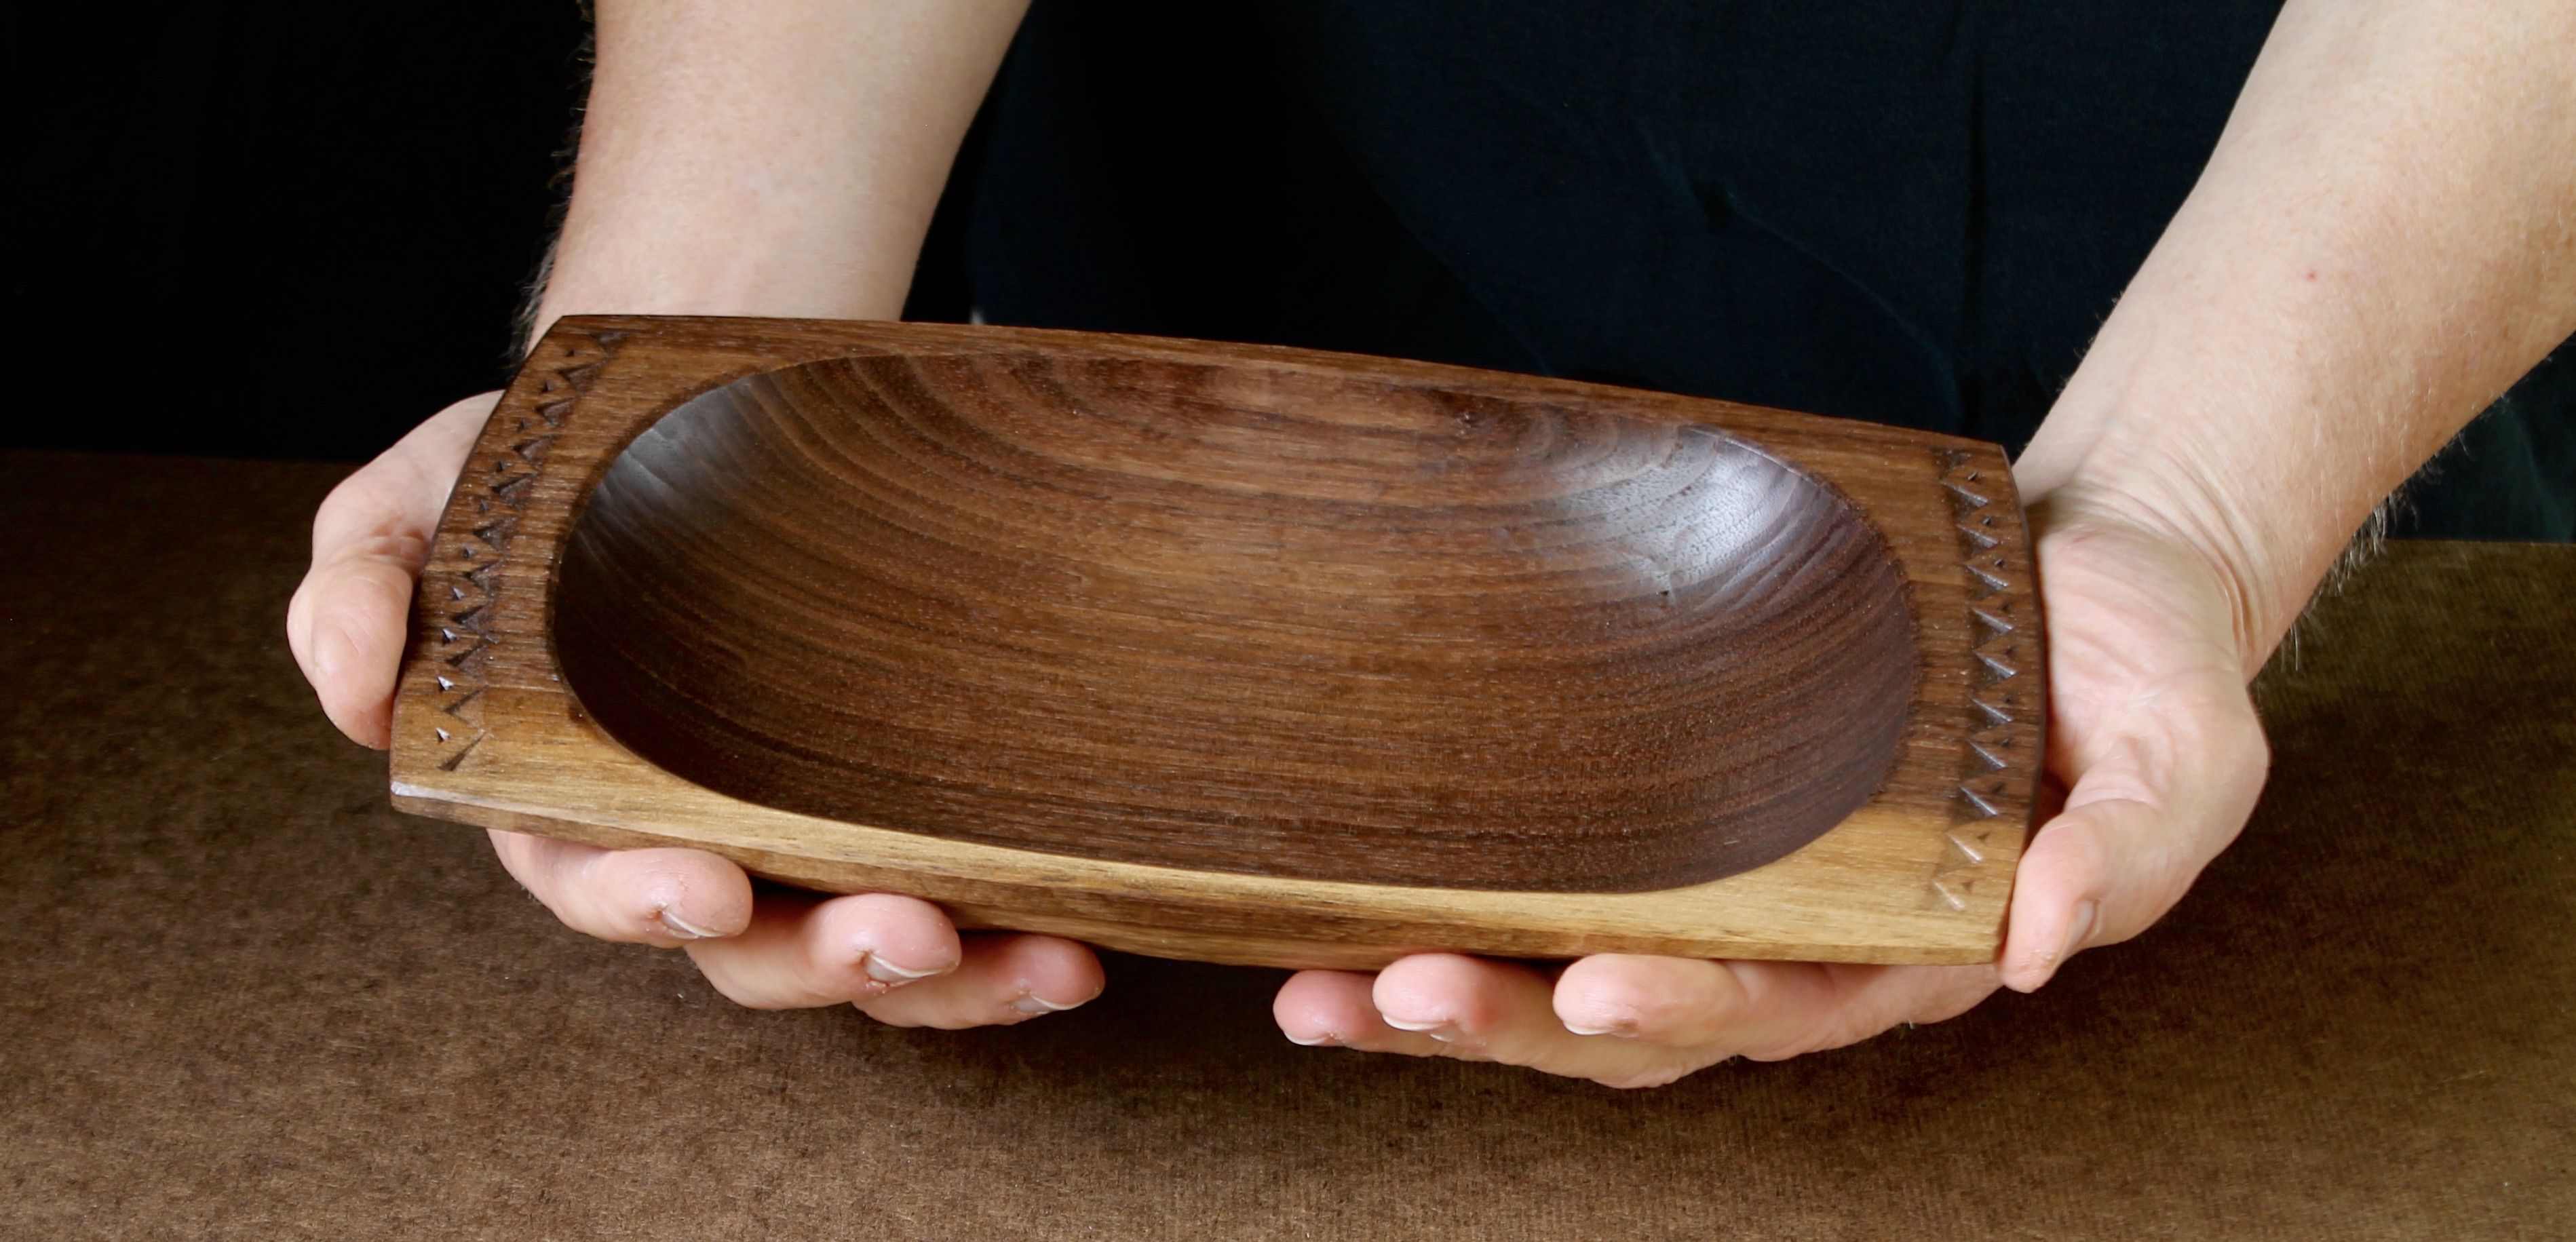
The shot above provides a sense of scale. 11″ long, 6 1/4″ wide, and just under 2″ high. Large enough to serve as a serving bowl or centerpiece without taking up too much real estate on a small table. Lots of possibilities.
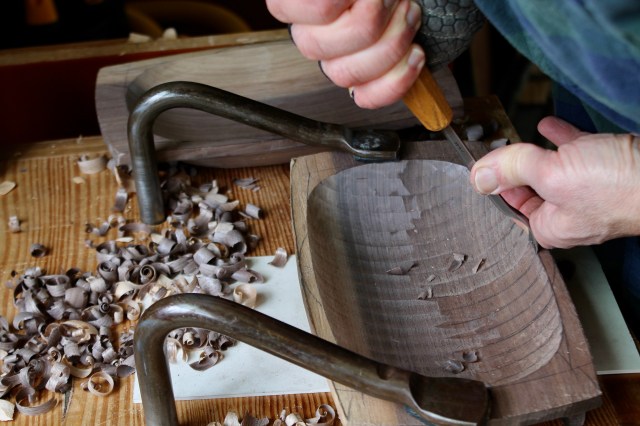

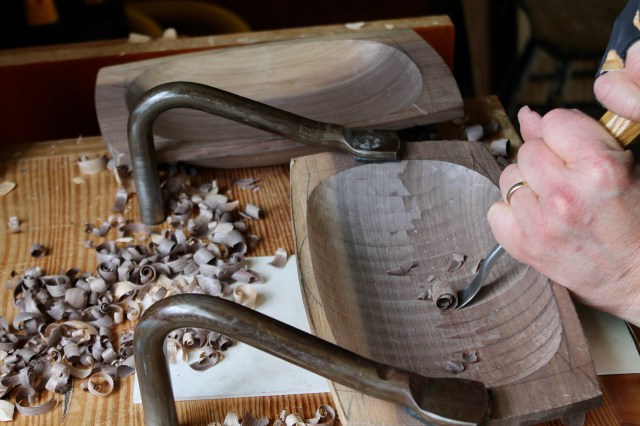
In the photo at the top of the post, you can see that the two bowls were made on the same plan, but I used two different techniques for the surface of the hollows. For the one on the left, I experimented with working across the grain in roughly parallel rows. The steepness of the sidewalls required a spoon-bent gouge (in this case, a #5/16mm). In the three-shot slideshow above, you can see the progression of the gouge position as I cut from the rim to the middle of the hollow.
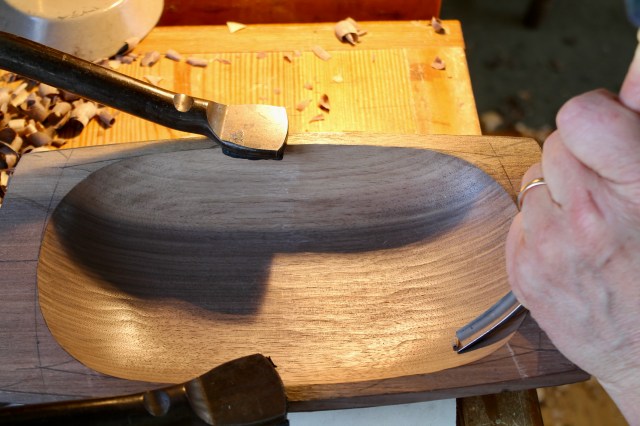
For the other hollow, I used a long-bent #5. I decided to finish by using just a small portion of the gouge width, leaving a subtle texture of long shallow cuts.

The exteriors are the same. I might normally make a foot with four corners that would correspond to the corners of the upper surface. That would result in four distinct exterior surfaces, and is a good option. In this case, I nixed the corners and went with this “rectoval” shape echoing the perimeter of the hollow. I finished the surface by creating a bold gouged texture that runs around the bowl following the shape of the foot.
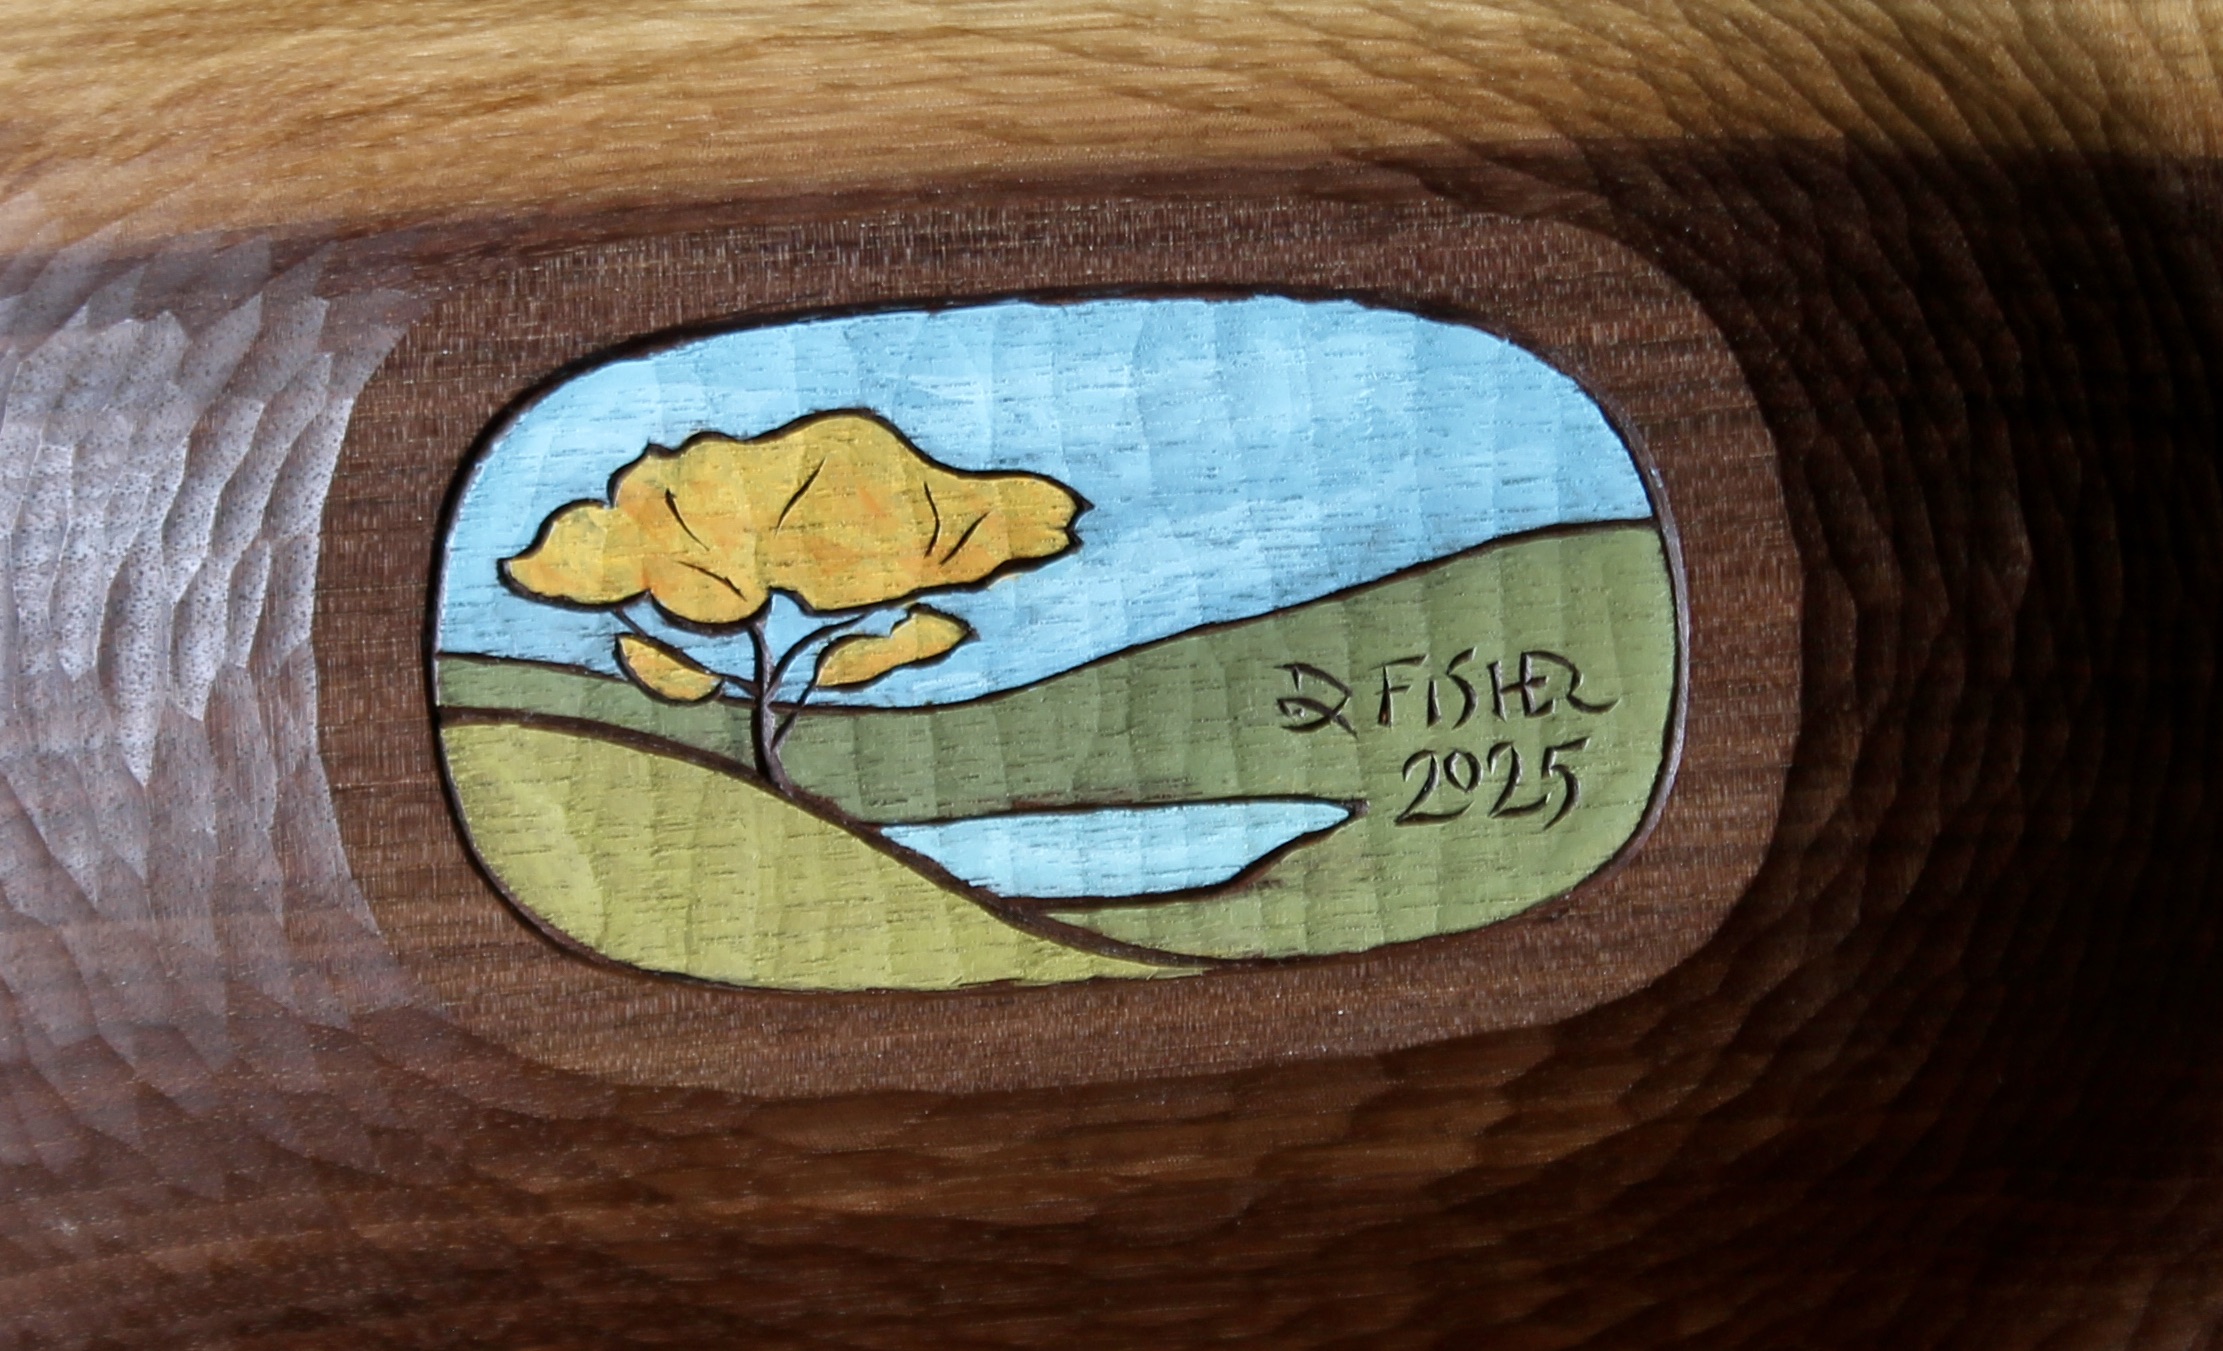
I painted a design on each bowl foot, with carved lines separating the simple blocks of color. Walnut tree leaves turn brilliant yellow in the fall.

Two different decorative designs on the handles. As I mentioned, both of these bowls are for sale. If you’re interested, email me at dandkfish@gmail.com. UPDATE: Both bowls have sold. Thank you.
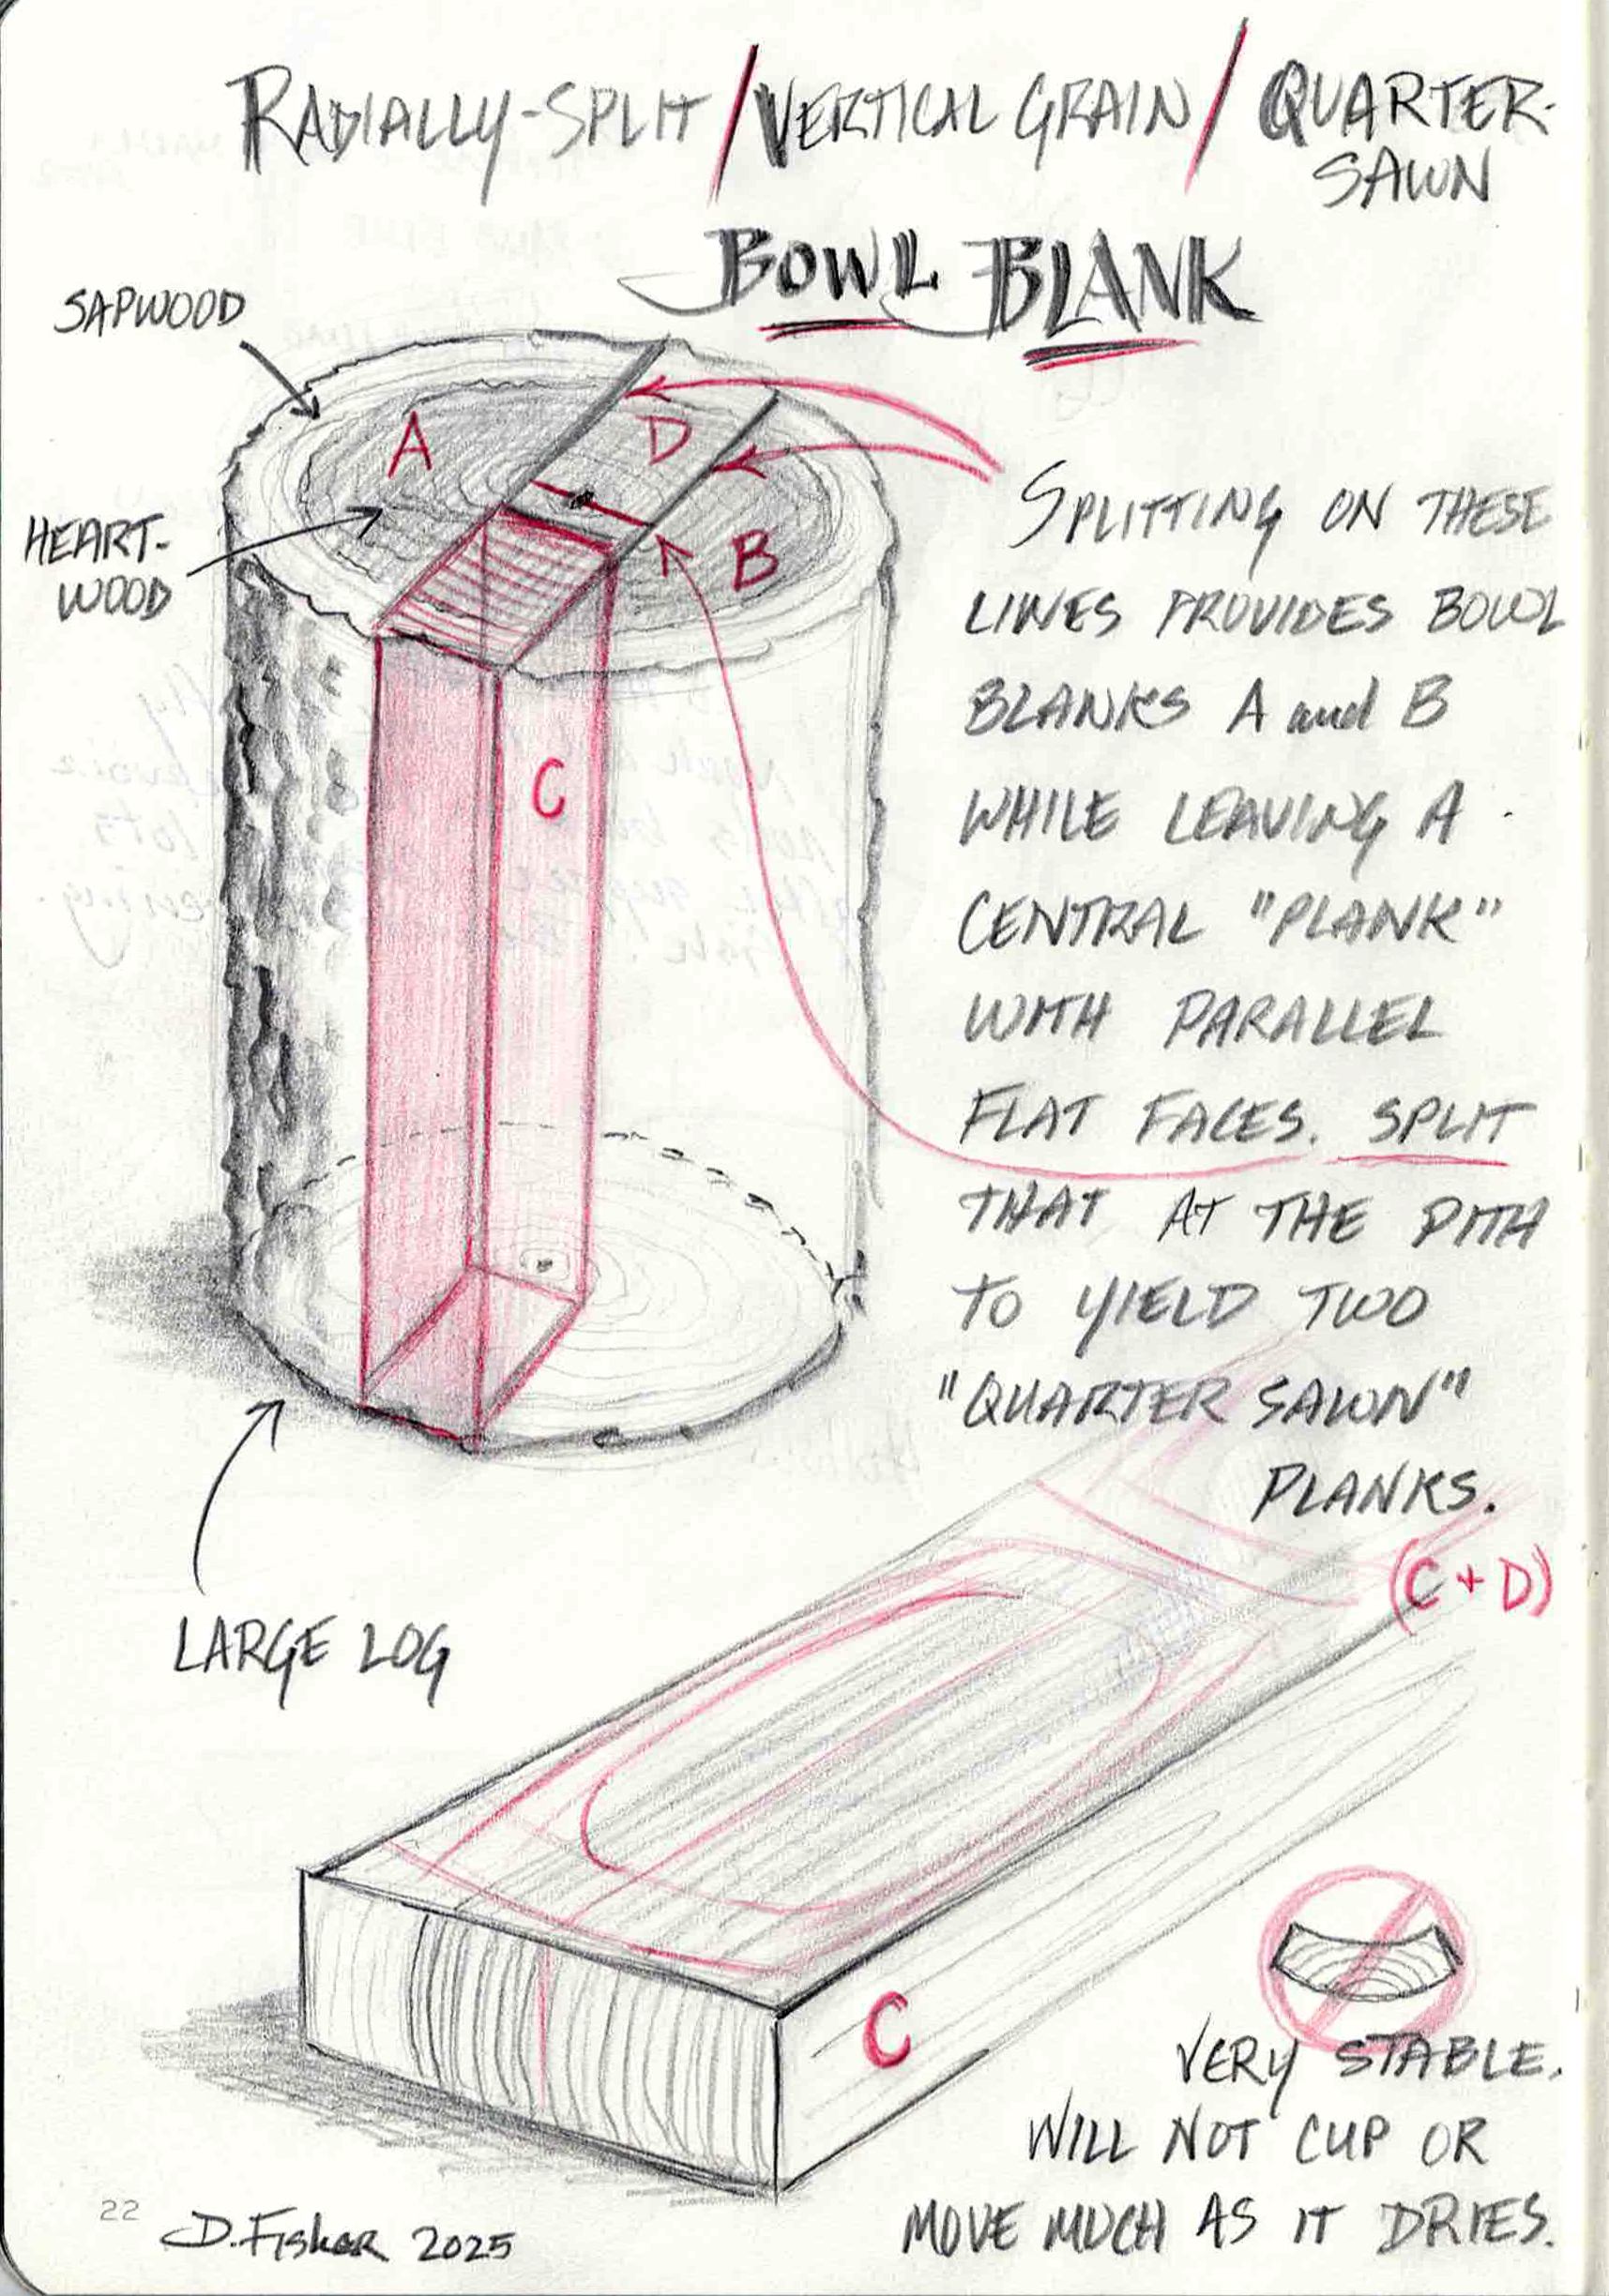
I sketched a page in my notebook to show how I got the blank for these two bowls out of a log. This sort of blank works especially well for bowls like this when working with green wood, but you’ve got to have a larger log, in this case, at least around 14″ diameter. Of course, you don’t need a log at all for this design, just any 2″ plank.
This old post may also be helpful in understanding my thinking about various possibilities, and technique, when splitting bowl blanks out of a big log.

absolutely beautiful- love the rich colour; and the painted bases are a nice surprise… inspired as ever – Guy
LikeLiked by 1 person
Thanks, Guy!
LikeLiked by 1 person
Dave, wonderful bowls. I especially like the flutes, handle detail and the artwork on the bottoms. It ads such a personal touch. Are you using acrylic paint?
LikeLiked by 1 person
Skip, for these ones, yes, I used artist acrylics thinned way down with water. I’ve also done this technique with milk paint. Both dry quickly.
LikeLike
Beautiful carving and corresponding illustration.
I enjoy your work.
Pat
LikeLiked by 1 person
Love the “hidden” feature of the painted carving underneath. I often put hidden features in my woodworking as a way to reward those who explore.
LikeLiked by 1 person
What a lovely pair of bowl’s…
LikeLiked by 1 person
Hi David. I have been buying carving tools only as I need them. The surprising part is that I am actually sticking to that plan. For the bowl from a plank, I will need (really want) to get the No. 5 long bent gouge (years ago I got the No 8 long bent you have recommended over the years and it really came in handy on the Bellamy Eagle I’m working on). Since I will be buying a No 5 for the bowl from a plank, I could go with either a spoon bent or long bent No 5 gouge. How do a spoon vs. long bent gouge differ? Never owen a spoon bent gouge so really just curious. Thanks, Joe.
LikeLiked by 1 person
Joe, I would definitely recommend the #5 long bent before the spoon bent. The long bent is much more generally useful.
The difference between straight, long bent, and spoon bent gouges is a matter of how steep of a curve they can effectively negotiate. You could only carve a shallow bowl hollow with a straight gouge because the tool shank or handle would hit the rim and get in the way. For tasks that don’t require it, however, a spoon bent gouge is awkward to use and control. You’ll know when you need a spoon bent gouge when you want to carve a form that the other gouges can’t achieve. I should also mention that “spoon bent” is a term used in the language of traditional carving tools. Other makers and blacksmiths sometimes call equivalent sorts of gouges “swan neck” or “dog-leg” etc. The specific geometry can vary quite a lot.
LikeLike
Thanks David. I will be at WoodCraft this weekend and will see if they have the No 5 bent gouge you recommend as well as the No 6 for the tree of life.
I do like the you know when you’ll need a spoon gouge comment. Helpful.
LikeLike
Beautiful work as always Dave. I love the proportions of these bowls as they rest in your hands. I’m guessing that the log was green and there was some drying time involved. I’m constantly amazed by the delicate chip carving in such hard wood. I recently broke the tip off a chip carving knife attempting to carve in walnut!
LikeLiked by 1 person
I’ve noticed that you put a small chamfer on the inside edge of the plank bowls. I struggle with getting a smooth curve on the bowl hollow at each end where the grain is essentially end grain. Working with the chisel almost upright I end up with essentially a series of scallops. It occurs to me that the chamfer would hide that trouble area. But maybe it is more for wear purposes so there isn’t a sharp edge to break?
LikeLiked by 1 person
Yes, that chamfer serves to break the sharp corner that might otherwise be vulnerable to easy damage, but it can also serve to clean up the lines a bit. So, both of the things you suggested. The upper edge of the chamfer creates a fresh crisp line where it meets the upper surface of the bowl. For painted versions, I cut that chamfer after I paint because it makes a nice clean paint border.
Regarding the end grain cutting and scallops, make sure the gouge is very sharp with proper geometry and make your body weight part of the gouge for those paring cuts (keep your arms tight to your torso and propel the gouge forward by dropping at your knees). Avoid deeper scallops on the flatter area of end grain by using just a portion of the #5 gouge and overlapping the strokes. Happy carving!
LikeLike
David, I purchased the plans but did have a question. I am not sure I understand what part of the log you used for the bowl blanks. The directions say “Bowl Blanks A and B” but in the lower drawing, the bowl diagram is shown on part “C”. So my question is did you carve the bowls out of the bowl blanks A and B or did you use the boards labeled “C” and “D” to carve the bowls. I am asking since I have several cherry logs that I am going to try to split and use for bowls (first attempt at this) and am trying to determine what part of the log I should try to use. [image: image.png] BTW – do you ever teach a class anywhere near Huntsville, AL. I would love to sign up for your class but Maine is a bit far for me to travel to this year.
Thanks.
Nate Buchheit
LikeLike
Thanks for purchasing the plans, Nate. I used part C (and D would be the same thing). I just meant that A and B could also be blanks for other sorts of bowls. Much depends on the size of the log. If your log is only 9″ in diameter, you could simply split it in half and shape one half into a good blank for the BFAP (Bowl from a Plank). My drawing is an example with a larger log of at least, say, 14″ diameter. This post goes through some of my thinking and technique as I split up a big cherry log: https://davidffisher.com/2018/07/26/busting-out/
Every log has its own nuances and knots and so on, so rules can only go so far. The assessment and creative problem-solving is part of the fun of working with green wood. Frustrating at times, but that just goes with the territory. With a dry plank, things are much more predictable.
As for now, all of the classes I have scheduled are at Peter Galbert’s School in Maine. Nothing in line yet for the south, but who knows? If anything develops, I’ll be sure to post about it through the blog. Thanks for your interest in a class. I hope we get to carve together sometime!
LikeLike
David, Hate to bother you with another couple of questions but….
After you split the log, you said that if you are not able to get to the piece right away that you wrap it in plastic. Is that just regular plastic like a roll of construction plastic or is more of Saran Wrap type plastic wrap?
Also, does it matter how long you leave a cut piece of log before you split it into bowl blanks (?) if that is the correct term. I have quite a few cut log pieces from the tree that fell since I had to cut the tree into small enough pieces that I could pick them up and move by myself.
Thanks.
Nate Buchheit
LikeLike
No problem at all, Nate. I’m happy to answer your questions.
Any plastic will work, or anything at all that will retain the moisture in the log. I usually just use a garage bag or re-use a dog food or birdseed bag. Yes, it does matter how long you have a log-in-waiting. Much depends on the length of the log, what species, and the season/temperatures. Decay-resistant species can last a long time and still be usable, well over a year for sure. Species prone to decay can start to discolor and develop other problems within a month or two in mid-summer. And that’s IF you keep them from cracking. These two posts go into much more detail and then some:
LikeLike