

Only three weeks until I head to Pete Galbert’s for our six-day bowl carving course. Among the various tools we’ll be using, the compass is an important one. I use mine on every bowl I make. It does a lot more than make circles.
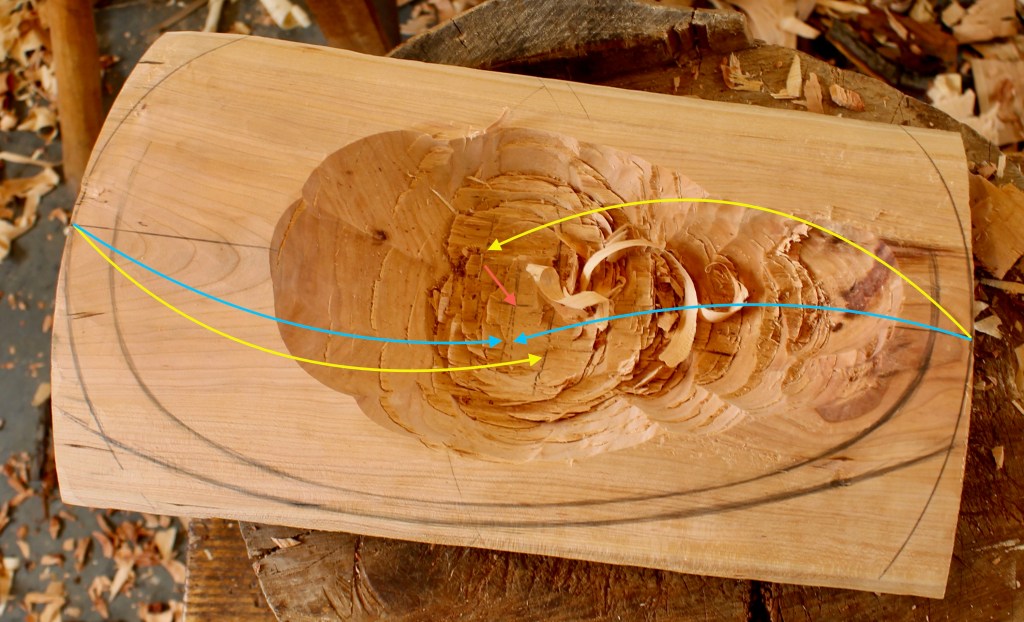
In my last post, I wrote about redesigning a bowl after I had already begun to excavate the hollow. The first thing I did was to relocate the center down in that recess somewhere. If you zoom in, you can see some pencil lines struck from the compass. I started by guessing a little over half of the distance and striking the arcs at the yellow arrows. Then I could easily estimate the distance between them and reset the compass to strike the lines indicated by the blue arrows. I did the same from the sides to determine center at the red arrow. Unlike straightedges, compasses reach over obstructions.

In the above photo, I’ve established the ends of the bowl with the compass from the center point. Then I sketched the edge of the hollow and the outer wall on one side of the bowl. I wanted the other side to be symmetrical.
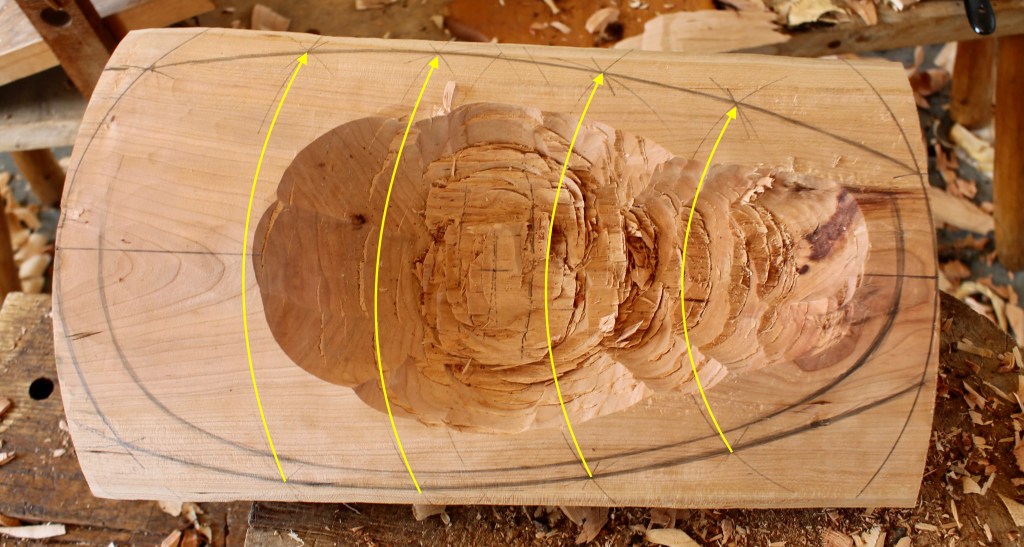
The compass can be used to transfer points from one side to another. Notice that at the ends of each yellow arrow there are some arc sections crossing each other. Those were struck with a compass. Connect the dots and you’ve got it.

This concept can be used in a variety of circumstances. I’ll break it down with this example to transfer a point that will guide me in drawing the edge of the hollow on the other side. With the compass focal point in the center, I strike an arc through the drawn line representing the edge of the hollow (Let’s call it the “hollow line”). The arc crosses it at the yellow arrow. Then I extend that arc over to the other side (blue arrow). Now I just need to pinpoint the place that the arc crosses the hollow line.

I pick another point common to both sides (in this case, the center of the end of the bowl) and set the compass to the place where the arc and hollow line cross.

Then I swing that arc over to the other side. I now know that the edge of my hollow should pass through that point where the two arcs cross (at the blue arrow). That gives me enough to go by to get close enough to draw the rest by eye. But you could transfer as many points as you’d like if you want more dots to connect.
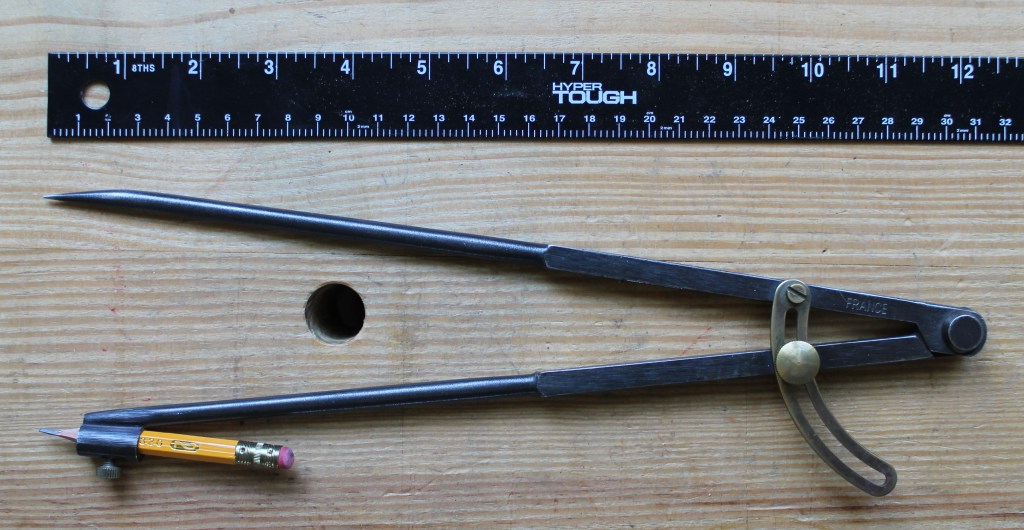
I find that a 12″ pencil compass works very well for just about every situation. This is the one I’ve been using for many years. I bought it from Lee Valley Tools. I see they still have it, but I think the price has about doubled since then, and they no longer stain it black.
I love mine, but there are other versions available for much less that will perform well, too. Here’s one available from Grizzly. If you do a search under 12″ pencil compass, you’ll see others.

Do they make good compasses in France? Oui oui.

A compass is pretty straightforward to operate, but before you go off striking arcs, make sure to put the legs of the compass together and set the pencil point and the compass point at the same depth. This will keep the hinge balanced over both points as you use it, making it feel much more natural to use. Also, a compass is a great use for pencil stubs.
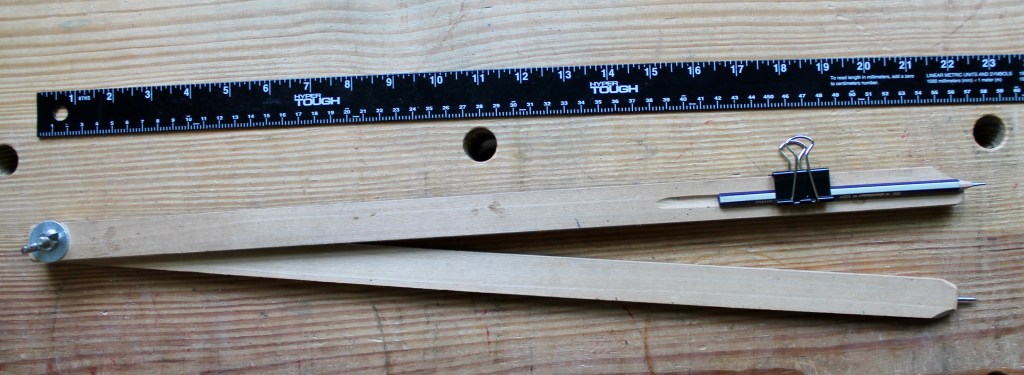
You can also make your own compass of any length with simple materials. Here’s an extra large one I made years ago from two scrap lengths of poplar, a little under an inch wide and 5/16″ thick. I drilled a hole near the ends and sandwiched them between two broad “fender” washers, all connected by a bolt and a wing nut. The friction between the boards holds the compass setting quite well.

I drilled a hole in the end of one leg, drove in a nail, then filed it to a point.
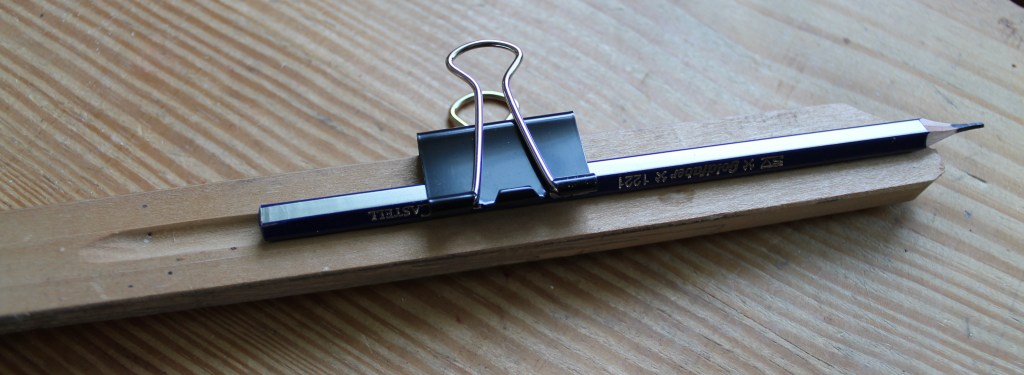
I carved a groove along the outer face of the other leg. A common paper clamp holds the pencil firmly in the groove.
I’ll be packing my compass soon, then again in October. I’m really looking forward to carving with everyone both weeks.

Being frugal “Scotts ancestry,” I really like your shop-made compass. I have one like it that will soon be upgraded with a groove. Groovy!
LikeLiked by 1 person
I hope you won’t be accused by your kin of putting on airs with your compass upgrade, Bob. It’s worth the risk.
LikeLike
Please video your classes and upload to YouTube! 💛
LikeLiked by 1 person
The binder clip is one of those blinding flashes of the obvious!
I’m going out tomorrow to strip off the hundredth dried out elastic band and put one on my homemade, oversize compass. You inspiration reaches into every corner, thanks!
LikeLiked by 1 person
Binder clip, yes, that’s a better name than paper clamp. Thanks. Those things are so simple and useful, and in all sorts of sizes. Glad I was able to help you retire the rubber band!
LikeLiked by 1 person
Dave,
<
div>This reminds me of finding perpendicular bisectors and bisecti
LikeLiked by 1 person
Yep! One of my first uses of the compass on just about every bowl. Still fun!
LikeLike
I learned something new today!
LikeLiked by 1 person
I haven’t been able to locate a large compass over here so I took to adapting a pair of 8″ internal dividers I’ve had since my youth in England attaching the pencil by means of a cable tie. Never thought of trying to make my own but you’ve inspired me. That’s something I have to commend you on, not only your ability to “‘make a plan” but more importantly, your willingness to share your plans with others. Thanks.
LikeLiked by 1 person