
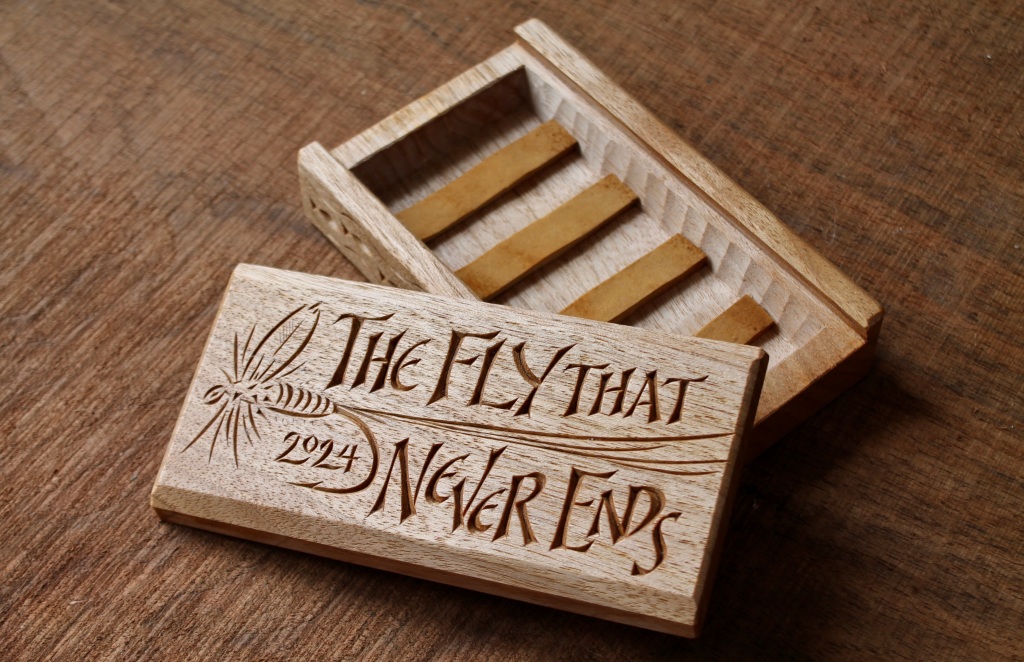
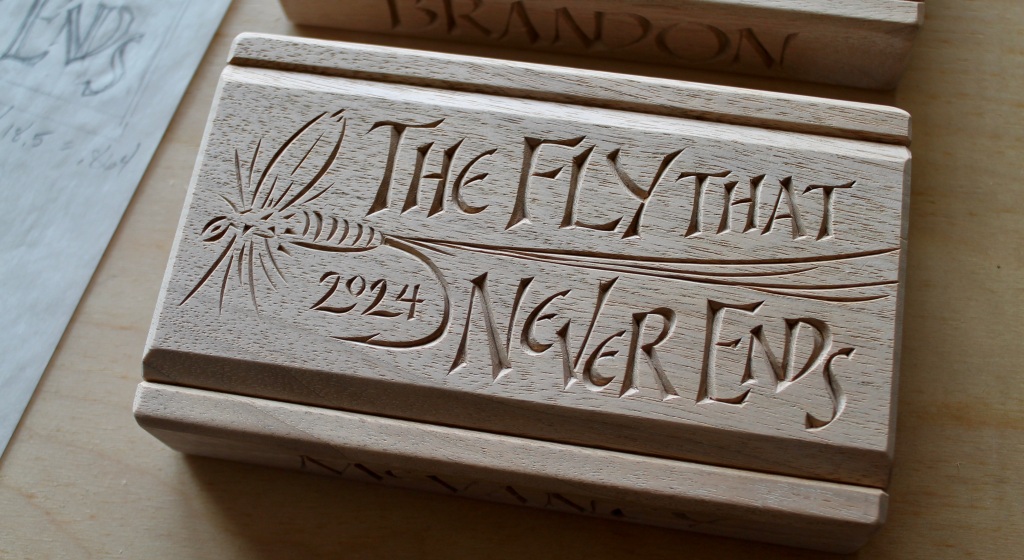
Box lids can pop off, swing out, hinge up, wedge in, slide over, and who knows what else. This post is about the sliding kind. The box above is one of a pair that I recently made at the request of a friend. He and some fly-fishing companions had planned a themed (see the box top) excursion and he was looking for some gifts.
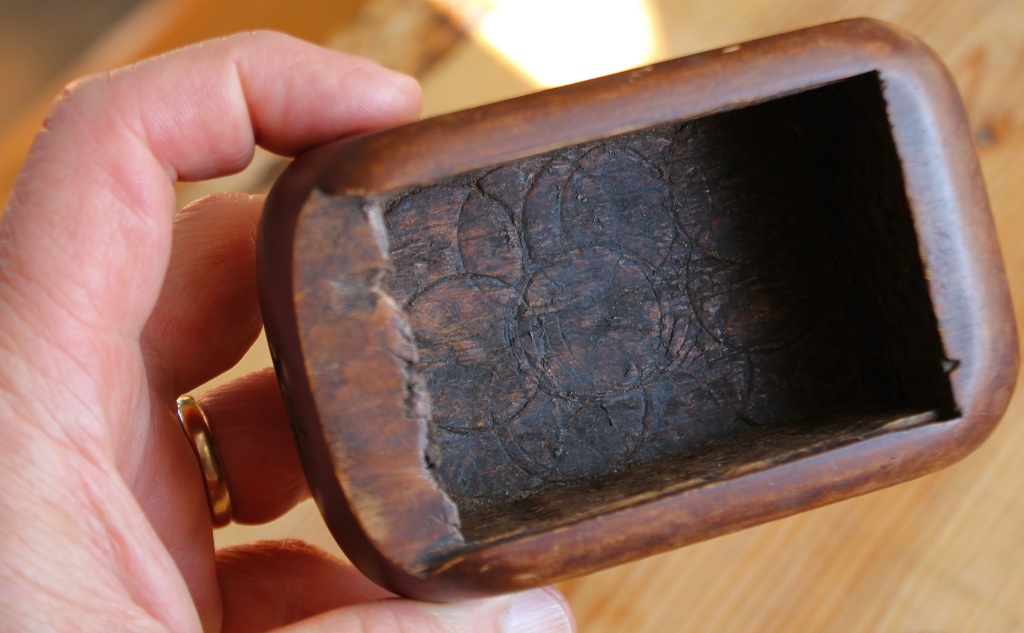
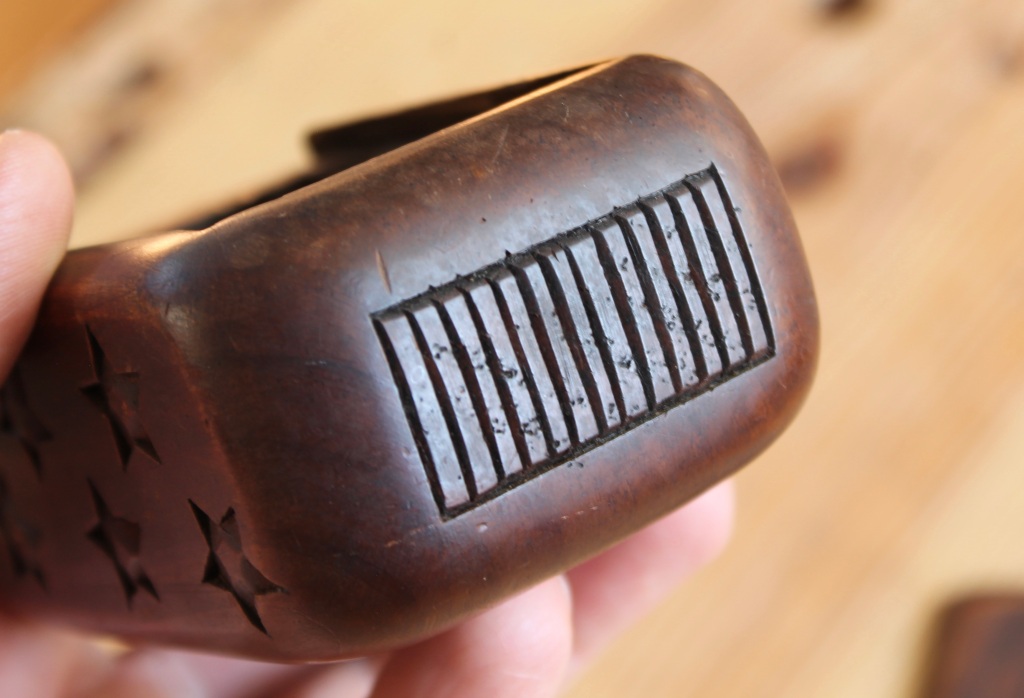
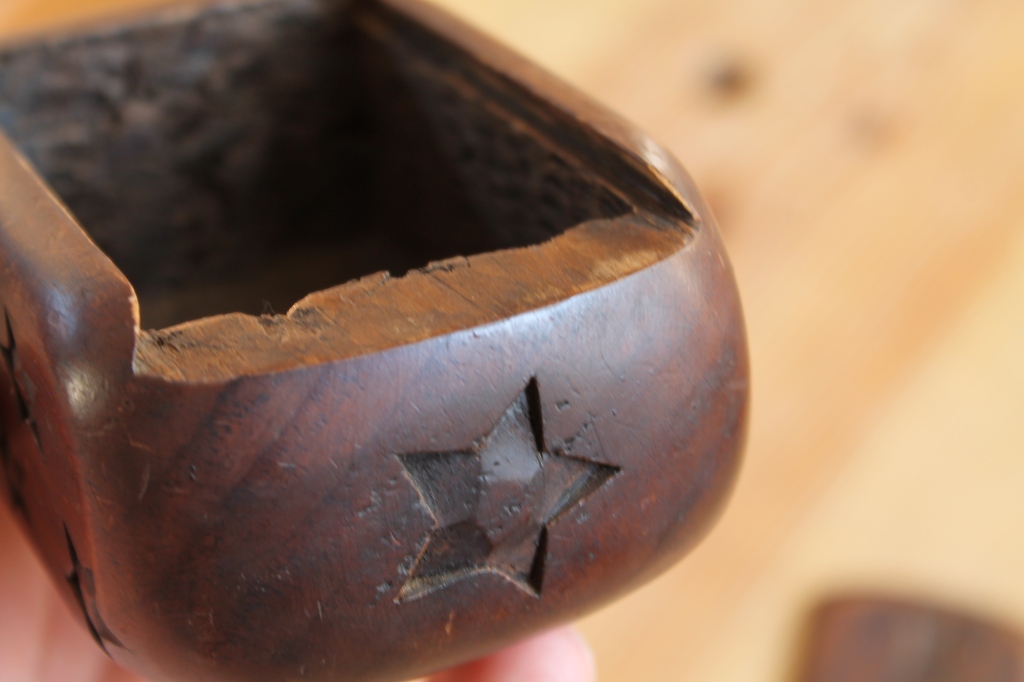
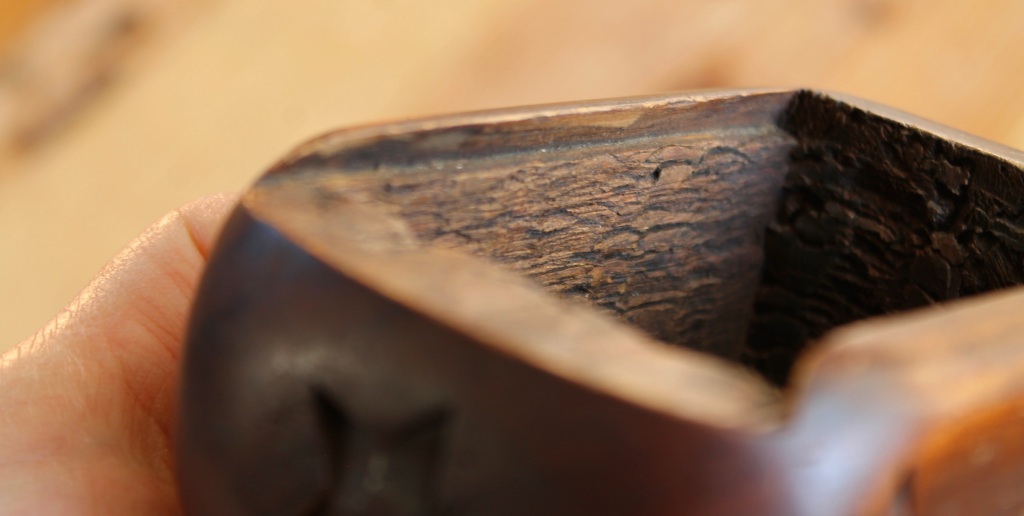
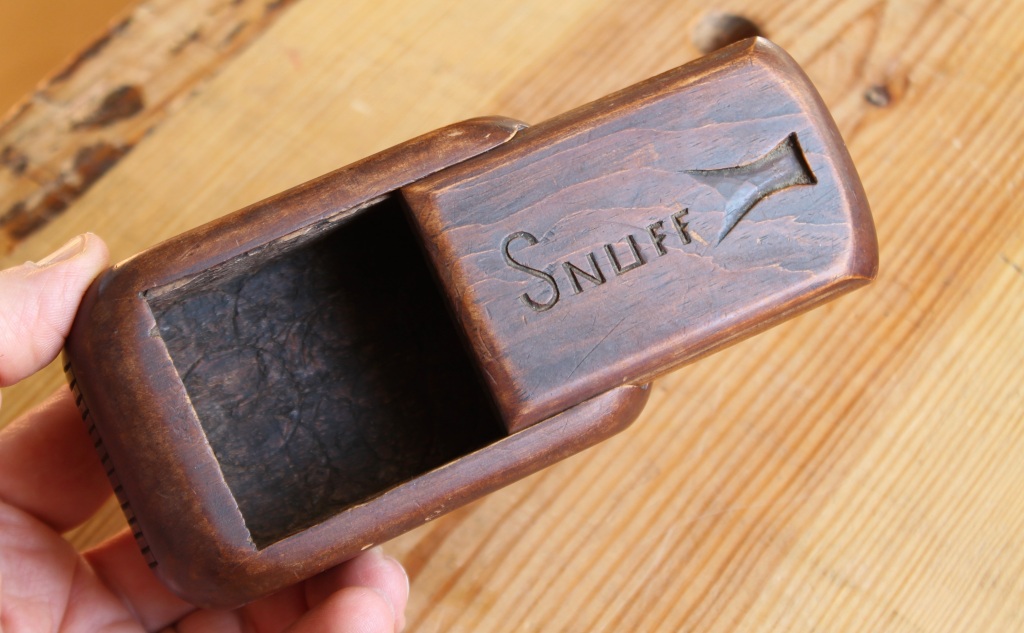
I decided on sliding-lid fly boxes with amadou strips to hold the flies. Before I go on to show how I made them, I want to share a little sliding lid box I found at a local flea market. The box itself is carved from a single piece of white pine. I like the box, but I’m also intrigued by its stated purpose. Many early snuff boxes were highly ornate, made by trained specialists. This one seems likely to have been made by the user or another person who was handy with a few tools. It is a lovely example of folk carving and the carver took care to achieve a good fit and make crisp knife cuts.

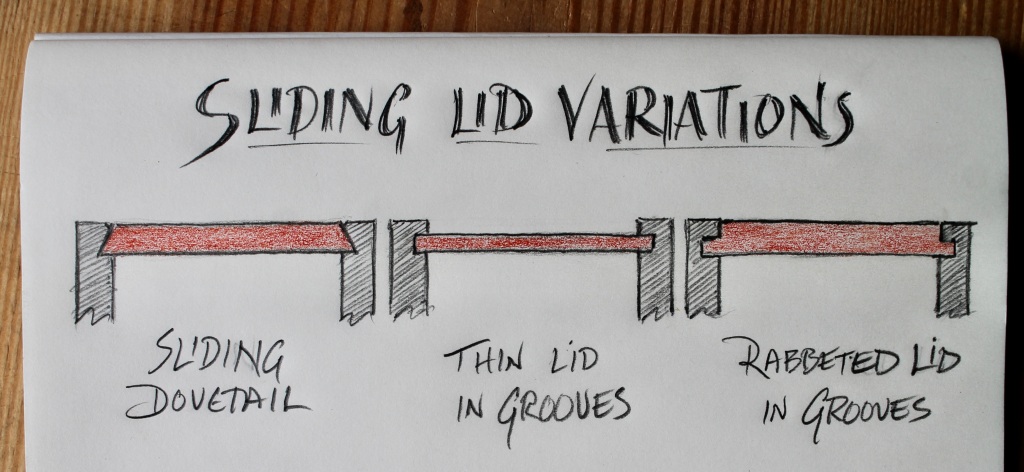
The top is held in place, and allowed to slide, via a sliding dovetail arrangement. This is the most sensible solution when carving the box from a single chunk of wood. When joining a box from boards, the top is typically held in grooves plowed into the sides (and, sometimes, far end) before assembly. The little sketch below shows three typical situations.
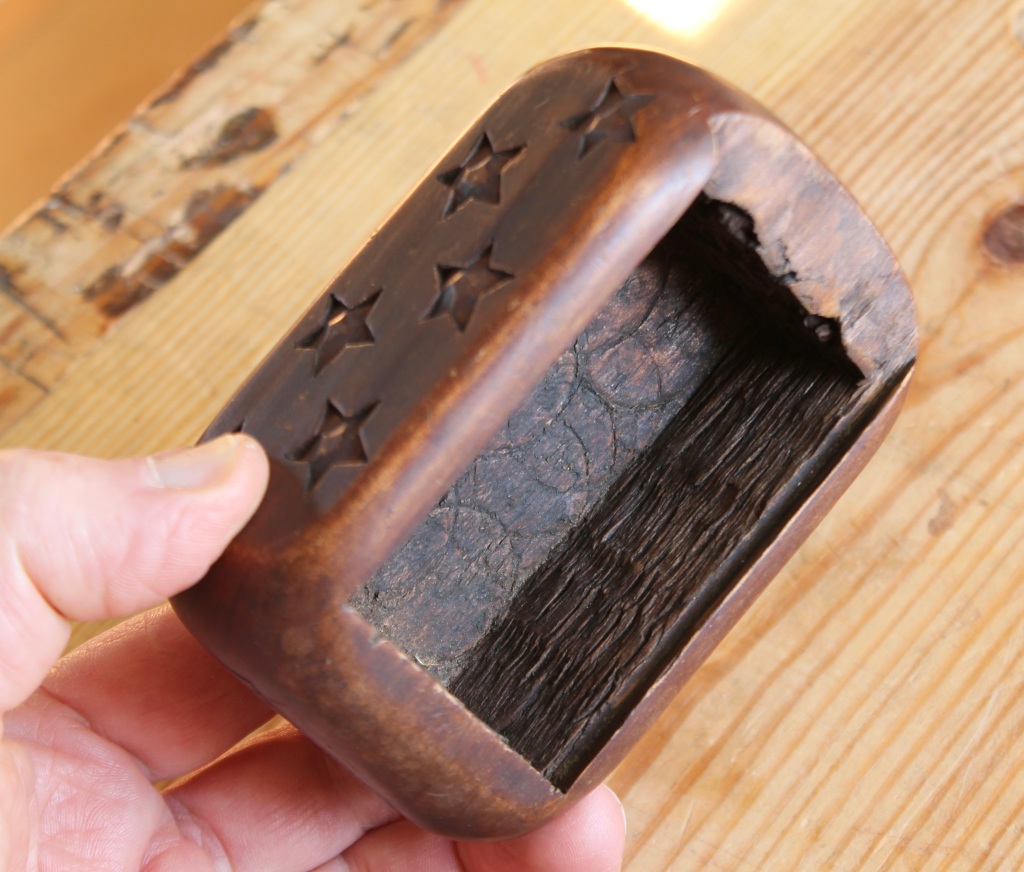
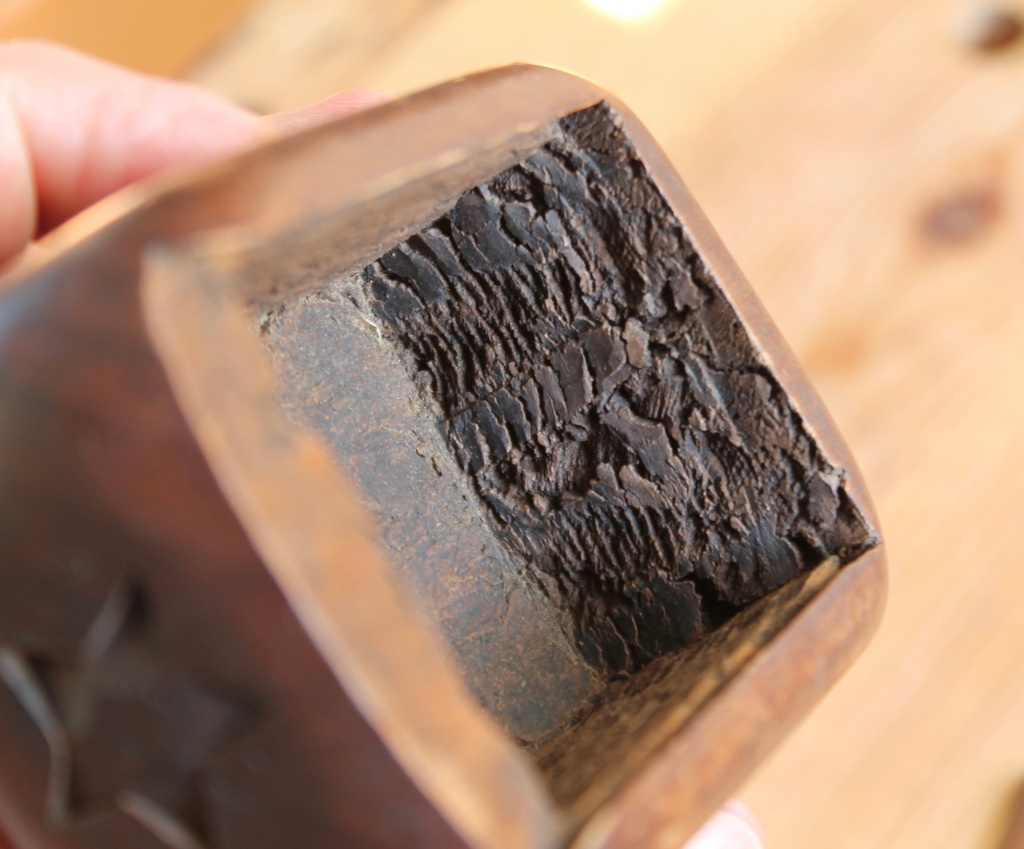
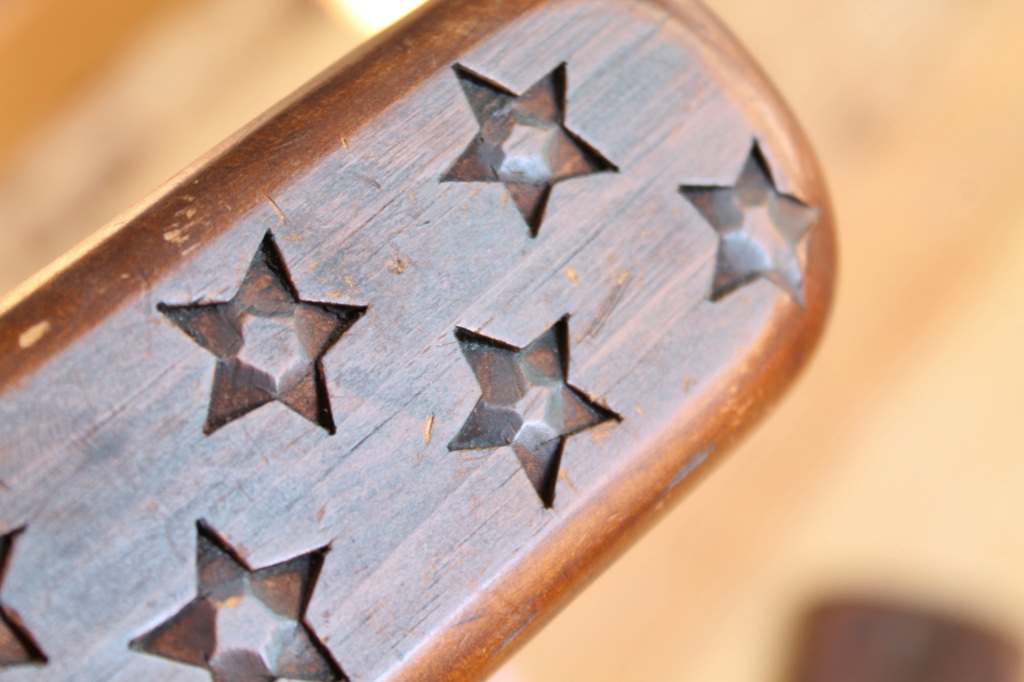
The cavity of the snuff box was bored out with overlapping holes. Based on the marks left behind (no lead screw and a very shallow rim mark), I’m guessing a Forstner bit was used, but I’m open to suggestions. Forstner bits go back to the 1870’s, which is further back than the box, I’d bet. Whatever bit was used, it might not have been very sharp. The end grain of this soft pine shows a lot of crushing. Some of that could also be from the chisel used to clean up the walls. The five-pointed stars are an interesting touch. Just five two-wall chip cuts, leaving a little raised pentagon in the middle. The knife was definitely sharp. Looks like they were laid out meticulously, probably with a small template. I’ve thrown several shots into the slideshow below:

For the fly boxes, I decided to allow the lid to slide either way so that flies could be retrieved from either end of the box without necessarily removing the lid entirely. I wanted the fit to be pretty tight, just right to slide with a little pressure, but hold its position otherwise.
I started with a board about 2″ thick and 3 3/4″ wide. The 13″ length would yield both fly boxes, and allow me to do some of the prep more accurately with a longer board. First, I resawed a 1/2″ thick board off the top with a rip saw. After planing the surfaces clean, I made some marks, plowed a shallow groove on both sides of the top surface, then used the outer corners of those grooves to guide my backsaw. I set a bevel gauge to the angle I wanted for the dovetail and kept the saw blade parallel to it (see the above photo).
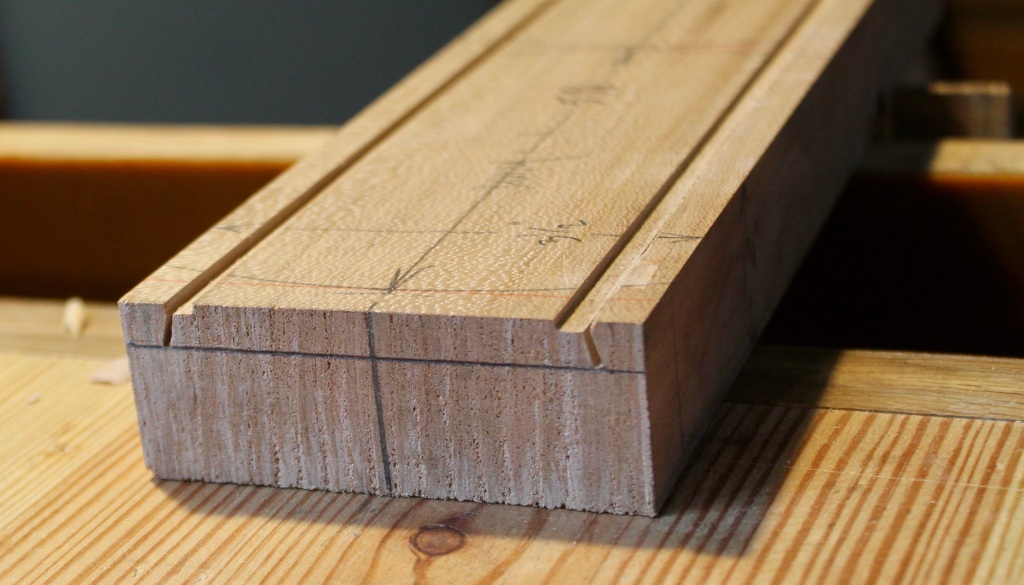
There’s a shot above after the sawing. I used a rabbet plane to remove the material between the saw cuts down to the pencil line. Actually, I ended up rejecting this cherry board, then started over with one of butternut. The edges of the lid were planed to match the dovetail slope and carefully fitted.
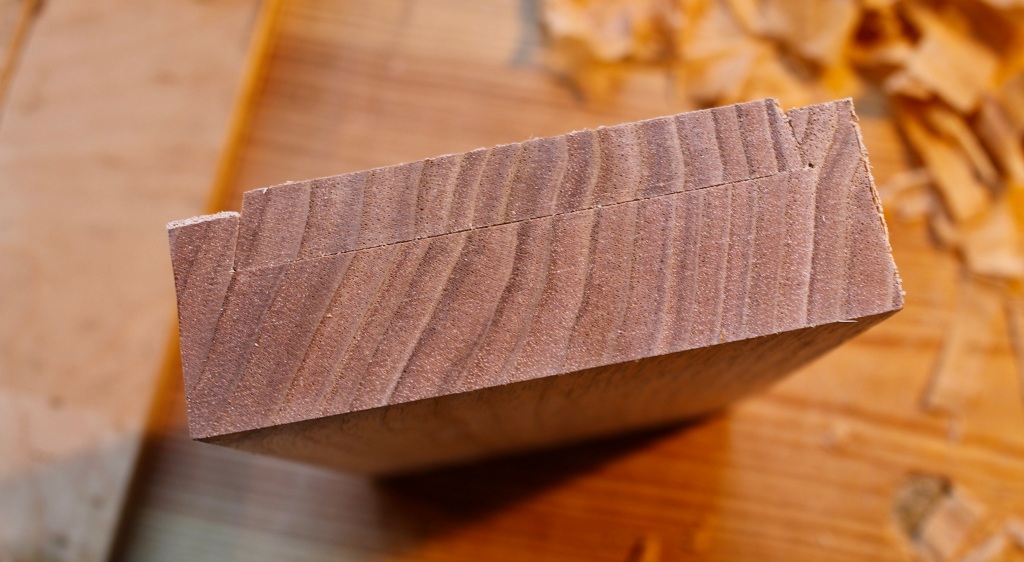
I chose a butternut board that was quarter-sawn to avoid warping and movement as much as possible. Since the lid and the base were oriented in the same way they had been before the resawing, any movement should be harmonious. Fingers crossed. With the lid fit to the base, I cut the length in two.
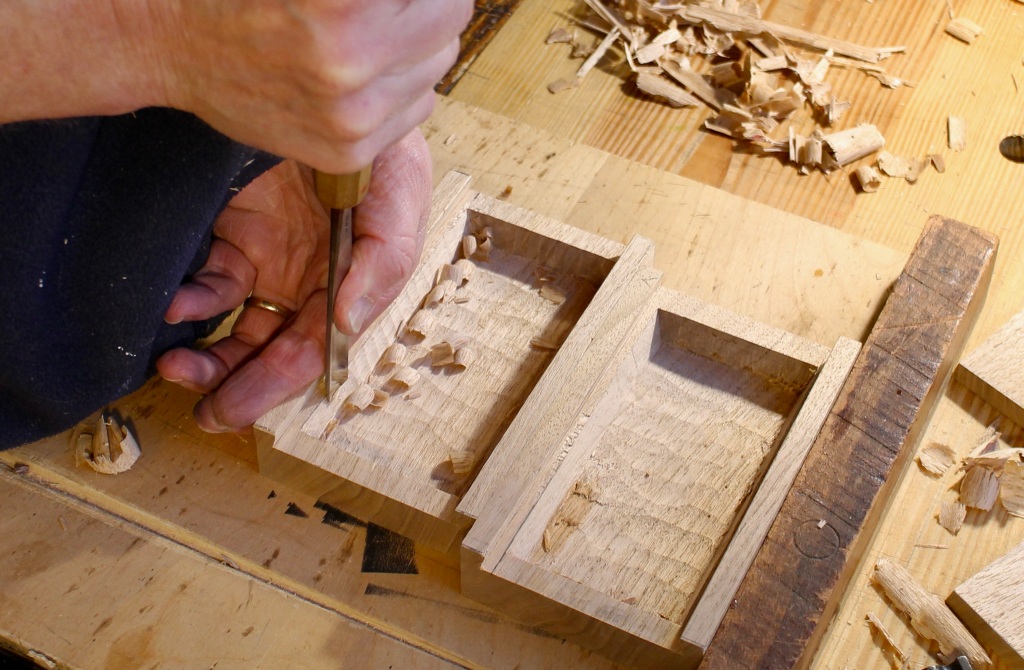
Like the maker of the snuff box, I bored out the majority of the cavity with overlapping Forstner bit holes. Then I cleaned up the bottom and sidewalls with gouge cuts, leaving a little texture.
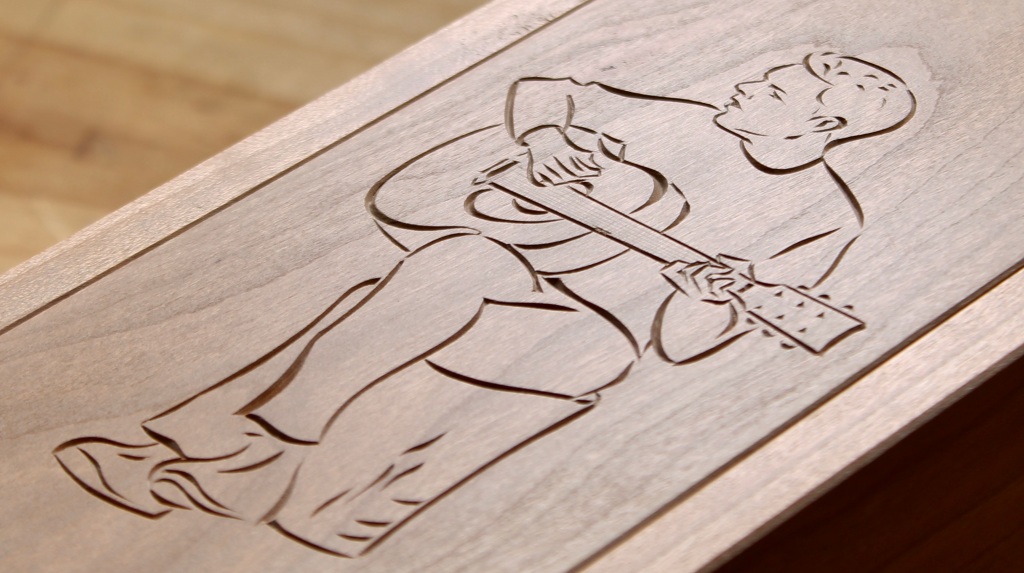
Then some heavy chamfers and easing of edges to make it comfortable in the hand, followed by some lettering and image design/carving. Finished dimensions are 6 1/4″ x 3 3/4″ x 1 3/8″.
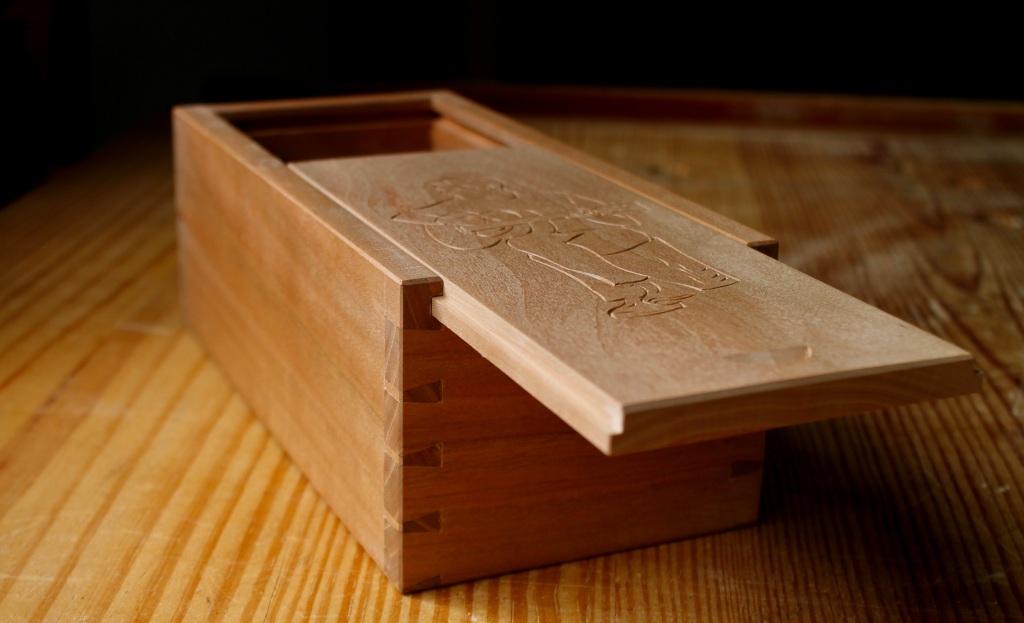
And, while we’re on the subject, here’s another sliding-lid box I just finished, still to get a coat of oil/wax. This one is made from six pieces of black cherry. A graduation gift for our son. The tongue created by the rabbet in the lid rides in grooves in the sides and also engages at the end.
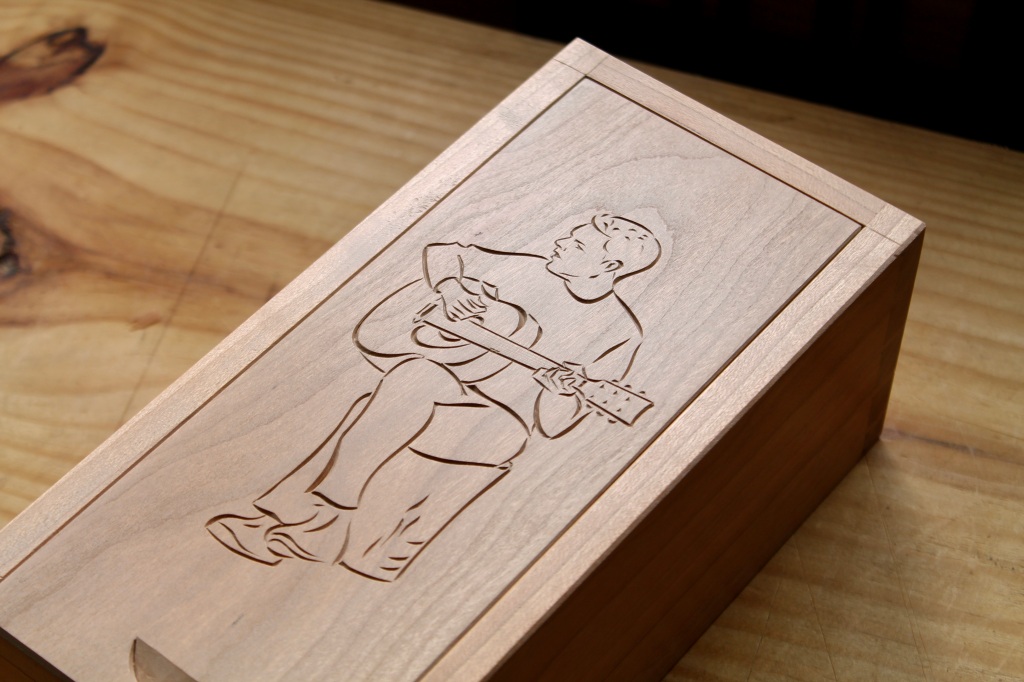
The carving on the surface, based on a photograph of Noah, is simply made up of v-grooves of varying width and depth. Two opposing cuts from the tip of a penknife.
This post shows a couple other applications of a sliding lid.
Happy sliding!

So if you were going to try to make a sliding lid box out of one piece of wood with hand tools, how would you do the lid? I have always resorted to cutting a slice off the top and turning that into the lid as I can’t figure out how to cut out the lid and leave the slot intact.
Thanks!
Jay
LikeLiked by 1 person
Jay, if I’m understanding your question correctly, I did exactly what you’ve done. I made the box with hand tools, and I started by cutting a slice off the top (resawing a thin slab for the lid with a hand rip saw). I don’t think there is any way (with hand or power tools of any kind) to release a lid from the actual area between the dovetail keyways. At least I can’t imagine one. But then there’s really no need, because you have the piece you resawed from above. No problem.
LikeLike
Thanks! I was afraid of that…
LikeLiked by 1 person
Thanks Dave,
Those boxes are really fine work, and I appreciate the shared instructions. You have stimulated me to make one or more of them, but the lid carving is in a whole different league than my current skill set.
Cheers,
Michael
LikeLiked by 1 person
Have fun with the boxes, Michael!
LikeLike
Dave, another example of the excellent work you do! Your posts are a learning resource. I was not familiar with amadou and clicked on the hyperlink. Surprised of its many uses, going back to ancient native peoples.
LikeLiked by 1 person
This was the first time I had used amadou, Skip. It really is an incredible natural material.
LikeLike
Beautiful work, and a very educational post!
LikeLiked by 1 person
Excellent, I saw carved boxes by John Heatwole back in the day in an old issue of Fine Woodworking and forgot about them until seeing your fantastic boxes. Thanks for refreshing my slightly old tired brain.
LikeLiked by 1 person
Thanks. I’ll have to look back through the Fine Woodworking archives and find the John Heatwole articles.
LikeLike
Welp. Looks like now I’m going to have to make a sliding lid box.
How did you find out about amadou? Or are you a fly fisher yourself? (… in addition to being a Dave Fisher)
Final question. Where did you source the amadou? From the woods or ordered?
Thanks,
Phil
LikeLike
Phil, I am much more a Dave Fisher than a fly fisher! I have a couple fly rods and I dabble a bit in fly fishing. I can fool a hungry bluegill on a good day, and that’s about the limit of my skill. I don’t remember where I first heard about amadou; probably in a fishing gear catalog or something. Amadou pads to attach to a fishing vest are commonly sold for drying waterlogged flies stream side. Still, I had never actually touched any until my order arrived a few months ago. I ordered it from Etsy: https://www.etsy.com/shop/Fomesfomentarius?ref=shop-header-name&listing_id=802350229&from_page=listing. It seems like most of the suppliers are from Eastern Europe, especially Romania. Looks like there’s a long tradition there of using it for all sorts of things, including wound care and some cool hats. I was very happy with the transaction and the amadou that arrived — and it didn’t take long.
LikeLike
Hey David, I was recently rewatching your video on twca cams and was wondering if you ever found a need to have a left and a right. I guess the same question could be applied to spoon knives as well. Thanks again for all your informative videos and blog posts.
LikeLike
I’ve never purchased a left-handed twca cam, Scott. not that one couldn’t be useful. A friend told me recently that he purchased a double-edged twca cam from Nic Westermann. Maybe it’s a relatively new offering. I do like using double-edged hook knives for some tasks, especially for carving deeper, steeper hollows. For example, the Kestrel Tool E-bend crooked knife https://davidffisher.com/2016/04/04/almost-ready-for-ale/
When it comes to spoon carving, I typically do everything with a right-handed single-edged hook knife. That back right quadrant of the spoon bowl is the trickiest part, but I’ve found a way to use the end of the hook to do that area effectively. But, using a left-handed hook with a thumb push stroke wold works well for that quadrant too. It’s just a matter of preference.
LikeLike
great stuff–
LikeLike