

I’ve been designing and carving an exterior sign for a cottage called “Minglewood.” Above is the sign with the carving portion complete, and below is my early small sketch of the design. The cap boards, which were inspired by the roofline of the cottage, will be attached to the top of the sign board itself. They’ll slope toward the back of the sign to shed water behind. The sign (30″ long) will be attached to two vertical posts anchored in the ground.

Compared to the thumbnail sketch above, the final design was streamlined, especially the branches and leaves. Designing took more time than the carving. I don’t know how much time for either, but I know it was more for the first.

I chose white oak mainly for its durability outdoors that I’ve experienced first-hand. I made our patio furniture over 20 years ago from white oak, a table and chairs. They’ve sat out in the rain and the sun and they’re still solid. The piece I’m using here is quarter sawn, so it won’t move much and will be unlikely to warp. Also, the ray fleck is a nice touch.
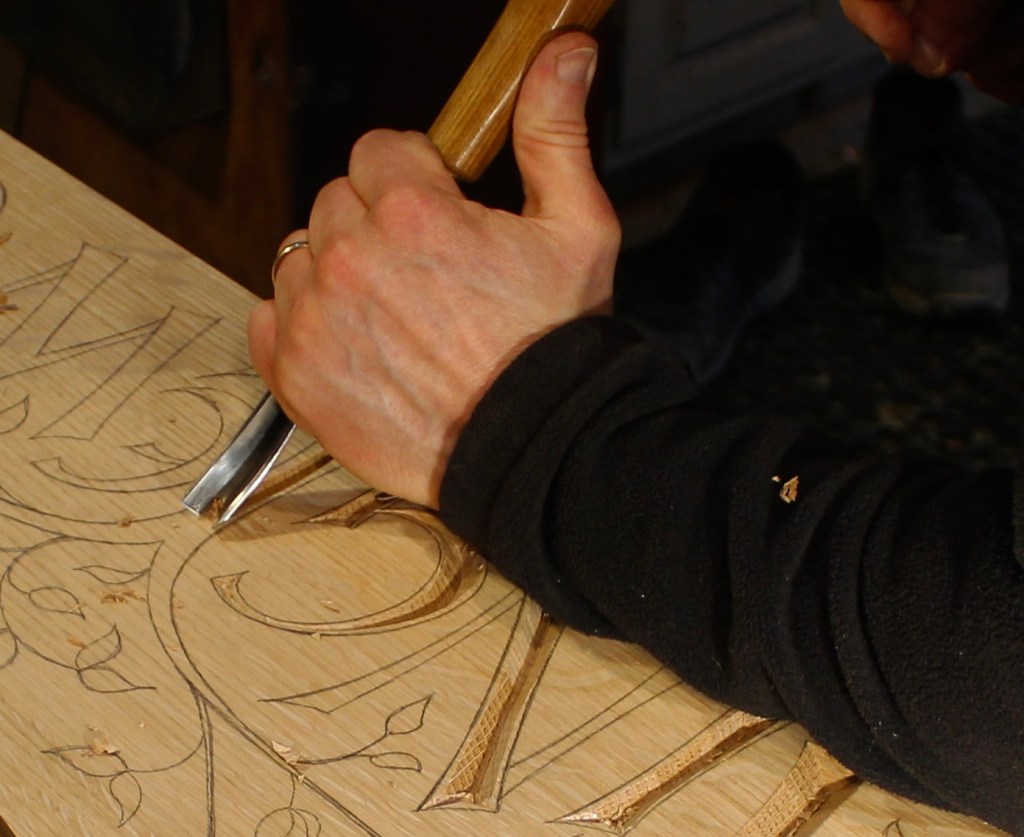
There’s the first cut up there on the M, a stop cut of sorts. For these big letters (the M is about 6″ high) I used a big V-tool to remove much of the wood before refining the walls with chisels and gouges. Much more effective than a knife in this very hard wood.
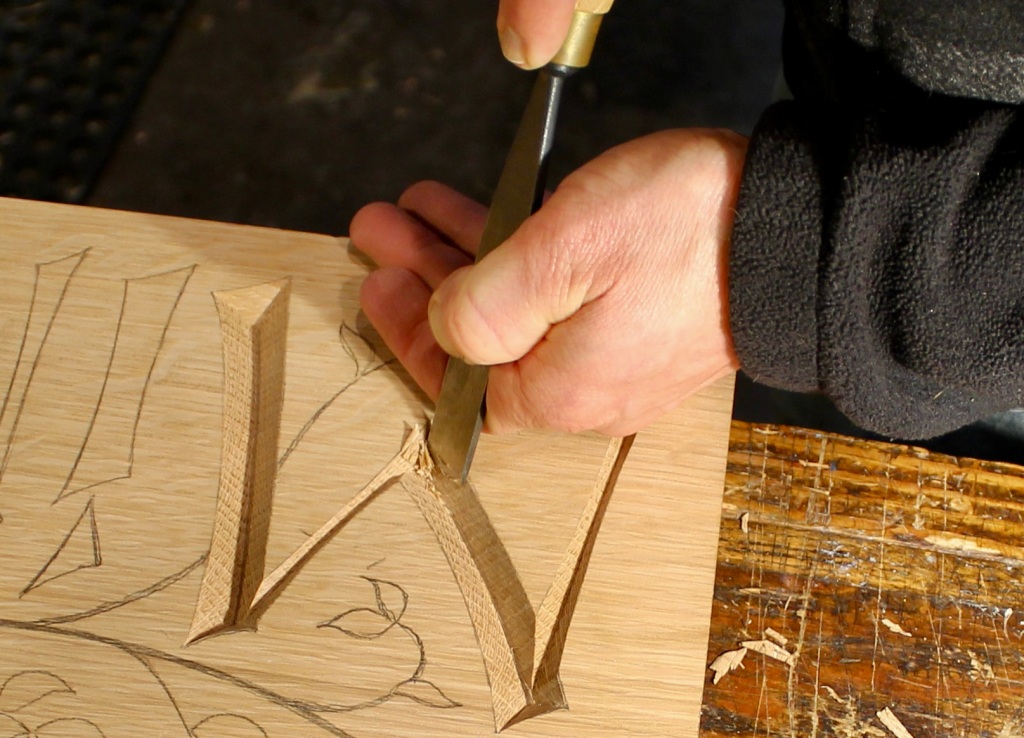
Here I’m roughing the upright of the L, which is also the trunk of the tree. The V-tool work on other letters can be seen as well. The remaining wood will be removed with the chisels and gouges.

For these flaring (waisted) elements, I use a combination of the three tools above, all flat carving chisels, but sharpened differently. I work them from the upper edge to the bottom of the V. The one on the left is ground straight across and is best for straight or slightly convex (when viewed from the outside of the trench) walls. the middle one has a slight camber and can negotiate slightly concave areas without the corners digging in. The third is ground to a skew to get into tight spots usually at the terminals and junctions.
Here’s the cambered chisel working the concave wall right up to the corner.

There’s the skew slicing right down into the junction of the end wall and side wall.

The curves are cleaned up with gouges. Here I’m removing some chips with some mallet blows. I’ll follow by rocking and slicing with a gouge to create the final surface.

I’ve shown this arrangement before, but I use this sort of I-beam bench extension held in my vise to hold the workpiece out on a narrow peninsula so that I can access it from both sides easily. Just a couple 2x4s capped by a 1×6, all held in the vise at one end.
The plan is to paint the letters, branches, and leaves before treating the whole thing with oil that can be easily maintained from year to year. The shot above is taken in the shop with light coming across the sign from the left. The shadows allow the sign to be read clearly. Below, I’ve simply rotated the sign into the direction of the light, and the difference is clear. The paint will assure a contrast no matter what that sun is up to throughout the day or if car lights are approaching the sign head-on.

I don’t think I’ve painted an exterior sign before, but Martin Wenham’s book has a whole section on painting-in letters and selecting materials.


Dave,
It looks terrific! The proportions fit in the sign very well. The addition of the tree branches and leaves convey a feeling of a shaded cottage.
LikeLiked by 1 person
Thanks, Skip. The cottage is truly nestled among the trees. It’s good to know that my attempt to reflect that in the design worked out.
LikeLike
That is an excellent solution to the double letter challenge! Something I struggle with. Beautifully done.
LikeLiked by 1 person
Thanks, St.John. Struggle indeed. There was a lot of sketching before arriving at that solution. Glad to know I’m in good company.
LikeLike
Elegant
LikeLiked by 1 person
I only have one thing to say:
A couple of shots of whiskey, women ’round here start lookin’ good
Couple more shots of whiskey I’m goin’ down to Minglewood
LikeLiked by 1 person
Good stuff. I thought the name might catch your attention. I think, at least when it comes to music, you and the owners of the cottage might be kindred spirits.
LikeLike
I was just making sure you knew what kind of people you’re dealing with…
LikeLike
Thanks David for giving us insight into your techniques. I’m an old dog but always learn new tricks from you.
LikeLiked by 1 person
Really cool work. I don’t have the confidence to take a big job like that and then carve it.
LikeLiked by 1 person
What a quietly spectacular piece of work! The end-grain patterns exposed in the letter’s interiors really caught my eye. The roof line is the perfect foil for the tree and leaves. Stunned!
LikeLiked by 1 person
Thanks Dave. Yet one more example of your highly imaginative, finely executed work, generously shared.
LikeLiked by 1 person
Looks great – I really like your carving style, have you posted videos on this subject? Making some shelves out of white oak, probably will have enough left over for a sign :).
LikeLiked by 1 person
Thanks, Michael. There’s a short video of my knife letter cutting technique that was taken at Spoonfest. You can find that on youtube. But, as far as I recall, I haven’t been filmed cutting letters with chisels and gouges. However, I have written other blog posts about it as well, with more photos. Check under the “lettering” category in the dropdown menu to the right. Hopefully, in the future, I’ll get something more complete together.
LikeLike
Gorgeous work as always, fantastic design and execution. Oak is hard, you make it look soft. Do you use one or more tools for the leaves? Really like the look of those as well. Thanks for sharing!
LikeLike
Hi, Jay. I do a bit of quick roughing on the leaves with the v-tool, but not much. The main tools I use for the leaves are a couple gouges with a pretty heavy camber or bullnose. I work from both sides while skewing the tool with respect to the grain direction. The leaves vary in shape and grain orientation, so there are adjustments for each. I’ll try to post something on that technique in the future.
LikeLike
Very nice. Thank you for sharing. Out of curiosity, how deep are the letters carved into the wood. Looks deep (1/4″ to 3/8″ if I had to guess). It might be the shadows making it look deeper.
LikeLike
The depth varies in proportion to the width of the letter at any given point, Joe. This is because the angle of cut, relative to the surface of the wood is consistent, or generally so. Somewhere around 50 to 60 degrees. The wider parts of these letters are around 5/8″ wide and 3/8″ deep. The narrower bits do tend to be cut at a slightly steeper angle.
LikeLike
Just beautiful!! I also appreciate very much how you have included tips on workholding and shaping your chisels.
LikeLiked by 1 person
Stunning – I love the ray fleck on that White Oak. You chose very wisely here. The carving accentuates that beautiful background even more.
LikeLiked by 1 person
Beautiful work as always Dave.
LikeLiked by 1 person
Pingback: Exterior Sign in White Oak: Finished | David Fisher, Carving Explorations
Hi Dave,
Was wondering how you cut the leaves…technique and the tool(s) you used for them.
LikeLiked by 1 person
For these larger leaves in this white oak, I used a couple gouges of different sweeps (maybe a #5 and a #7?) ground to a bullnose, or cambered, front edge (like a fingernail) that allows the edge to reach the bottom without the corners digging in. each leaf has its own shape and relation to the grain direction, so that must be adjusted to individually. I’ll try to do a post specifically about leaves sometime.
LikeLike