
I intended to do this over three years ago — make an elbow adze. My intentions were so sincere that I purchased the iron from Kestrel Tool. I even found a branch junction that would work well for the haft and roughed it out of the green white oak, thinking I’d leave it to dry for a couple months, then finish up. Then other things kept intervening. 45 months later, it’s done, and I like it.

The crook moved around a good bit as it dried, so it was a good thing that I had left a fair amount of extra material. I was able to flatten both sides and get things trued up. I could have just purchased a finished adze from Kestrel, but thought making one would be more fun and better help me to understand this animal that is different in many ways from the adze style I’m used to.

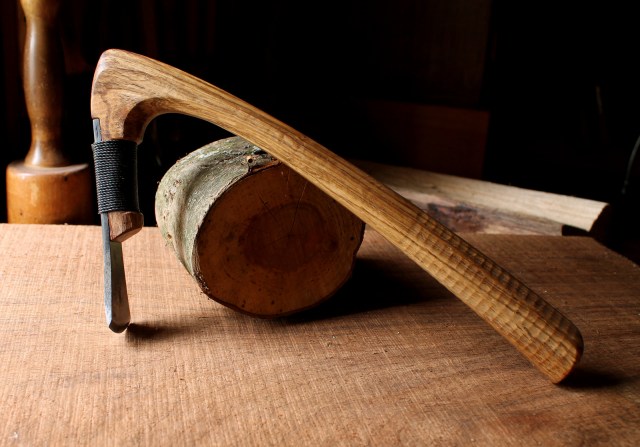
Kestrel refers to this iron as a “Baby Adze Iron.” The haft I made is about 13 inches long.
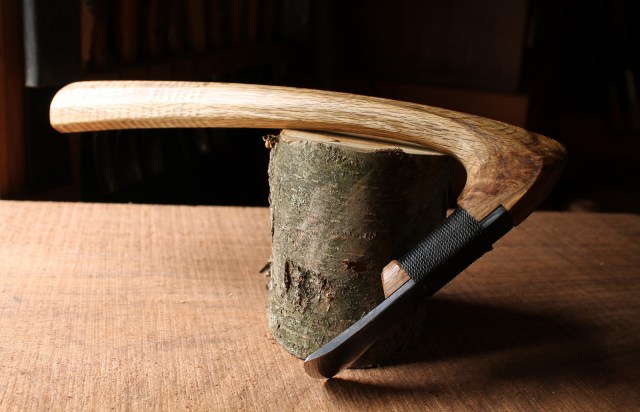
Doing it this way forced me to really concentrate on the literature packet that came with the iron that went into great detail on northwest coast elbow adzes and what makes them tick. In the photo above, the major shaping has been done. I used a drawknife and sloyd knife, but a rasp came in especially handy with all of that convoluted grain around the tight bend. My handle is oval in form overall, but more like a squished octagon, with eight facets that merge into the head. I refined everything with a sharp card scraper.

I also used a bench chisel on the surface where the iron rests. Good contact is important there. I just noticed in the photo of the haft that it makes me think of a horse.

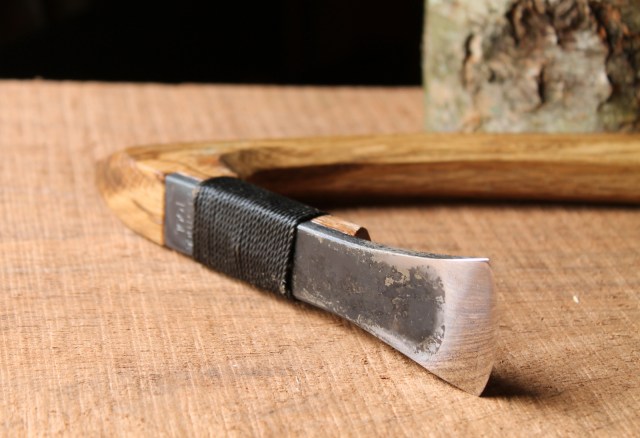
I temporarily attached the iron with some electrical tape. This temporary binding allowed me to try out the action of the adze. I could still make adjustments, including shaving the neck to adjust the action. There is a liveliness, a slight springiness, to the haft that you can feel as the tool takes a chip.

After I finished shaping and oiling the handle, I secured the iron to the haft with tight wraps of cord.
I textured the grip area with cross-grain cuts from a small gouge…
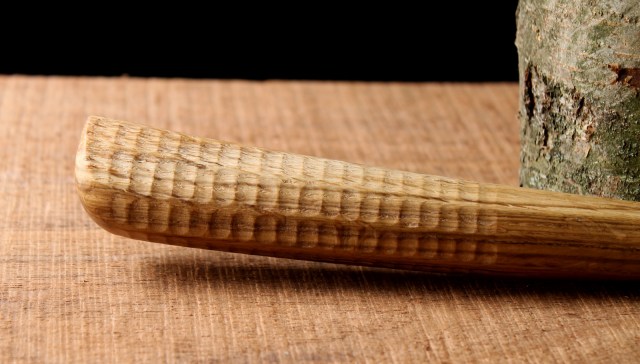
Then softened the sharp corners between facets with some very fine sandpaper.

As you can tell most obviously by the straight iron, this isn’t an adze for hollowing bowls but rather for shaping and texturing (although there are also specialized texturing adzes with extra springy hafts). I’ve spent a total of about 15 minutes using my finished elbow adze now, so we still have to get to know each other. But we had a great time in our first play session with this chunk of pine.

Swinging this tool is quite different from my bowl adze (above). For one thing, the pivot point on my bowl adze swing is near the base of the short handle. The significant swell and kick at the bottom of the handle encourages this full rotation that can reach well into a hollow. Whereas the pivot point on this elbow adze is right above the index finger almost halfway up the haft. There is more of a rocking motion in the hand, a steady rhythm of back and forth. At least that’s my initial impression.
Both have their strengths and particular uses, but I’ve got a lot more exploring to do to even begin to understand or comment much more. Whether you buy an iron or make one from an old car spring or lawnmower blade, an elbow adze is a great project and there’s no need to wait a few years!

Really nice looking tool, careful or you’ll be in the tool making business. How difficult was the white oak to deal with after sitting so long?
LikeLike
The white oak was hard, but the main difficulty is due to the tough grain of the branch junction.
LikeLike
Very beautiful work Dave, sincerity in conception and production shines through.
LikeLiked by 1 person
looks like fun–and great handle–
LikeLiked by 1 person
Awesome – I’ve been experimenting with mine just a bit too!
LikeLiked by 1 person
Beautiful tool, Dave. I’m interested in the wrap (I work with paracord). How did you fasten the ends?
LikeLike
The end are sort of tucked in under the wrap, Chris. You start by forming a loop that runs the length of the iron. When you get to the end of the horizontal wraps, run the cord through the loop that still sticking out and pull on the loose end of the loop to pull the end under the wraps about half way. You snip off the two parts that still stick out from under the wraps, but the rest is absolutely trapped underneath. In fact, in order to pull that loop through to the halfway point, I had to really pull hard on the cord with pliers, even then it was tough. Those wraps hold with incredible force collectively. I should have taken photos of those steps, but there are some good photos in the Kestrel literature that I went by.
LikeLiked by 1 person
There is a very informative video on youtube showing exactly how to wrap the cord around, from Kestrel tools. Here is the link:
I used this when I wrapped my two elbow adzes and it was very helpful.
You did a beautiful job on your adze by the way David. You are right that it looks like a horse. Many traditional adzes were shaped in the form of animals. I decided to shape my flat adze like a bird, with the blade being its tail feathers. I can send you a picture if you want.
My favorite thing about yours is that it makes me want to grab it and start adzing! nice work.
Take care,
Rudy
LikeLiked by 1 person
It’s done the same way you wrap eyes when building a fishing rod, lots of info. out there on that process.
LikeLike
That’s the same technique I use with paracord…only on a much larger scale. Thanks Dave.
LikeLiked by 1 person
Beautiful work Dave. Very inspiring. Your cord wrapping reminds me of the common whipping used by sailors to secure the of a rope so that it doesn’t fray. You can look it up under Ashley’s nautical knots-Common whipping.
LikeLike
Great “toolmanship”, Dave!! Also interested in your wrapping….
LikeLike
VERY nice job Dave. And that “liveliness” sounds intriguing.
LikeLiked by 1 person
I see that horse. I also see a fiddle bow.
Imagine that.
LikeLiked by 1 person
Great post Dave. You did such a nice job with that handle. I don’t know if you remember but years age when I came and worked with you in your shop I brought one of those along wondering if it was enough to get me started in bowl carving. I still love that tool. Even though it’s not suited for the job of carving balls it is so much fun to use.
LikeLiked by 1 person
Eric is it not suitable for bowls because of the flat blade? I see Kestrel makes curved blades, too. Would that work for bowls?
LikeLike
Hi Phillip, mine has some curve to it (I don’t recall which one, but it might be the sitka gutter), but the angles of my tool seem to be off for bowl carving per se, though it is an amazing tool for carving surfaces. It pops off small chips like nothing else, creating surfaces and light shapes with ease, but it does not have enough weight for bowl carving. It tends to just dive in and get stuck if you are trying to hollow out a bowl. Dave had some sage words about the bevel orientation and angle, but I don’t recall exactly what he said and I don’t want to put words in his mouth.
LikeLike
I forgot about you bringing that adze, Eric. You’ve got 100% more experience than me so I appreciate you sharing your experience with it since then.
Here are my thoughts on Phil’s question as well. Kestrel does make adzes with curved edges, but the iron behind the edge is straight. So it doesn’t seem to me that the profile of the head is curved enough to provide the clearance to reach down into a “significant” bowl hollow and follow the contour. Eric’s experience mentioned below seems to support that notion. I suppose it ultimately depends on what the shape of your intended hollow is and whether you’re just trying to rough out the majority of the wood or actually shape the interior largely with an adze.
As Eric mentioned, weight is a consideration too. I’ve gotten used to being able to take large chunks out of dense wood species with the momentum of a relatively heavy adze head. But there are different techniques for different types of adzes, and my experience is limited. I know that Charlie at Kestrel would be happy to answer any questions about the tools and what they are best designed for.
LikeLiked by 1 person
Thanks to Eric & Dave for your comments. All good. That helps a lot. My adze experience is pretty small and it’s tough to figure out what I don’t know.
LikeLike
Dang it. Now I want one.
LikeLike