
This tale from my isolated workshop is actually quite tame compared to Boccaccio’s famous ones from the 14th Century told by a group of friends isolating themselves in an Italian villa; unfortunately timely circumstances.
Amid the adjustments to the ever changing situation, the workshop was our own stable and comforting retreat yesterday. Noah and I worked on some spoons and returned to some walnut bowl blanks we had prepared weeks ago.
Considering the knots and form of this log, I decided to split one half of it into two quarters to make a couple “rooftop” bowl blanks — with a 90 degree angle in this case. Here’s a post I wrote about the rooftop orientation a few years ago, and here’s one more specific to the design I’m working on with these blanks.

These blanks have been waiting in bags for weeks. Walnut is so decay resistant that the heartwood doesn’t suffer or stain at all during the interim. I split and hewed away all of the sapwood in creating the blank. If I remember correctly, this tree was cut about a year and a half ago. It sat around outside with the bark intact and the ends painted for many months, then into a garbage bag. Now, still nice and green. Wonderful to work.

To plane a flat strip for the bottom surface, I just open up my vise’s jaws and set the blank in there upside down. I lay out a line on the end for the bottom surface that is perpendicular to the line that bisects the overall angle of the blank. By the way, there’s nothing magical about 90 degrees for these blanks. I adjust depending on the log — 100, 135, 143.8, unknown… whatever. Play around and see what happens. In this case, it just made sense to get two blanks out of the half log and consider the knot at the same time.
You could create the same sort of cradle by making a simple framework with some dimensional lumber and securing it to your workbench.

I clamp a board at the end of the log to act as a stop to keep the log from sliding during planing. Come to think of it, I could just clamp a board upright inside the near jaw and accomplish the same thing.
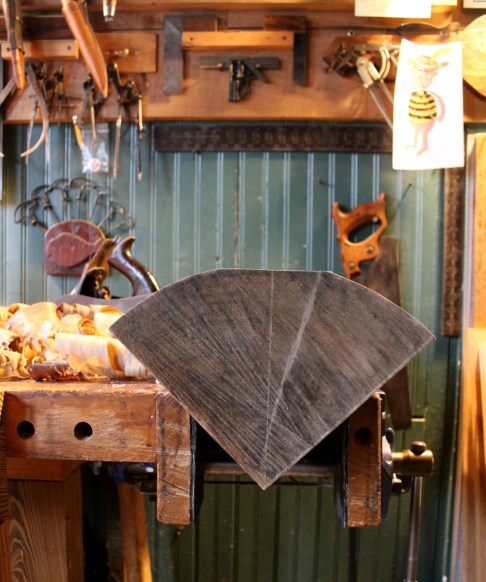
I found a couple photos I took when I prepared these blanks and you can see how the same arrangement works well for holding these pieces for planing the two upper surfaces:


And there’s that knot!

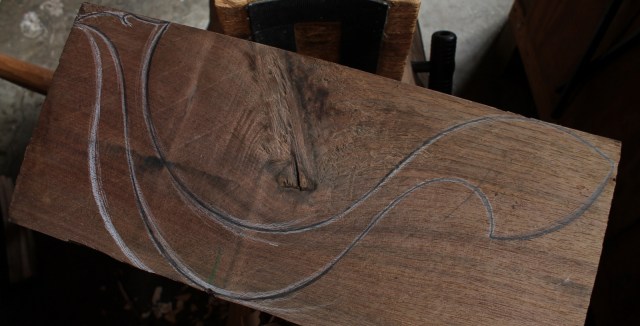
I play around with the curves of the design a bit with a white Prismacolor pencil on the dark wood, then specify the lines over top of them. (This is seen more clearly on the top-most photo.) That white line out in front is me just thinking out loud about a later stage. It’s not really needed now. You can transfer the lines to the other side by tracing a pattern from the first side or by transferring key points from the first side to the other with creative use of a compass then filling in between.
That peaked material falls away pretty quickly with an axe, but another method is to make a series of kerf cuts with a saw, then split them away. It gave Noah some sawing practice and it provides some control over the wild grain around that knot.


The froe works as well as anything to pry in there and knock off the little end-grain triangles.

The result is a sort of terraced effect.

Noah went back to spoons as I dug in with the adze, working mainly across the grain or at least partially so.

I move the blank around to facilitate a better swing.

The adze also creates some depth, but things are too tight at a certain point, requiring some other solutions. More on that later. For now, this is back in the bag. It won’t have to wait long, but it will be fine.
I hear the birds and trees calling. On a walk a couple evenings ago the spring peepers and the red winged blackbirds were creating quite a chorus. Deer jumped up in front of me and wood ducks were on the water. I couldn’t help but think of Wendell Berry’s poem The Peace of Wild Things and savor a sense of calm.

Wishing you peace — and wood chips.

thank you Dave and wishing you and yours well–stay safe–
LikeLiked by 1 person
and thank you for the Wendell Berry poem–day-blind stars–nice phrase–
LikeLiked by 1 person
I like the way he put that too, Marie. Take care.
LikeLike
Last Friday evening, Laura and I were seated on the front porch swing as is our daily habit when a painted bunting appeared out of nowhere. He sat tight in the tea olive for a bit out of caution, I suppose, and then jumped to the feeder and proceeded to wear it out. Laura chuckled at his appetite and said, “He must have just gotten in from a Mexico!”
I have never seen one this early in the year. He put our minds in a better place.
LikeLiked by 1 person
Thanks for sharing that story, Scott. Little wild things can make a big difference if we take the time to notice, and sit on the front porch swing!
LikeLike
MANY THANKS for all the illustrations, and the peek at another bowl in progress. I see beauty on the way.
And it just struck me, like a big heavy mallet, that not all birds come from crooks. Thanks for the inspiration!
LikeLiked by 1 person
Many ways to find a bird, Bob! Happy carving.
LikeLike
Brilliant! For some reason brings me a sense of peace to see these pictures. Thank you.
LikeLiked by 1 person
Can’t wait for the next chapter!
LikeLiked by 1 person
It’s such a pleasure to be able to share your experiences as we too are locked down in Australia. Am trying to learn from you, though haven’t yet managed to get those special tools. Have woodcarving chisels and lots of wood and true creativity comes from working with what you have I believe. Would love to know how you manage to produce such beautiful lettering. Words are so important I want to make them beautiful!
LikeLiked by 1 person
Thanks, Wendy. I agree wholeheartedly — use what you have. The creativity that that requires will lead to many unexpected rewards and satisfaction. In time you can get more tools if you wish, but you can carve letters, one way or another, with the tools you have. I’ve written many posts about lettering, including some discussing various techniques. On the right side of the blog, there’s a pull down menu of categories. If you choose “lettering” it will bring up those posts for you: https://davidffisherblog.wordpress.com/category/lettering/ Best wishes. If you have any questions, don’t hesitate to ask. Stay safe and have fun doing some carving.
LikeLike
Hi Wendy, David will probably answer, but in the meantime you can explore a video he made about lettering here.
LikeLike
Thanks so much for these posts! Such an inspiration! You make it look so easy. It is not! I have started some from green Sycamore and find it very difficult to pull a draw knife through. Cross fibers? Such a pleasant education!
LikeLike
Hi Steve. American Sycamore usually does have a lot of interlocked cross fibers and tends to move around a good bit when drying (at least in my experience). I like your attitude though, that in spite of the hardship, it is a pleasant education. That is the best way to understand and get to know these species, dig in and feel it, even those you may not wish to feel again!
Beyond the crossed fibers, you will find that your body mechanics will improve. When using the drawknife, concentrate, consciously at first, on using the large muscles in your back with good posture; just like Mick Jagger when he struts across the stage. Pull your shoulder blades together through the stroke rather than relying on the muscles in your arms and shoulders. As control and confidence develop, momentum will become your friend!
LikeLike
Pingback: Back to the Hens | David Fisher, Carving Explorations