

There may be no project in green woodworking as magical as the making of a shrink box. The magic happens slowly, but you still want to find somebody to ask, “Did you see that?!” Maybe that’s why I can’t resist a diversion once in awhile to make some more.
 Many of those reading this will already be familiar with the general idea: Hollow out a green branch, cut a groove around the interior near the bottom, and the cylinder will shrink around the bottom board, locking it in the groove. Just below is a link to a pdf file of a brief description with photos of the process that I created for a demonstration at a local festival a few years ago:
 Although often called shrink boxes, you’ll also here “shrink pots” and of course many names in other languages. In Jogge Sundqvist’s book in the left photo, completely in Swedish, they are “Krympburk.” In fact, I think I made my first shrink box about ten years ago after reading Jogge’s book — well, I can’t exactly “read” it, but the pictures are so good that the procedure is clear. Here is a German version for sale — same pictures though! There are many tools and methods you could use to make one, but here are a few photos showing how I go about it.


No power drill compares to the amount of torque that can be applied with a T-handle auger. The lead screw of this 2″ antique pulls the auger through the wood and the sharp cutting lips shear the end grain. This tool is a blast to use. It does take some torque, but it is invigorating and rewarding exercise.
Depending on the size of shrink box you are making and the size of the hole bored, there may still be a significant amount of material to remove from the inside. One method I sometimes use to hog away some of the bulk is seen above right. I use a gouge (with a deep sweep) and mallet, proceeding around the interior perimeter. This removes long sections of wood following the grain.
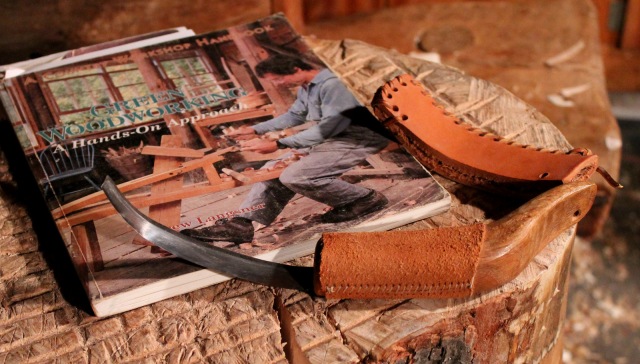 Any one of a variety of slicing tools can be used to remove excess wood and shape the interior: sloyd knife, hook knife, twca cam, etc. Wonderful cross-grain shavings roll out of the box as it and the knife are rotated opposite one another. One tool that I particularly enjoy using for this job is a crooked knife that I made from an old file several years ago, based on directions in Drew Langsner’s essential book Green Woodworking: A Hands-on Approach. As you’ll see through the link, Drew still sells the book, and it is a special one. It is a pleasure for me every time I refer back to my old copy full of underlines and page markers. I learned so much because of the thoughtful way that Drew organized and wrote this overview of green woodworking. He introduces the reader to the fundamentals and focuses on the skills and concepts that can be applied to a variety of tasks and projects, from spoons to chairs. It would be difficult to find anybody with a more comprehensive understanding of green woodworking than Drew Langsner, and here is much of it in one package that never needs to be plugged in. It’s a classic.

Marking gauge converted to a croze.
The one part of making a shrink box that was always the trickiest for me, was cutting the groove with a knife. Then I had an idea that has worked well. I borrowed the v-cutter out of a wood threader. This is the part of the tool that cuts the v-grooves in the male threads. I cut a mortise for it in the end of an old marking gauge and secured it with pressure from a screw from above. The marking gauge fence rides on the bottom of the shrink box, and the cutter cuts a groove parallel to the bottom.

Flexcut v-scorp
If you don’t have a wood threader from which to pilfer the cutter, one could easily be filed from a small length of tool steel, using a triangular file for the main channel. I also noticed that Flexcut makes a small v-scorp that looks ideal for cutting the groove. I have never seen one in person, but based on the photo and description, I can’t imagine why it wouldn’t work.


A few days after the dry bottom board has been put in place, it will be locked in due to the drying and shrinking of the cylinder. Now there are many creative options: lids, decorative carving, and so on. You can do it right away, but there is no rush at this point. Like the bunch in the opening photo, they can wait for further work. That will also provide time for some new ideas to simmer that I have for some of them.
And, finally, I’ll finish with a few photos of some I’ve made over the years. There are many potential uses (how about holding wooden spoons) and endless design possibilities. Have fun playing with magic.


So cool! I’ve never hear of these.
LikeLike
Pingback: The Magic of a Shrink Box | She Works Wood
The red one in the top right photo… I gave that one to a great friend some years ago. Dave, she was.. and is.. thrilled with it.
LikeLike
Pingback: Shrink Boxes | She Works Wood
Is it possible to get a watertight fit so that you could use one as a mug?
LikeLike
Well — sort of! That was my original idea, a few years ago, with the one in the photos that has paint brushes in it now. I poured some water in to test it out, and after a drop or two slowly leaked through, it stopped. Like in the joints of a wooden boat the fibers at the joint had swelled that last little bit, truly making it water tight. About half-hour later, as I was still patting myself on the back, I noticed that the contents of the cup were on the table. I think what happens is this: As the wood of the cylinder takes on water, it un-shrinks somewhat, creating a bit of a gap between the bottom and the cylinder. In that way, a shrink box differs from a staved container with binding hoops.
I haven’t tried it, but I think if you were to coat the inside with something completely impervious to water — say a thick coat of beeswax — then it would work, at least for cool beverages. Those are just my theories based on my experience and thoughts. Maybe someone else has some ideas.
LikeLike
Dear Dave and Kyle!
These kind of shrink boxes were quite common in the shepherd culture of Eastern Europe where I live. A while ago I was studied their construction a bit and found the following:
– The box is made from harder wood while the bottom from a very dry soft wood, usually pine.
– The edges of the bottom are shaped not in a \/ shape but rather in I/ shape such that the flat part is heading inside the box.
– The groove in the box is thin, not so shallow and, if possible, in a \I shape with a smaller angle than the angle of the edge of the bottom.
– Before putting the bottom, they dried it on a stove (or near fire) while keeping the bottom of the box in a hot water. Thus, when they put the bottom to the box, the dry bottom started to expand, the boiled box started to shrink and since the groove is with a smaller angle and the edge of the bottom is with a larger these two were tightened well…
In some places, they used to fill the groove with a tiny band of dry reed-mace (they used to use it also for isolating barrels.
I hope I could write it clearly, my English is not so good…
Best,
Tomas
LikeLiked by 2 people
Thank you for explaining that, Tomas. I think you were very clear. Details like this are fascinating.
LikeLike
Dave – thanks for yet another excellent blog post – of course, I find them all tremendous helpful and inspiring, but I actually put this one into action and made my first shrink pot today from a piece of green holly with a cherry bottom. Used an antique 1 1/2 inch auger – worked perfectly (albeit a bit of a workout as you said) and located one of those Flexcut V scorps at a local shop – it definitely did the trick. Now just waiting for the magic to happen!
LikeLike
Bill, thanks for the feedback and for sharing your recent experience. I’m glad to hear that the v-scorp worked. Hopefully, the holly cooperates for you as it dries. Usually, I try to make the bottom just pop into the groove with some slight persuasion, and all works out well. It’s not an exact science, and it’s interesting to experiment with different species. That holly will be nice and white and would take some nice chip decoration if you choose to go that route.
LikeLike
So far so good in the drying and, yes, there was some “slight persuasion” in fitting the bottom. Didn’t want force it (I never have luck with such things …) so I just continued to adjust the fit until it popped into place with a little encouragement. Definitely will be adding chip carving because of the contrast between the bark (which I’ve left on at this point) and the wood … We’ll see! Yes, experimenting is fun – trying pear next so that should be curious …
Dave, thanks again for your blog – your thoughts are always insightful and your work extraordinary.
LikeLike
Pingback: I Split Off More Than I Could Hew | A Riving Home
Pingback: Shrink Tubes | David Fisher, Carving Explorations
Pingback: Shrink Pots with Roy and Peter | David Fisher, Carving Explorations
Why not just use bamboo
LikeLike
Well it seems like that would be way too easy, and I’d miss out on all the joy of carving the hollow! Bamboo certainly is a fascinating material, but I know little about it, and I won’t find any growing around here. I’m sure it was traditionally used for containers of all sorts in its native range.
LikeLike
What do you put in a shrink pot?
LikeLike
Whatever fits! In those without lids, I typically store pencils on a desk, wooden spoons on the kitchen counter, odds and ends in the shop, and so on. With a tight fitting lid, you can store tea, coffee, or anything else.
LikeLike
So you may already know that Jögge is translating his book.
LikeLike
Yes, looking forward to that! Although it is a lot of fun typing phrases into Google Translate.
LikeLike
It is done and published by Lost Art Press: https://lostartpress.com/collections/green-woodworking/products/slojd-in-wood (for future searcher’s reference)
LikeLike
Pingback: The Nydam Quiver – part 2a – The Reverend's Musings
Dave, do you use an in-cannel gouge for the bulk removal or do you find you can get away with using a standard out-cannel gouge?
Thanks a lot!
M
LikeLike
I just use a standard out-cannel gouge and angle the handle in toward the center a bit. An in-cannel gouge makes sense in theory, but I might be concerned about it wanting to dive in toward the outside too much. I don’t have an in-cannel gouge to test that, though.
LikeLike
Fair enough, I’d seen it suggested but might as well try with the standard gouge I already have. Besides, an in-cannel gouge probably wouldn’t get much use in the workshop other than for these.
These pots are beautiful and inspiring, as is the rest of your blog – thanks for sharing your knowledge and process.
LikeLike
Good afternoon.
Please tell me, do shrink pots crack when they dry?
How to dry them properly so that there are no cracks?
I would be very grateful for your advice.
Thanks.
LikeLike
Just read this blog on the shrink boxes. My forest consists mainly of white pine, red and white oak, hickory, sassafras, red maple and dogwood. Which of these would work best? And thanks for your wonderful and inspiring posts.
LikeLike
Glad you’re going to try a shrink box, Tom. Of those, I would recommend the red maple and even the white pine, although you might wish to try experimenting with the others. The dogwood will just be very hard and it tends to move in crazy ways as it dries. The hickory will also be very hard and stringy. The oaks are hard, but I’m more concerned with their ring-porousness that may be prone to splitting in a shrink box. The red maple and the white pine should work well. The red maple will be harder than the pine, of course. Try both of those and see what you think.
LikeLike
Pingback: If You Still Haven’t Made a Shrink Pot | David Fisher, Carving Explorations