I’ve been meaning to mention this for over a week, but my spare moments have been hard to find lately (More news on the home transition coming soon). Fine Woodworking recently announced a new way to access the “Carve a Greenwood Bowl” video workshop we recorded a few years ago. Up until now it was only available with a yearly subscription to FWW online. Now they’ve made it available as a stand-alone workshop for much less. The details can be found here.
Photo by Jon Binzen
The video workshop goes through each step on the way from log to a finished bowl in the style in the photo above, including the carving of the necklace around the rim. Of course, the techniques are transferrable regardless of the design. Thanks to the work of FWW’s Ben Strano and Jeff Roos, it is a beautifully made video with multiple camera angles that really capture the process.
Another bowl-carving video workshop was recorded with Elia Bizzarri. It’s a completely different format than the FWW video. With little (no) editing, it’s an interactive experience between me (in Pennsylvania) and Elia (in North Carolina), with questions from folks participating via Zoom as we recorded. Lots of fun and packed with information and techniques as both of us make the chips fly. The link to that workshop is here at Elia’s site.
Both videos have a lot to offer in different ways. You can read more about them both here.
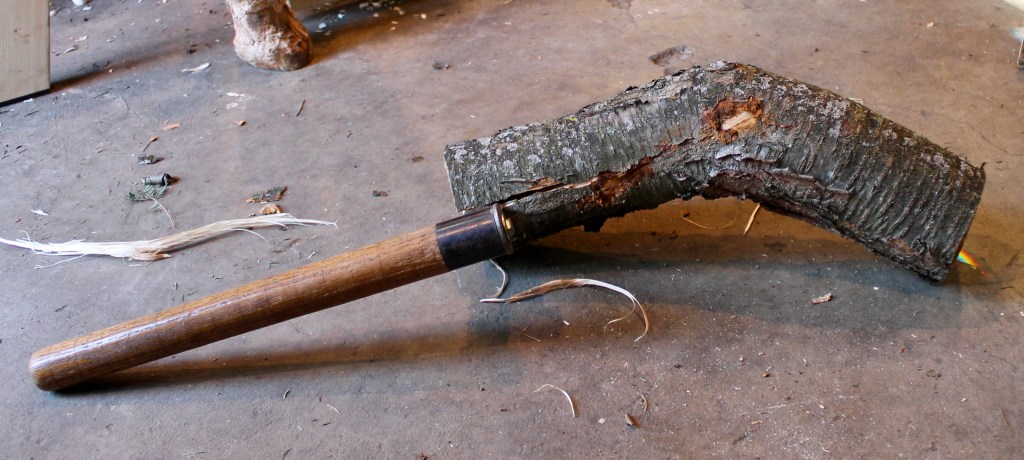
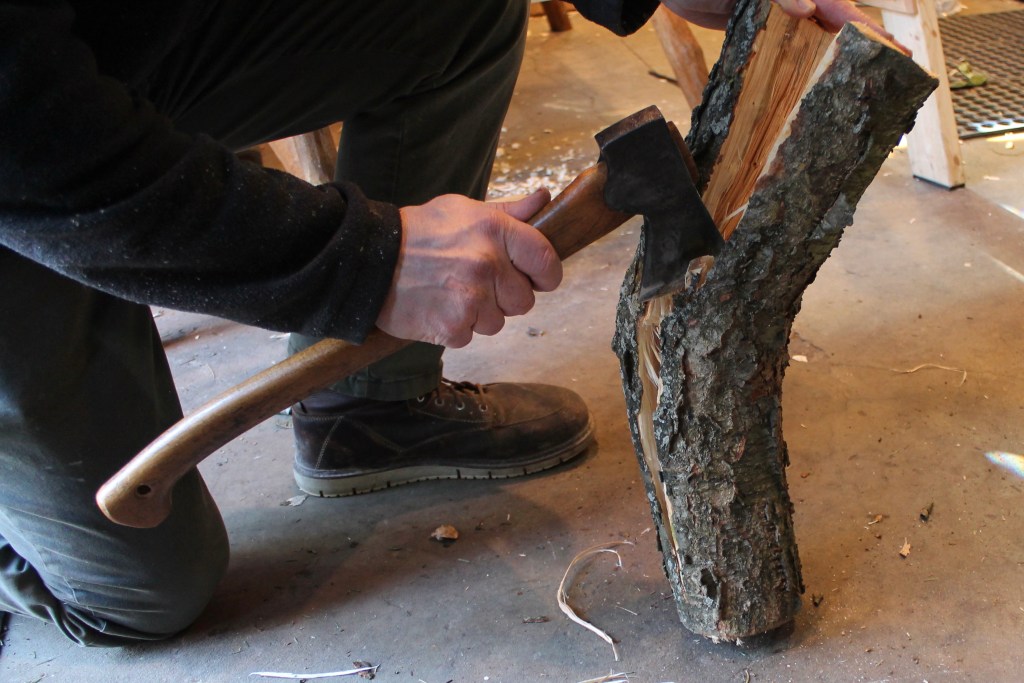
Some cherry branches with nice crooks fell during some recent windstorms. I snapped a few photos while splitting them into spoon blanks to show how I typically go about it. They can be split with an axe or wedge, but I like the leverage that a froe provides. Above, I’ve driven in the froe along a line that approximately divides the branch into two equal halves, usually right at the pith.
Sometimes a crook will pop apart like a piece of straight timber, but they’re usually more resistant. To get some good leverage, I position the crook concave-side-down on the ground or floor, along with the engaged froe.
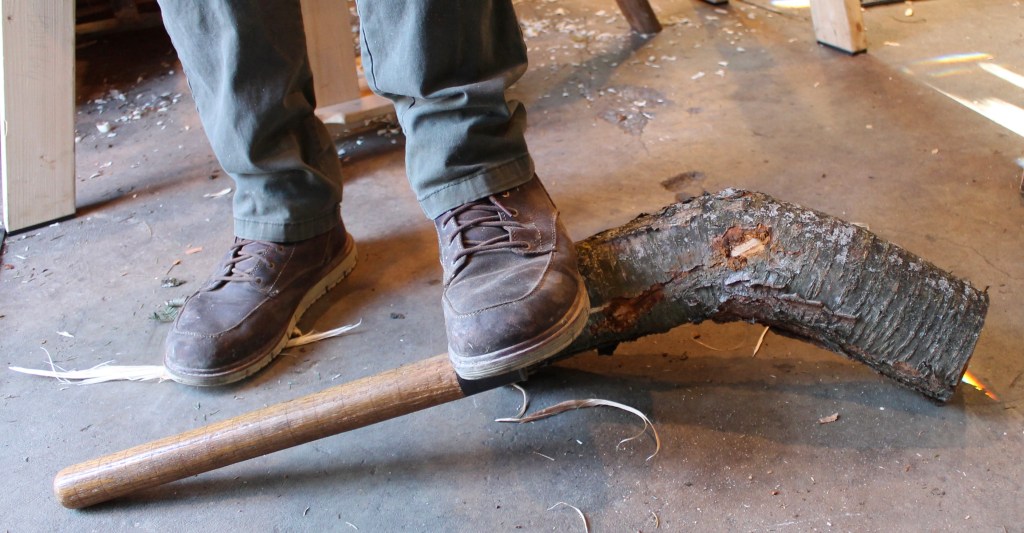
Then I step across both the crook and the angle of the froe with my left foot. The floor and my foot combine to form a sort-of riving brake.
While pushing down with my left foot, I lift the handle of the froe. The froe blade rotates and begins to pry open the crook.
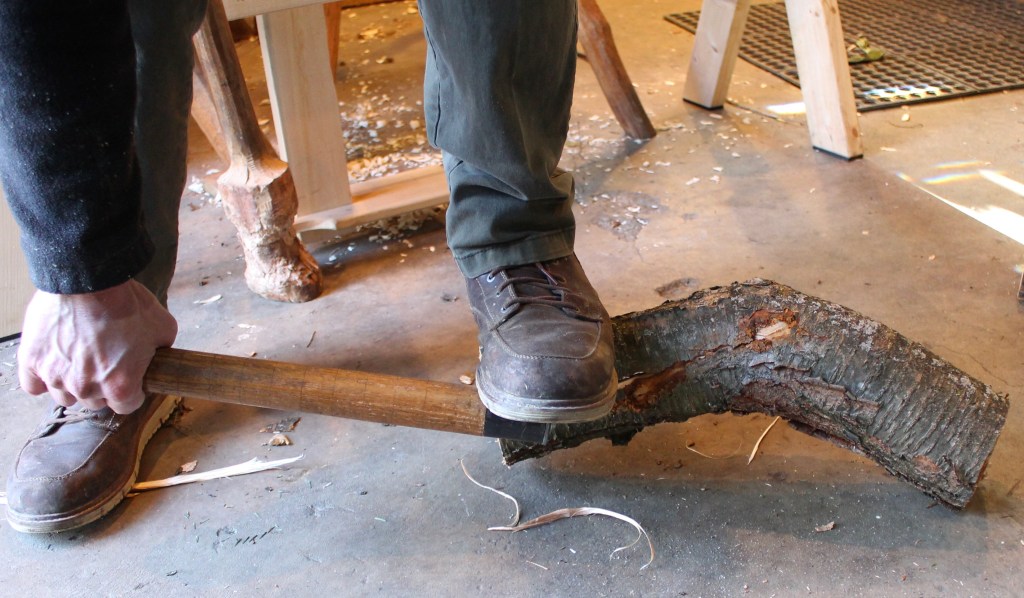
As the froe handle swings further up, the split opens up wider and further, following the fibers. You can shave the bark off of the sides before beginning the split to see things better, but I rarely bother.
If the crook still needs more persuasion, I can slide the blade of the froe further down and repeat the procedure. In the photo above, this has been done. The most stubborn fibers tend to be right around the bend itself; there they are just ahead of the froe, keeping the two halves from separating completely.
Often I know which end of the crook will be the handle of the spoon, and which the bowl, before splitting. In this case, I wanted to see how it split first, so I left the piece long enough for a handle to both sides of the bend. I decided to use the left bit for the handle, and I cut off the right side around the red line. As with most crooks, the upper side, on the outside of the bend, includes a broken branch-end within (which resulted in the tree following a side branch for growth), and isn’t typically useable for a spoon.
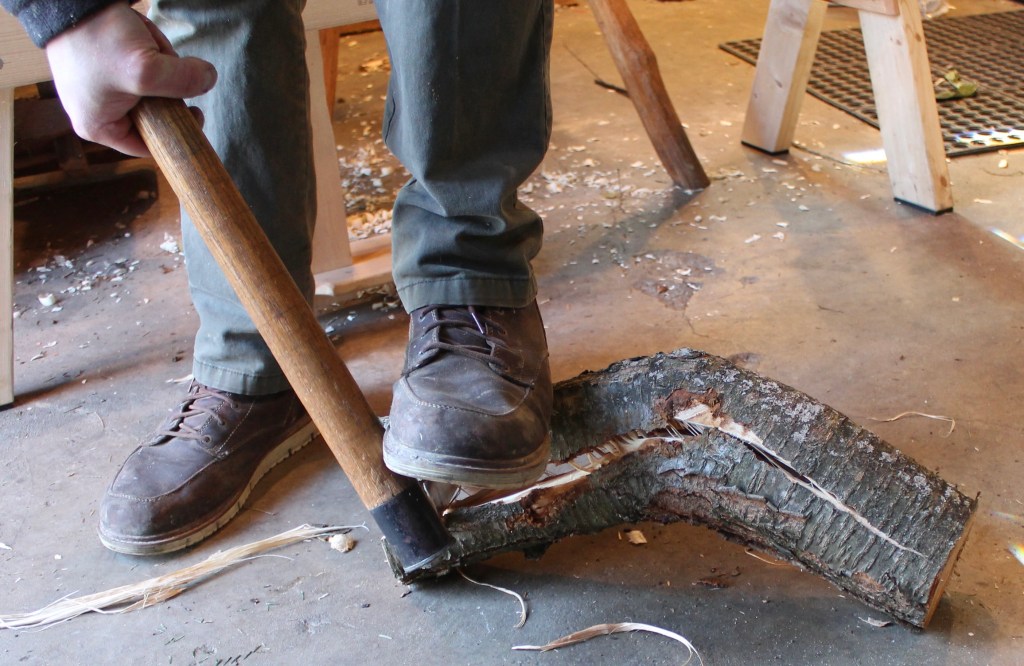
I sever the connecting fibers with some light axe strokes.
Often, I can get two spoon blanks from the crook half by splitting it again. I divide the surface area of the end grain approximately in half with the froe, parallel to the original split. I drive the froe in with a sharp blow of the club, then I can usually just pop it open while it’s upright.
Here are the two serving spoons roughed out of those two blanks, situated as they were in the crook. I axe them out and do some basic knife work while they’re green, taking them to this stage. I’ll come back to them after a day or two (or after a month or two) to do the final carving.
Here’s another cherry crook from the same windstorm, a real beauty. I split this one in the same way.
And there’s the ladle it provided. I’ll finish carving this one and some others in between house projects. Lots happening now at the point of transition.
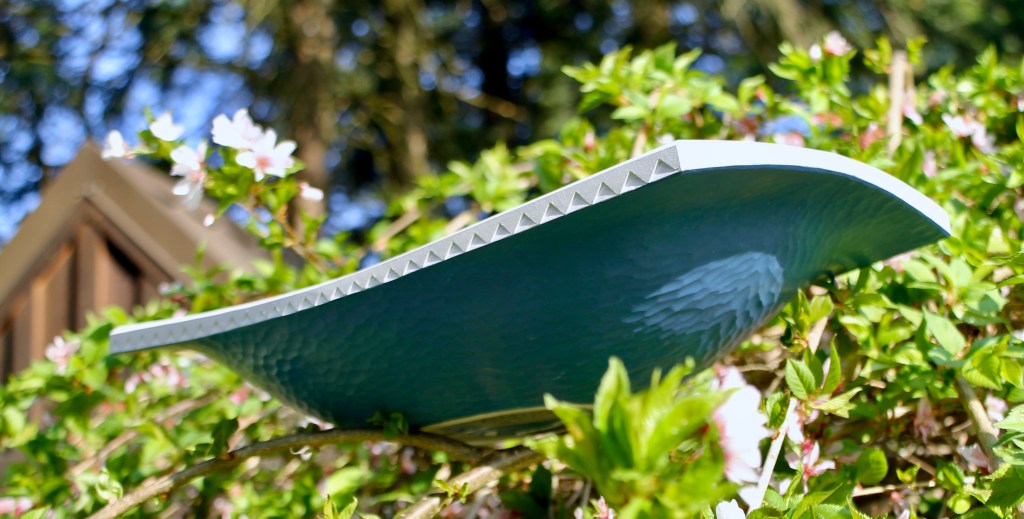
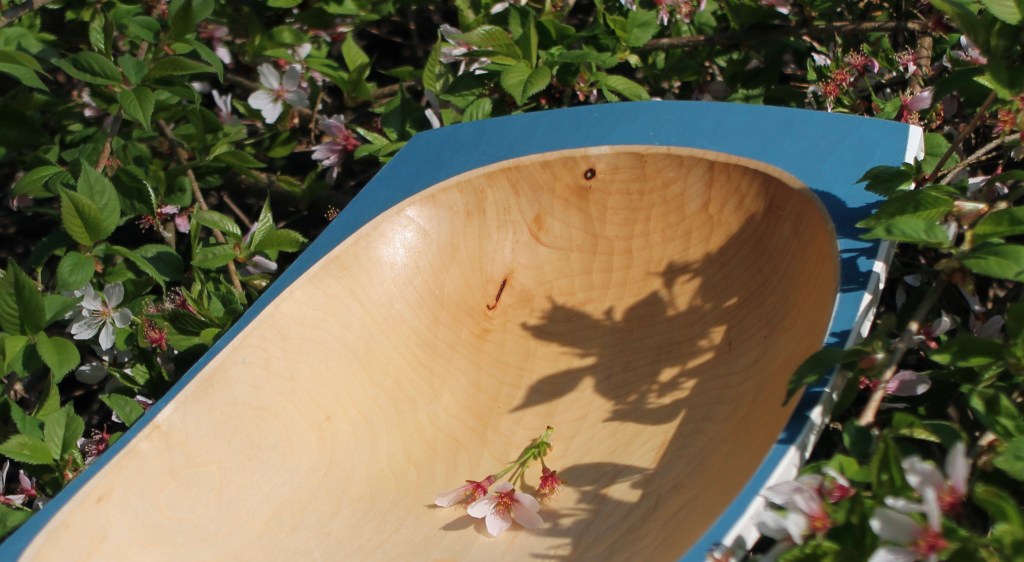
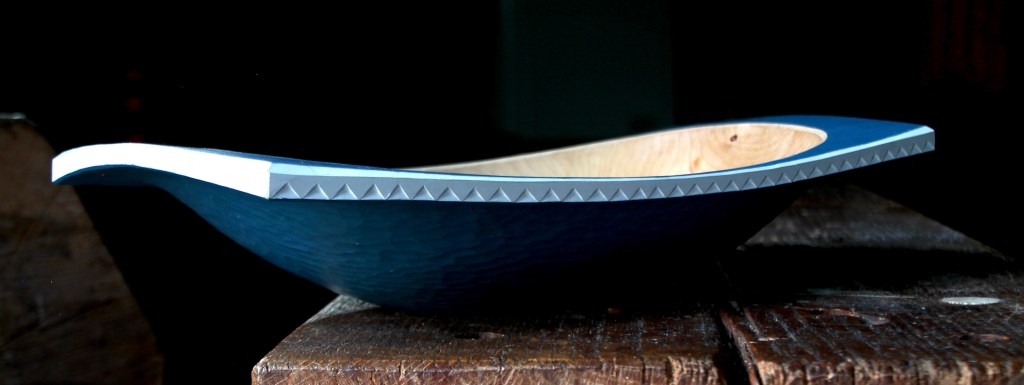
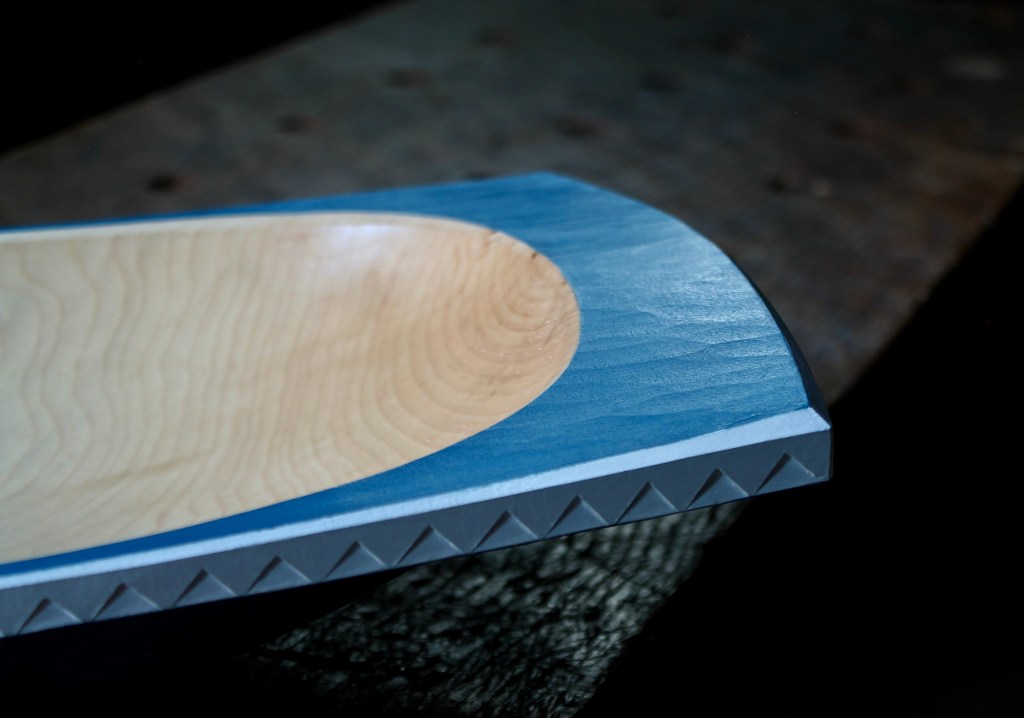
As I was carving this maple bowl with thoughts of spring on my mind, I decided to brighten it up with some color. I had been reading about kingfishers, learning more about the ones I watch around here — belted kingfishers. Why not let the bird inspire the colors for the bowl?
With that in mind, I carved an outline of a kingfisher into the foot of the bowl, then got out some artist oils (which are a mix of linseed oil and pigment). I did a ground coat of white, and let it dry for a few days. Then I went over that on the top and bottom with the blue shade, leaving the edges of the rim and handles white. As the paint wears over the years, hints of white will peak through the blue here and there.
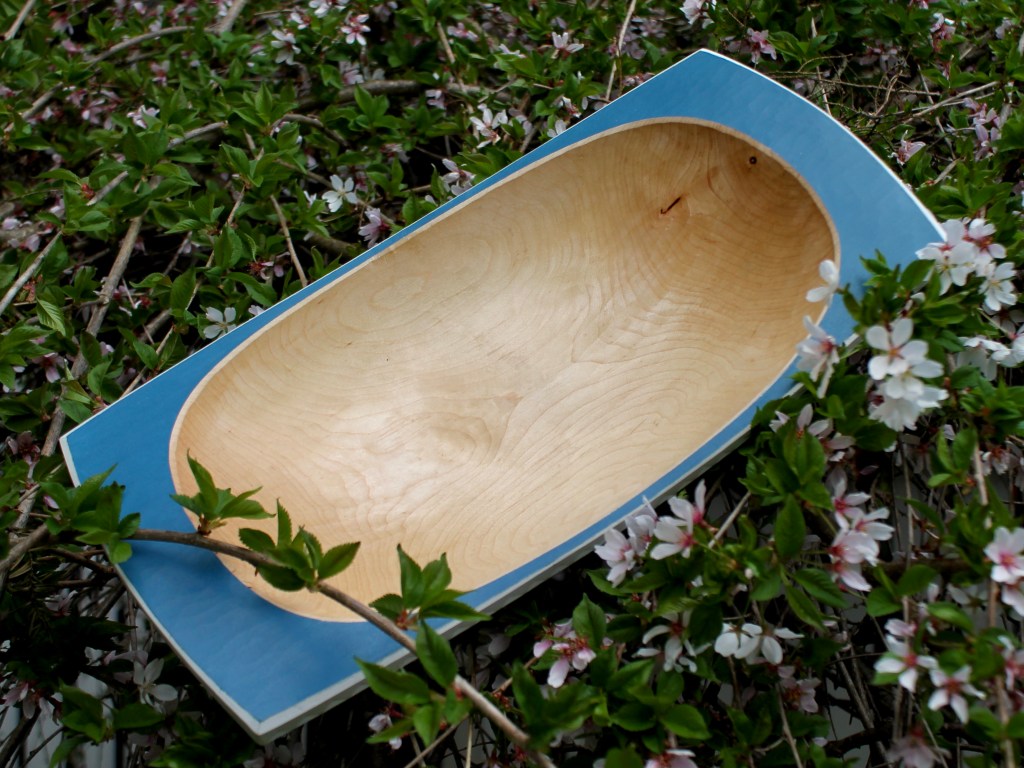
Color like this is tricky to photograph; it changes so much depending on the characteristics of the light. I took some photos of the bowl this morning in our little cherry tree, full of spring blossoms now.
In the more subdued light of the workshop, the color seems to deepen.
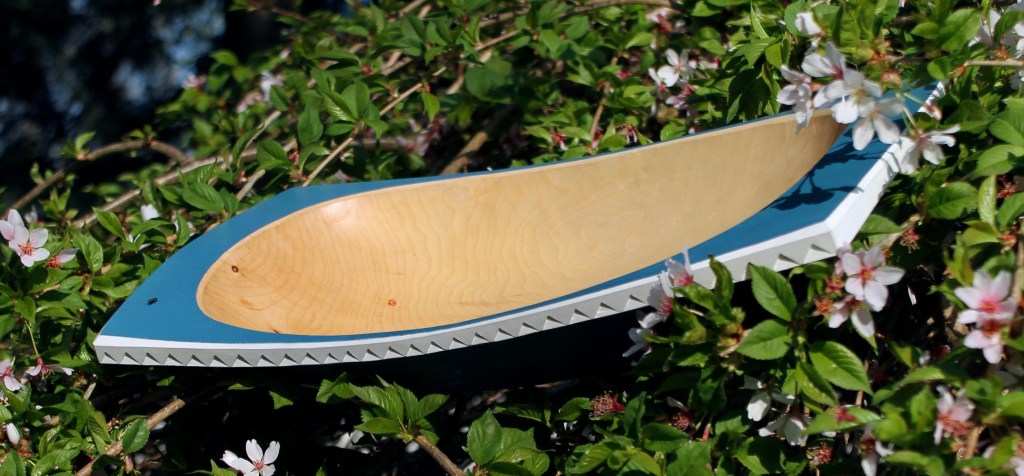
And these last two from the cherry tree again, but in the evening light.
This bowl is available for purchase. The hollow has been treated with linseed oil and is ready for use. The dimensions are 16″ long, 8″ wide, and 3 1/4″ high. $625 includes shipping. Email me at dandkfish@gmail.com if you’re interested. Update: SOLD
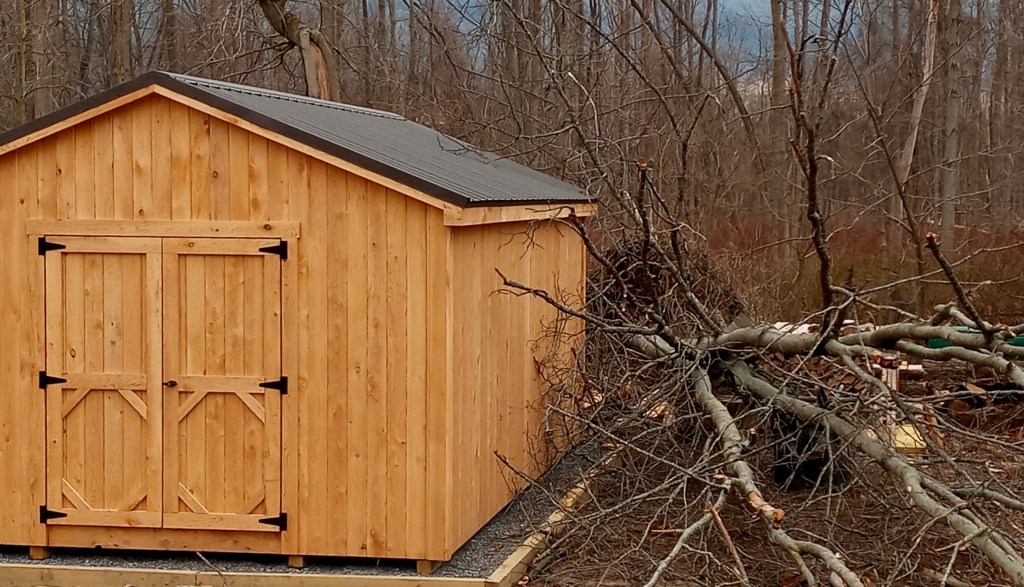
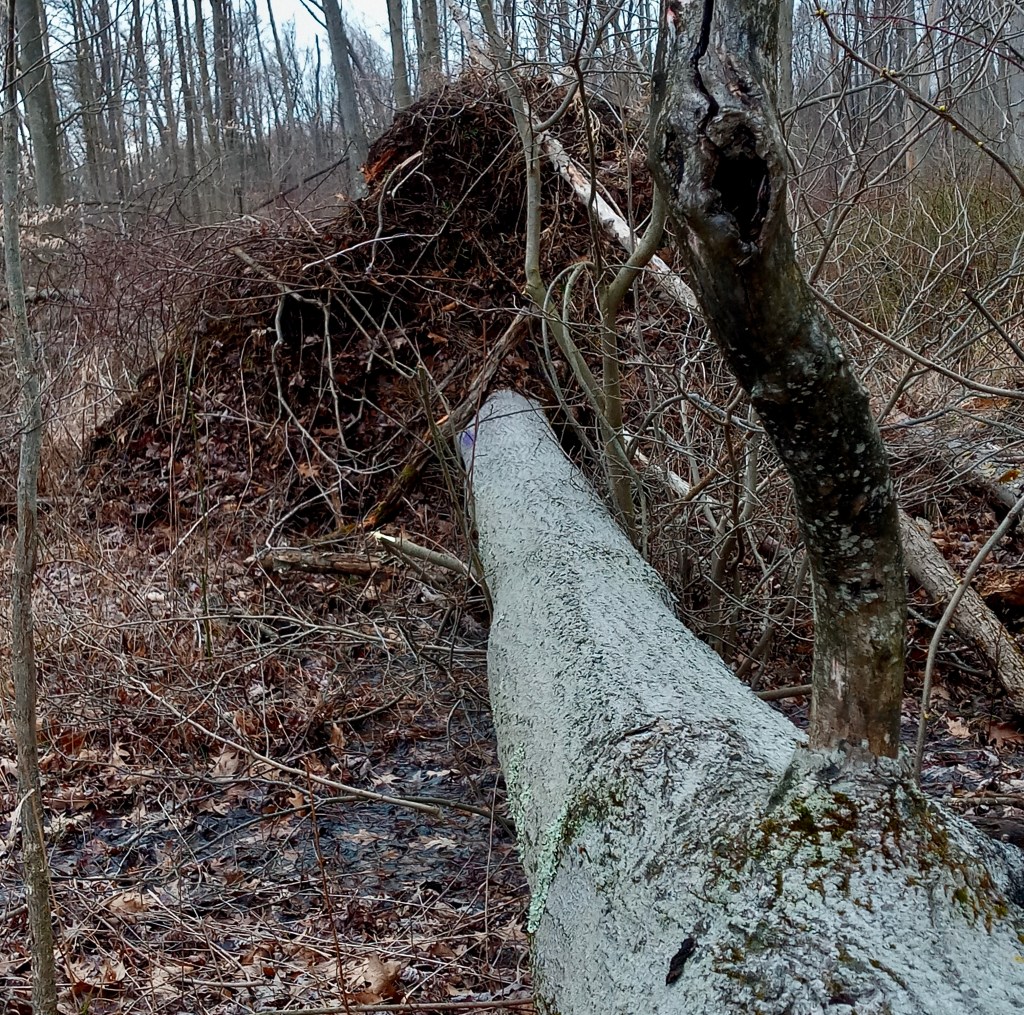
Close one! An uprooted maple tree beside the new shed.
High winds blew over a lot of trees in our area in two separate episodes recently. The tall maple in the photo stood strong in round one but was toppled in the second. Fortunately, it missed the shed — just. However, it did strike a direct blow on the wheelbarrow. It’s under there somewhere.
The shed, made by a craftsman, Edward, up the road, was constructed from local hemlock lumber sawn by his brother. No time for me to do it, and it’s a solid shed with windows on the opposite side. I’ve already got boards and other bits of wood stored in there, along with garden tools and other gear.
I’ve cut up the upper parts of the tree, but there may be some useful woodworking wood in the lower trunk section. It’s out of the way and up off the ground. I’ll leave it there for now.
Most of the limbs and branches will join the firewood that I’ll be restacking
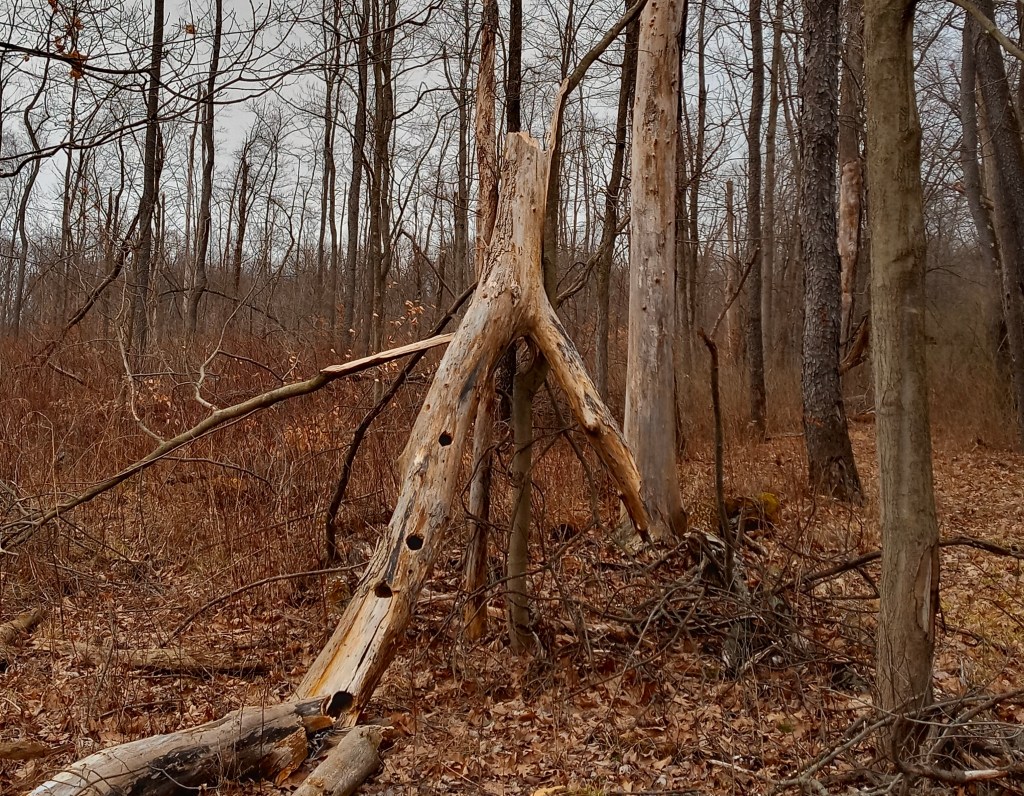
In the neighboring woods, there were plenty of other windfalls, including some nice green cherry branches that I’ll be able to use. The tree above is anything but green, and I felt bad for the woodpeckers when I saw it. More work for them this spring I guess. I was exploring the old nest cavities a bit when a piece on the ground caught my eye.
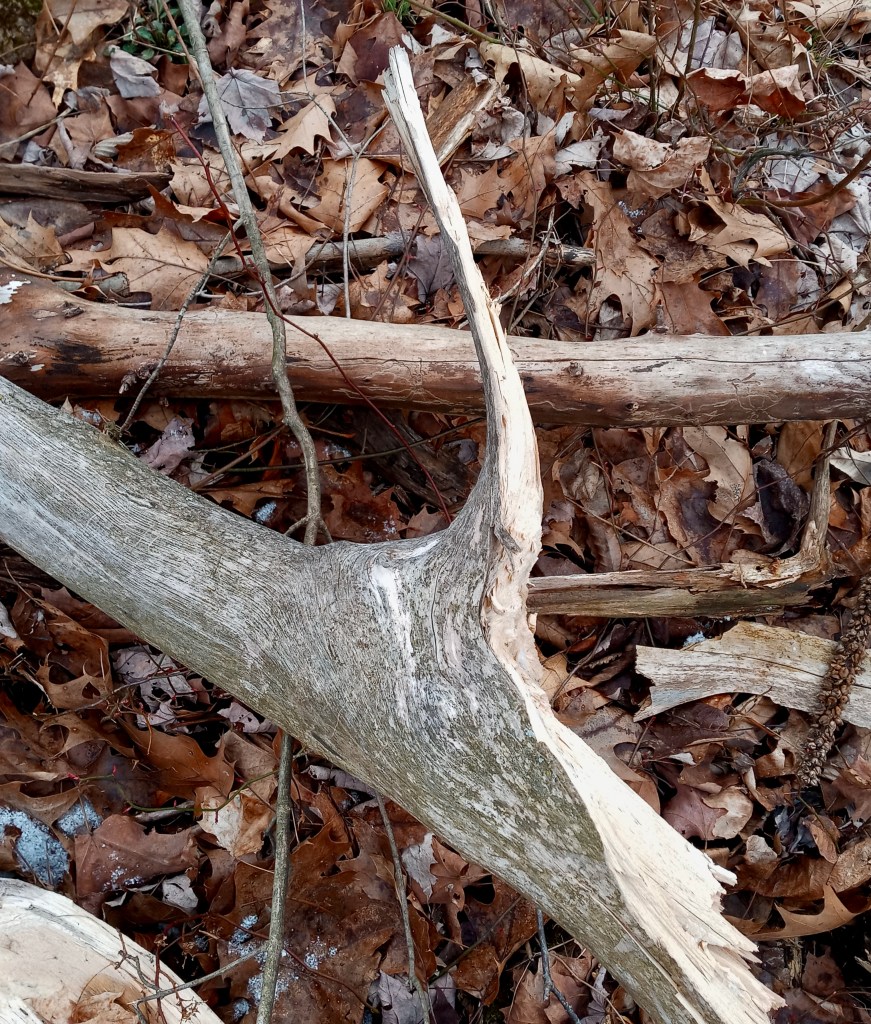
This chunk snapped off when it hit the ground. I think there may be some sort of a bird in there.
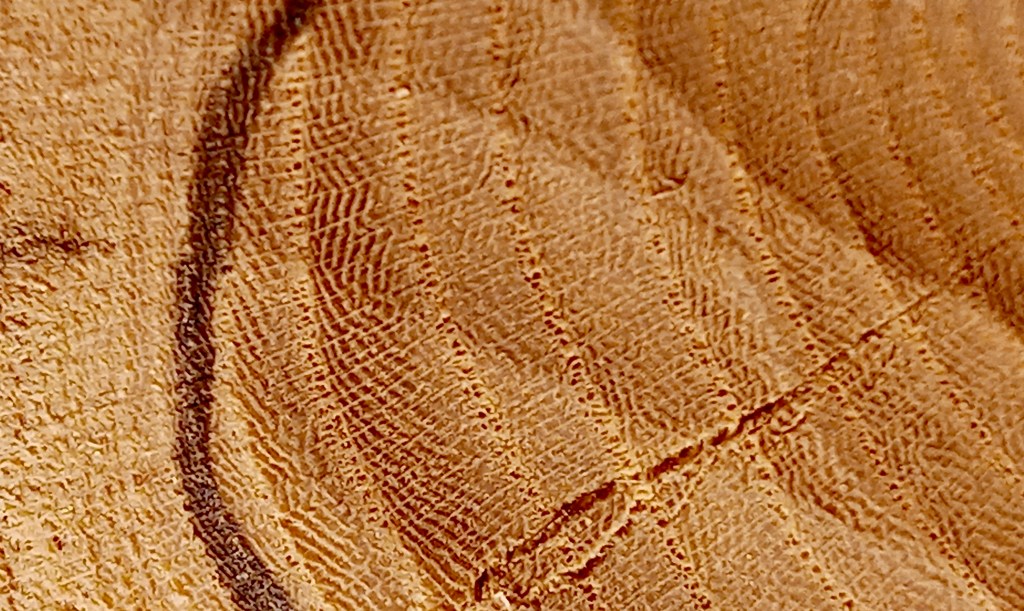
The wood of that piece is surprisingly solid. I’m sure it has been standing dead for at least a few years. I cut across some of the end grain with a sharp gouge to help identify the species. R. Bruce Hoadley’s classic bookIdentifying Wood can be very helpful with excellent photos and detailed descriptions. So, I got out my copy and confirmed (I think!) that this is American Elm. Notice the latewood pores arranged in thin wavy bands. This is most clear in the photo within that darker growth ring a little to the right of my dark pencil line.
Anyway, I’ve got this bit of elm in the shop now where I can see it and think a bit more before digging in sometime. Some other pieces to finish up first, and soon.
After I cut up the upper part of the tree, it became clear that my old wheelbarrow might need a major chiropractic adjustment. It had was leaning upside down over the edge of my outdoor workbench. The workbench is still solid. I couldn’t help but think of William Carlos Williams. So, this is just to say that
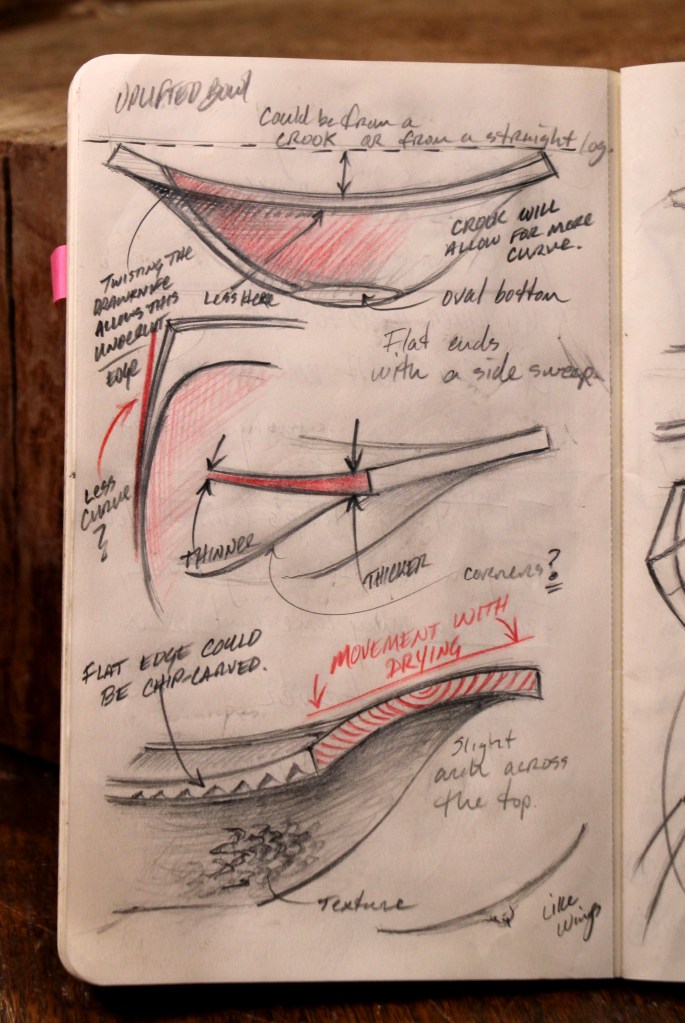
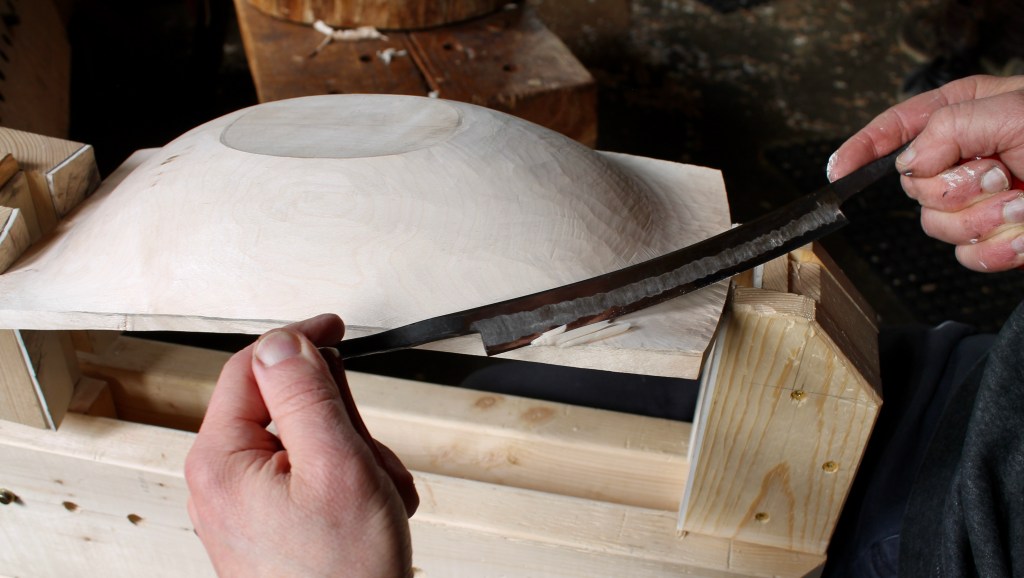
I began sketching an idea on this page of my notebook last September, then added a bit here and there since then. Nothing revolutionary, just some thoughts on a design with rising ends and an underside that goes from convex to concave all around. This concavity defines the lower edge of the tapering band just below the rim. Sketches like this serve to help sort out my thoughts and remind me of what I was thinking later on.
There’s a note on the upper-left that reads “Twisting the drawknife allows this undercut edge.” That description is clear as mud, but it worked out once I had a chance to carve one of these bowls. I took a few photos of the drawknife in action and they captured a lot of skewing and slicing.
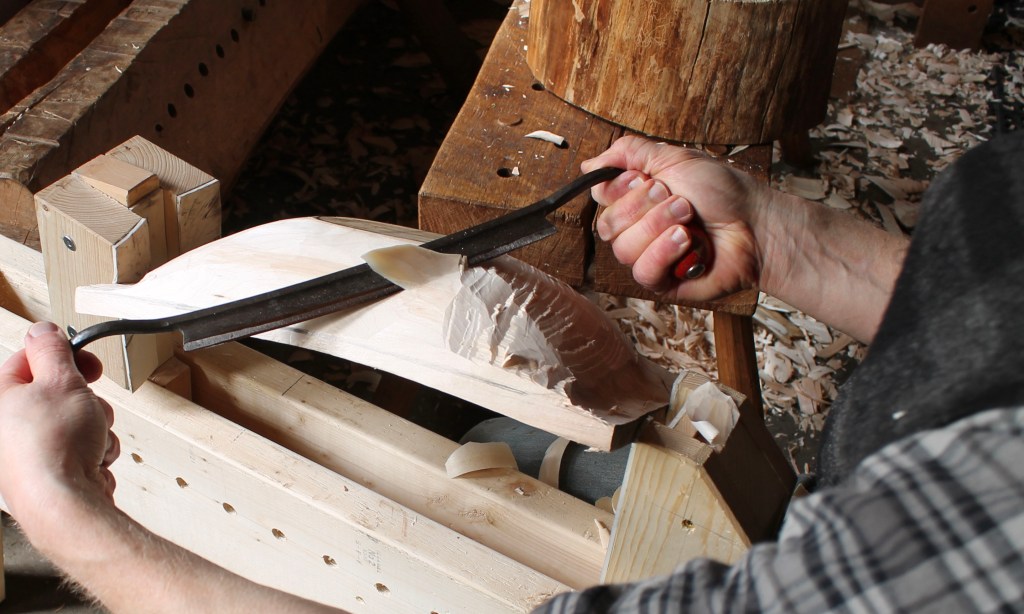
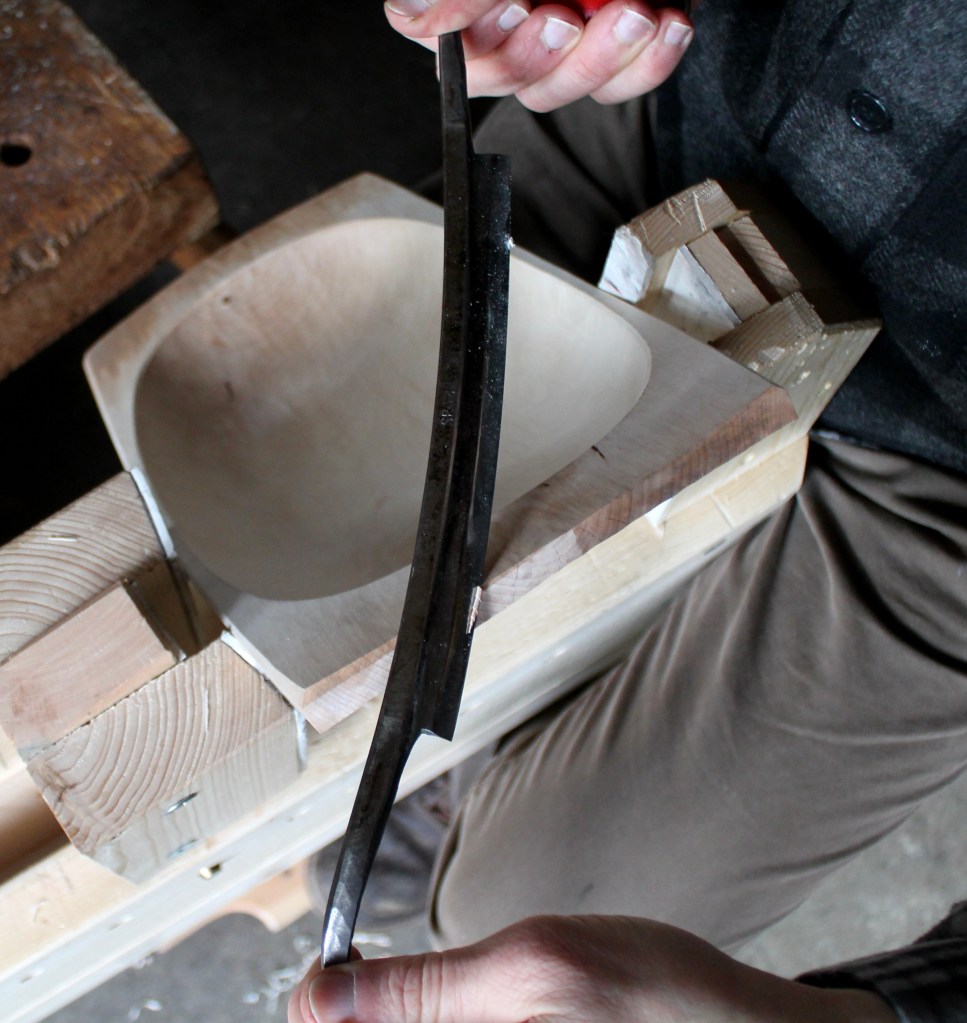
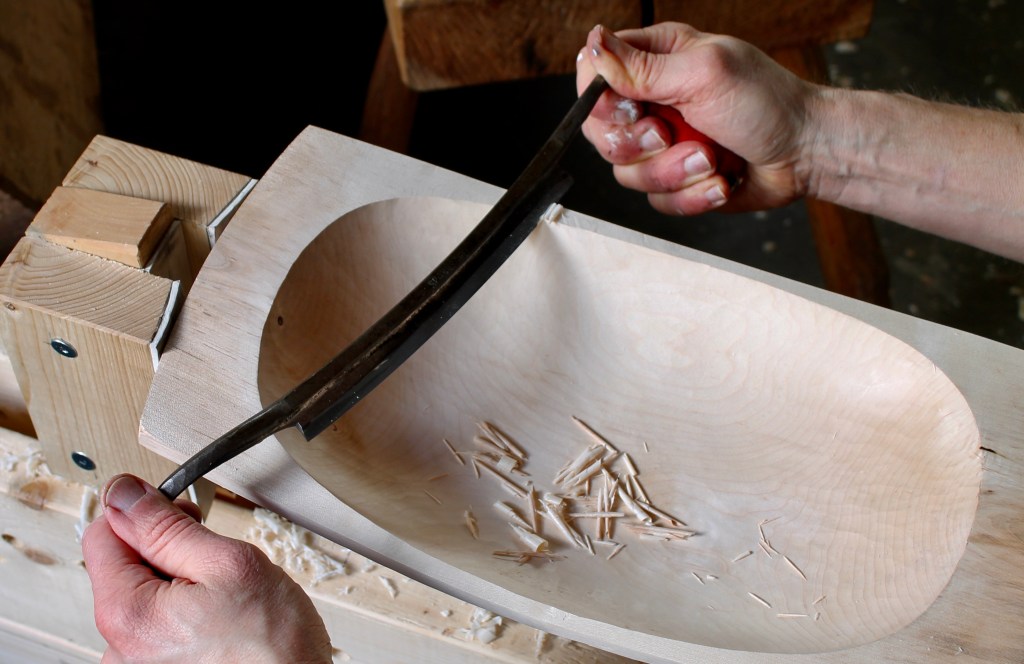
Above, I’m using a drawknife to hog away material after the axe work on the exterior. Notice the drawknife is skewed a bit for a more effective slicing cut.
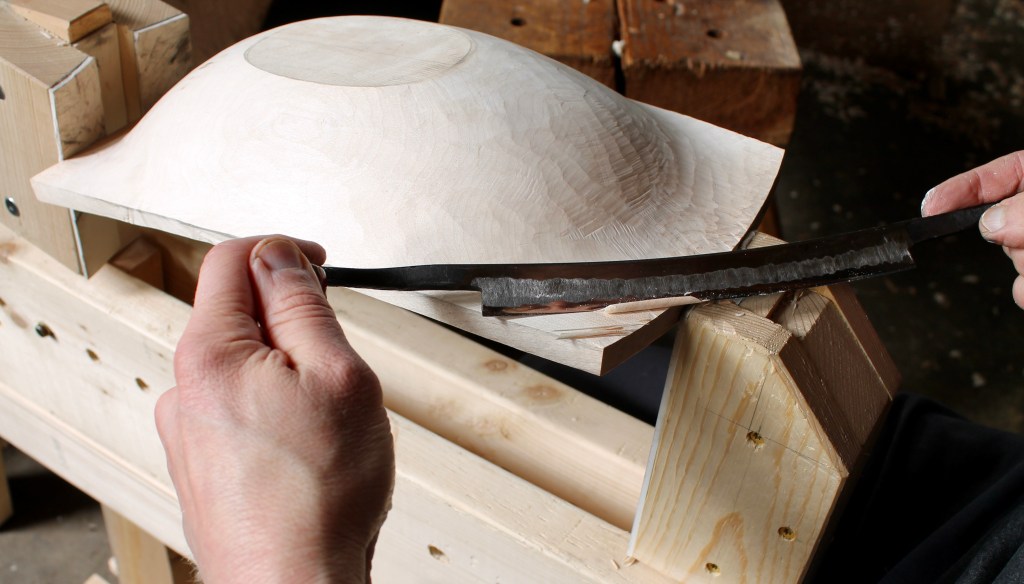
In this area under the corner of the handle, I needed to remove a lot of material. I used a series of short repeated cuts while sliding the edge to the right to create a slicing cut. I keep my right elbow and forearm tight to my body for control and to “put on the brakes”, so to speak. It’s so pleasant to carve with a drawknife like this, especially when the wood is green.
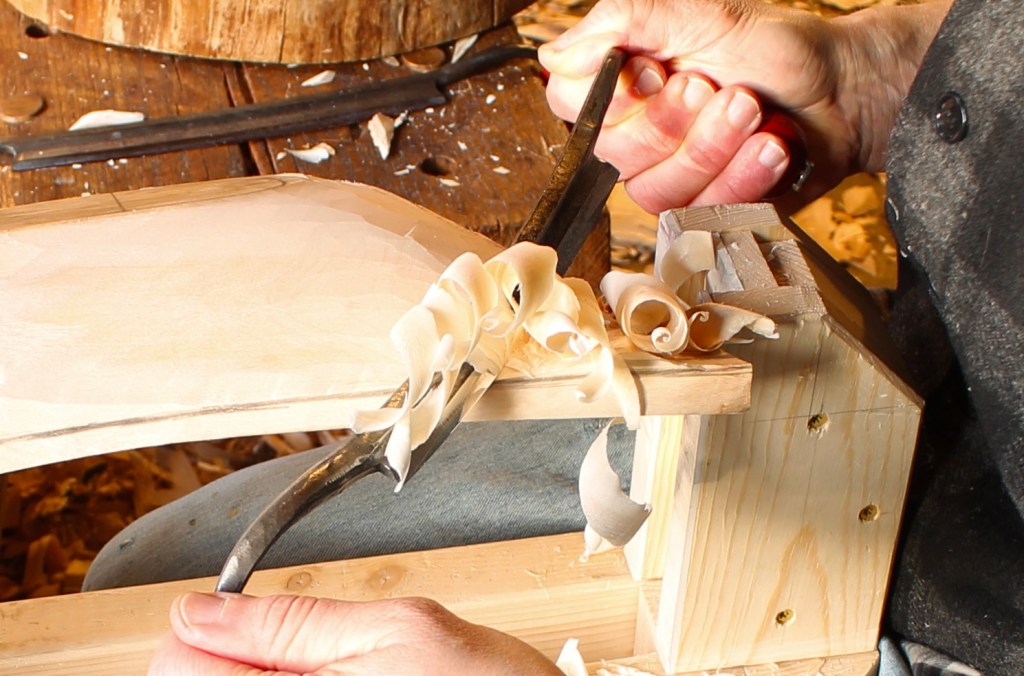
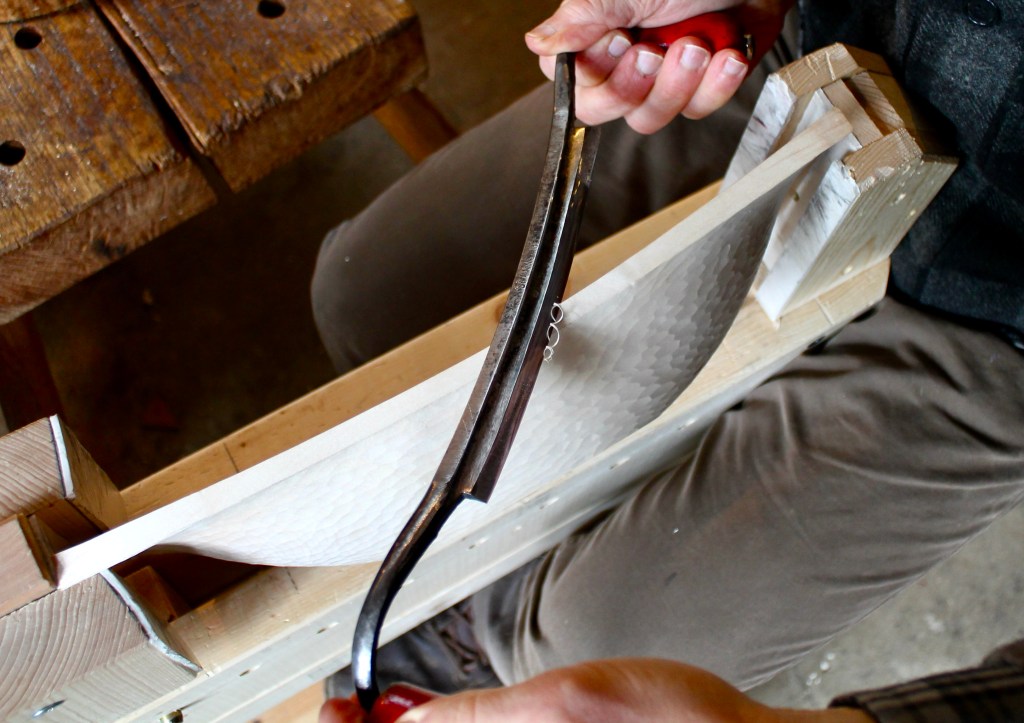
After the bowl was dry, I planed the bottom flat, then used a spokeshave to fair the convex portion closer to the foot. I transitioned into the concave portion down to the rim with the drawknife. The spiraling form of the curls results from the skewed slicing cut. The drawkife is moving toward me (the right side of the photo) as my right hand also pivots toward the rim.
As I proceed toward the corner, the hollow gets a little tighter, so I’ve flipped the knife over to work bevel-down.
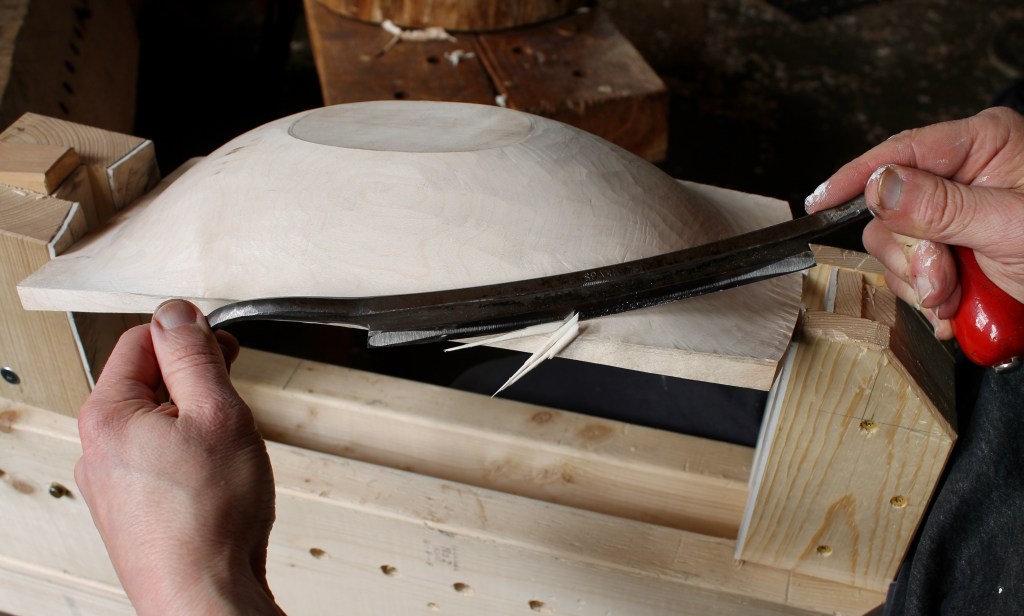
I was able to work through most of the hollow under the handle as well, right out over the edge.
As the bowl dried, handles were drawn up into a gentle arch. Light passes with the drawknife shapes the curve a bit and leaves a new, clean, surface. I’m working toward the hollow in order to go with the grain of this piece.
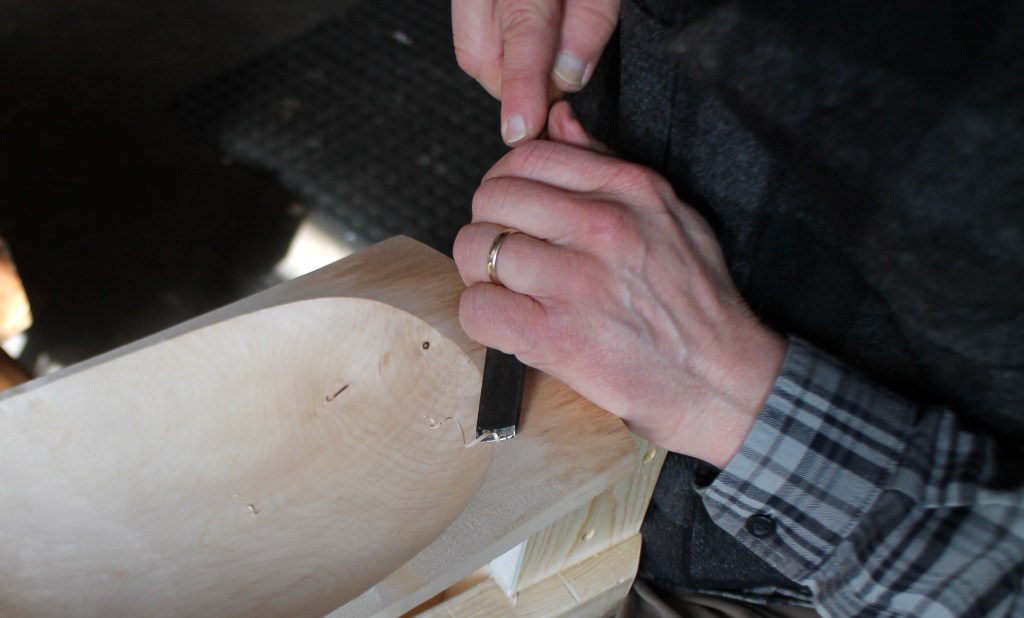
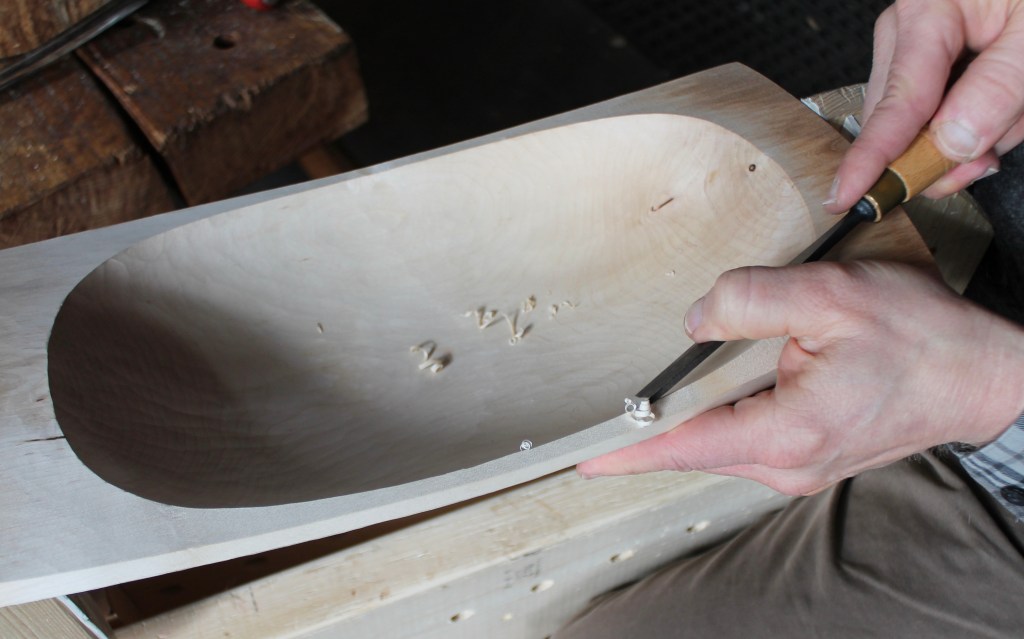
With just about all else done, I move on to the chamfering of sharp edges. These chamfers are not only practical, they create faces that catch light and shadow to define the shapes. I use different tools to make them, depending on the situation. Could be a sloyd knife, spokeshave, drawknife….here I’m using a flat carving chisel, riding the bevel as I move forward around the curve of the hollow.
I’ll stop about halfway across or wherever I feel the grain begin to reverse on me.
Above, I’m back to the drawknife, cutting the chamfer in the end grain of the handle. I skew the cutting edge to push the fibers towards the supporting wood beneath them.
The chamfer on the outer edge tapers from wider at the end to narrower at the middle. The drawknife allows full visibility to judge the depth of cut.
With the bowl flipped up more, you can catch a bit of the carved surface texture (from a gouge) on the underside of the bowl. Also the sweep of the top on this attempt is much more subtle than the original sketch. It would have been ready for oil, but I’m trying something a bit different with this one. It may not work out. We’ll see. There’s always more logs!
This evening, I was alerted by a bowl horse builder of a typo in the materials list portion of the plans. The swing arm length is correctly labeled at 31 1/2″ everywhere else on the plans, but in the materials list, it is was marked at 21 1/2″. I had missed it, but Jeff Lefkowitz has already fixed my error and I’ve updated the PDF at the Bowl Horse Plans page. I apologize if the digit mix-up left you short.
It seems like any glitches with the ordering system have been worked out, but if you have any trouble at all, or would just prefer to use PayPal, just email me at dandkfish@gmail.com. I’ll set you up with the plans right away.
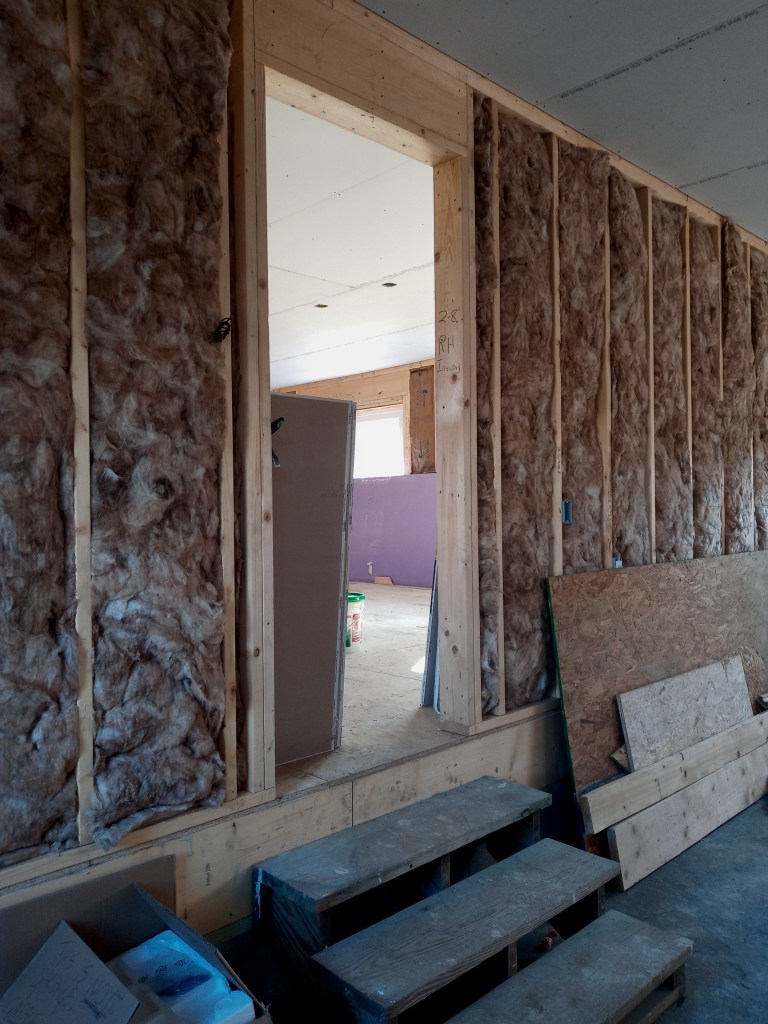
In my future workshop looking into our future home.
The house project has been progressing in spite of the typical delays and hiccups. It has been inspiring to meet and watch the many skilled tradespersons working on the project. From the framers, to the electrician, to the HVAC pros, they all have demonstrated great expertise and tremendous pride in their work. I’ll be dragging guests to the basement to check out Robert’s meticulous wiring runs.
As you might expect, the workshop situation at the new place crossed my mind while we were planning. Kristin and I considered all sorts of scenarios, including the possibility of me building a small workshop apart from the house. Ultimately, we decided that the attached two-car garage would be the workshop. That decision was based partly on practical simplicity but, also, on what has worked for us already.
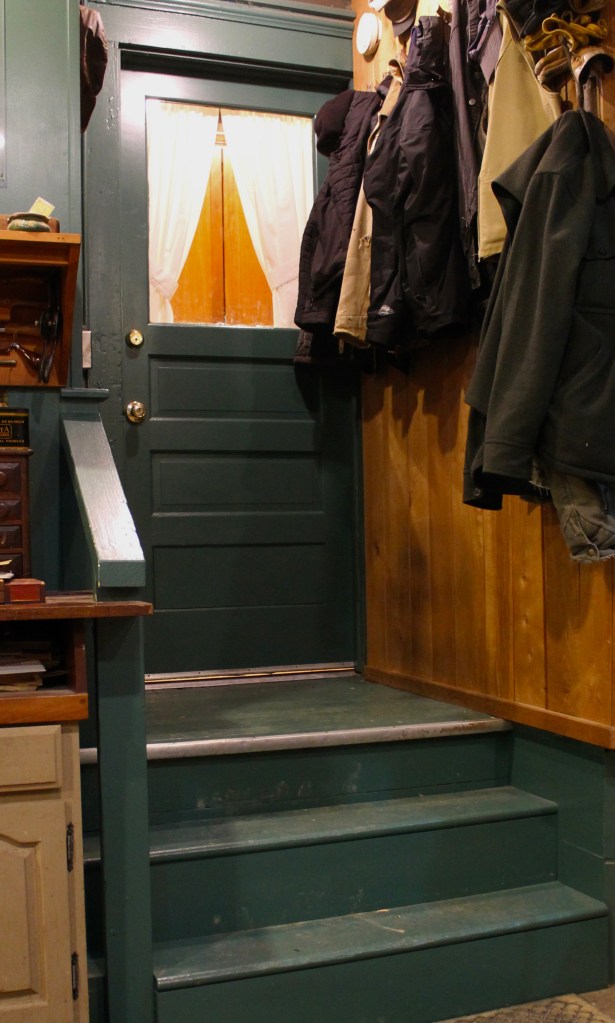
In my present workshop looking into our present home.
Our one-car attached garage has been my workshop for the last 27 years. It has worked well for me and it’s what I’m used to. Much of my workshop time necessarily occurs in small bursts of time, so it’s nice to step right out of the kitchen and into the shop. Three large-enough windows have allowed in a fair amount of natural light. It has also served as a transition area/mudroom from outside into the house.
The new shop will be larger (absent of two theoretical cars instead of one), but still attached, with a place for everyone to kick off their shoes and hang their coats. A few good windows will let in natural light, and, for most of the year, the large garage door will open up the shop to the outside.
I’ll build in some bookshelves, tool storage, and all that. I’ll sort out the details later. Meanwhile, I’ll be able to work just fine with a bench and my bowl horse. The bowl horse and low bench can be moved around easily, but I’ve been thinking a lot about the workbench location.
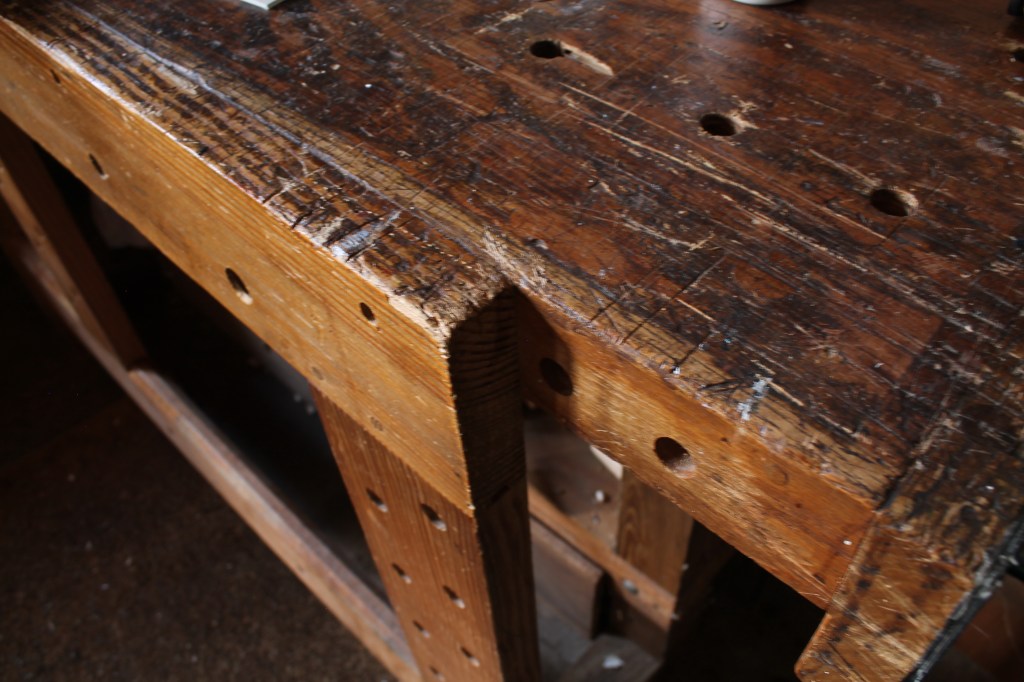
I built my workbench 27 years ago. It began with a simple framework of construction lumber and a 2×4 ledger board lag-bolted to the wall studs. I ripped two sheets of 3/4″ plywood in half lengthwise, then screwed and glued them, one-by-one, to the frame beneath and then to the layer below as the layer cake rose up. It sort of grew organically from there as my methods and work evolved. More holdfast holes, extended vise jaws, and a face frame to expand the edge-holding possibilities.
I know there are many other workbench options, but I’m taking this one with me. It works for me and I can’t bear to leave it behind. I know a lot of folks prefer to have a free-standing bench that allows access all around, but, after considering adapting this one with back legs, I plan to attach mine to the new wall, much as it has been attached to the old wall. The only difference is that the left end will be accessible instead of trapped in a corner.
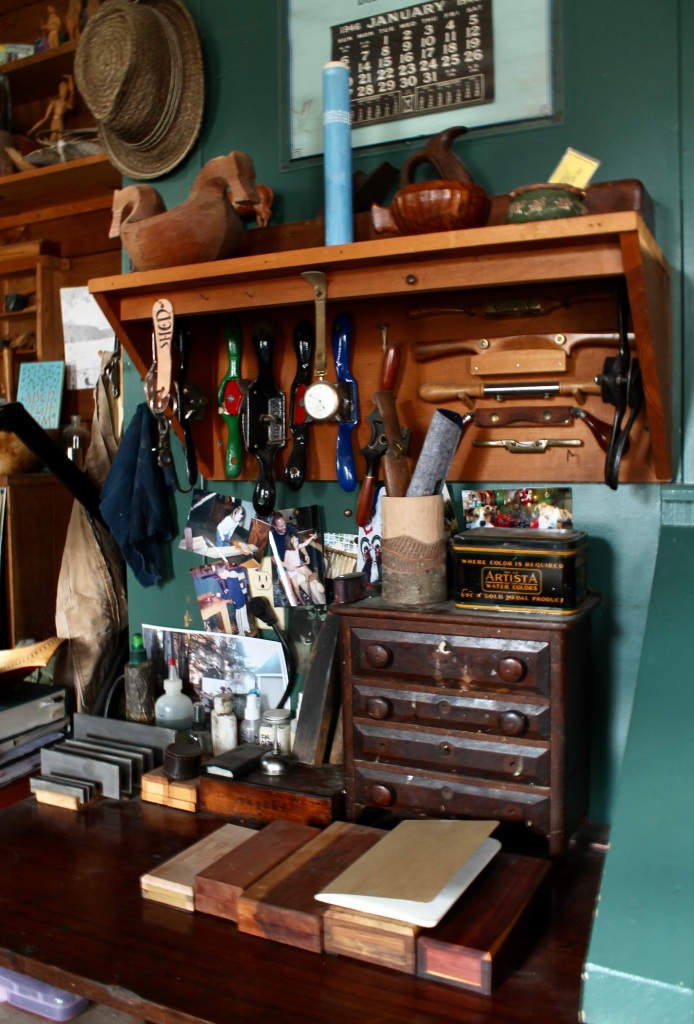
One of my reasons for attaching it to the wall is stability. The bench simply doesn’t move, even with heavy or sudden pressure. Also, I’ve gotten used to having many of my tools in easy reach on the wall behind and beside the bench. I think I’ll arrange things similarly, although I will have two windows just above the bench.
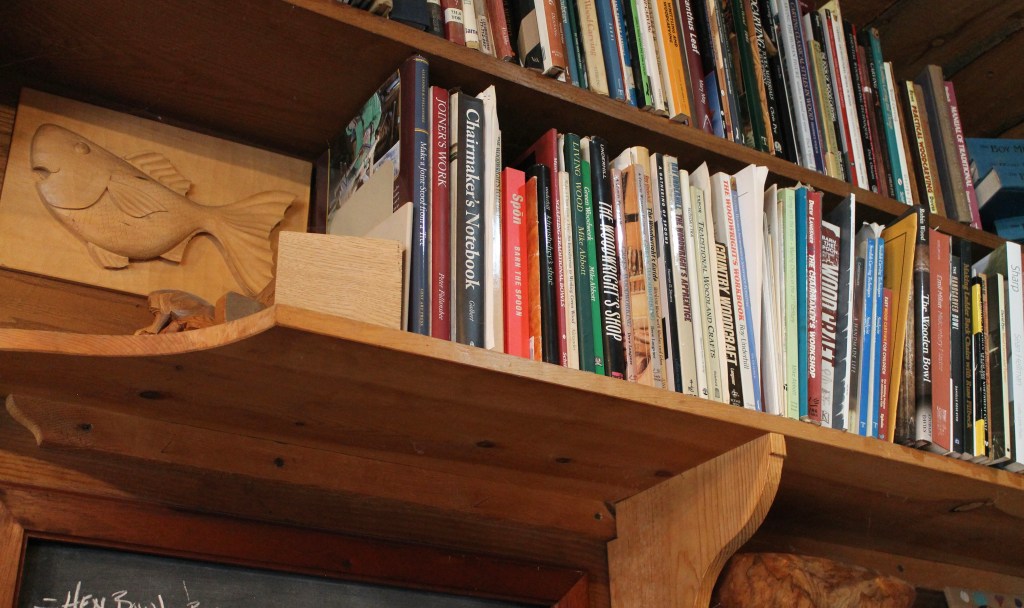
That upper shelf in the current workshop runs around the room and is incorporated with the boards lining the wall itself, so it, and much of the shop, will stay. But many things will be coming with me: shelving units (including the one holding the planes), wooden boxes, chests, cabinets, hooks, stools, horses, racks, and more.
Book shelves will be important. I’m thinking about putting doors on the shelves to keep the dust out. Ideas are welcome!
Shelves like the one above my sharpening area will be relatively easy to transfer.
I like the way narrow shelves, like this one from a branch crook, catch the light coming in windows. Things like these will re-attach in the new shop.
The view will be new. Here’s a look at a little grove of aspens from the north wall window of the new shop.
Meanwhile, things are busy for now, but I’ll still have some time over the next couple months to work in this shop. Maybe I’ll even finish this bowl over the weekend.
Following a couple recent posts on carving a sign in white oak, here and here, there were some questions about how I carved the leaves. Below are two photos of the leaves before and after painting. I’ll expand on my general explanation with this post.
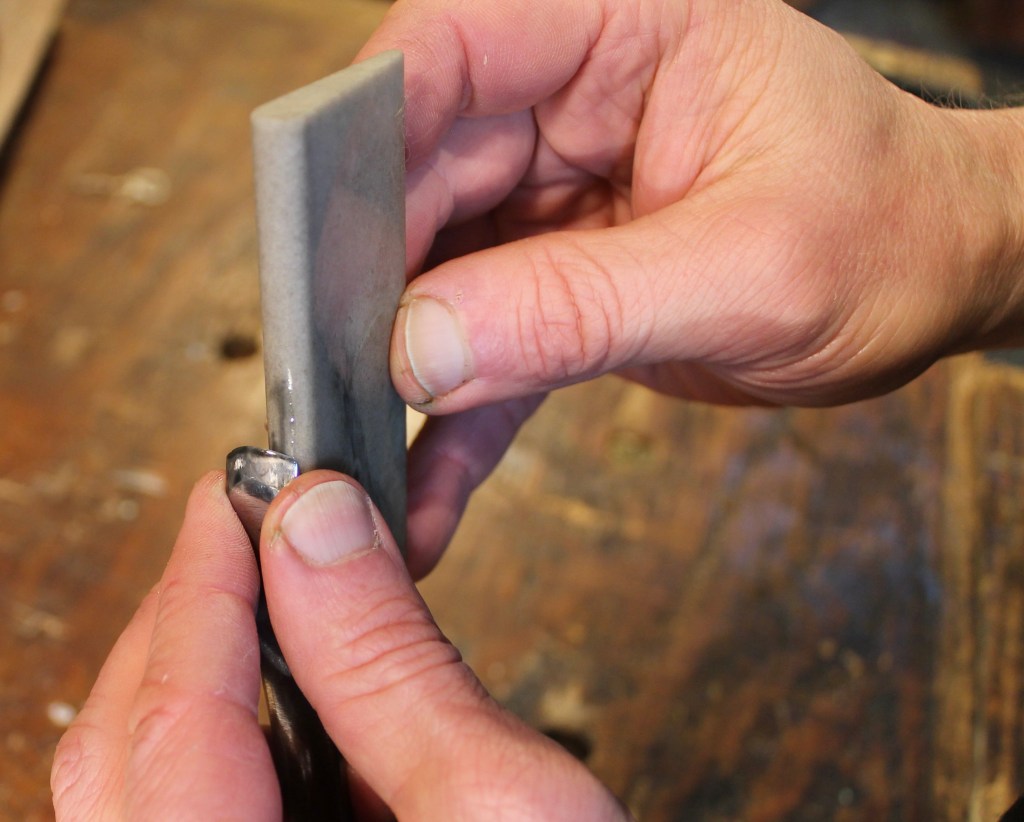
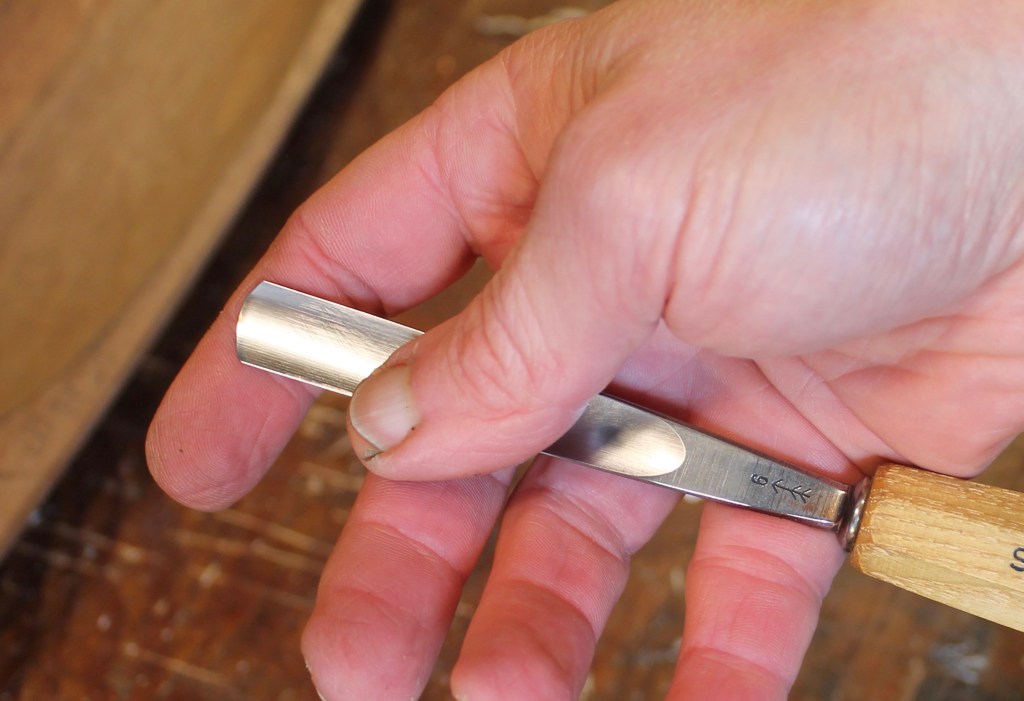
For smaller leaves in softer wood, like those on the alphabet boards in this post, I use a knife. Leaves like these in white oak call for a gouge. I’ll demonstrate with a #6 14mm (9/16″) gouge, and a utility knife for the stem. As you may have noticed in the lead photo, the shapes of both have been modified. The gouge has a cambered or bullnose shape across the edge, with the corners drawn back. This is the key for carving these incised almond shapes without the corners marring the opposite side.
I keep a few gouges sharpened like this because they can come in handy for other situations too, including letter carving. Otherwise, my gouges are sharpened straight across with, theoretically, sharp crisp corners.
I just eyeball the radius, rather than measuring, but you could use a circle template to trace a line in Sharpie onto the tool. Measuring this particular tool now, the edge is an arc of a 3/4″ (19mm) circle, so a 3/8″ (9.5mm) radius.
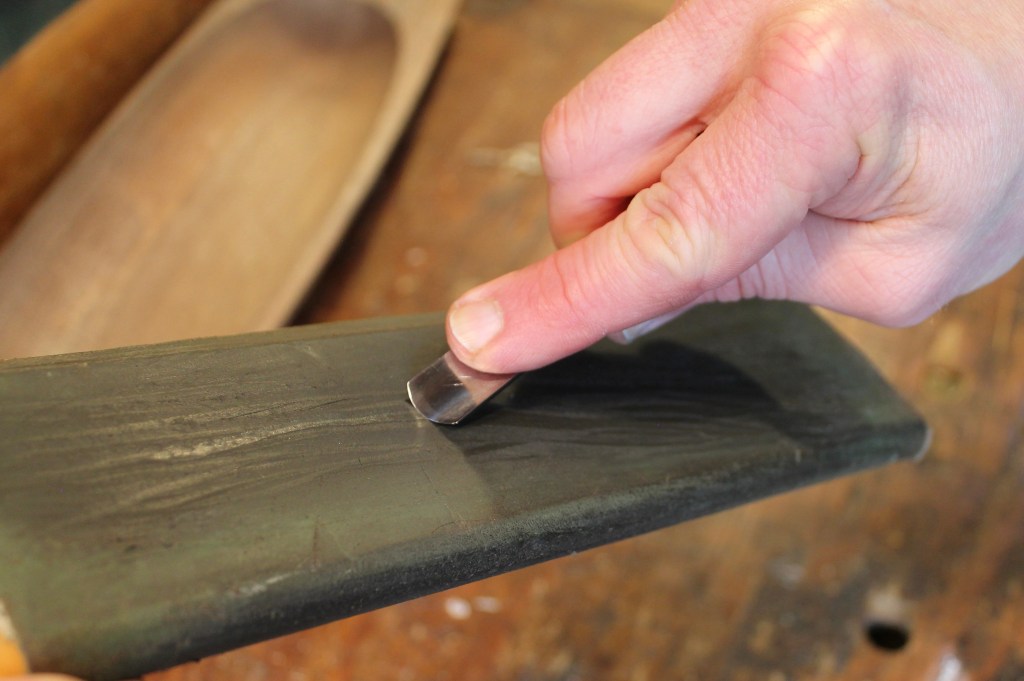
I begin by grinding the radius at 90 degrees to the face of the grinding wheel, then I tilt the support up to grind the bevel at around 25 degrees or a little less (I suppose). I normally take gouges to a stationary stone for honing as I show here. Here’s an alternative. I hold the stone in my right hand and the gouge in my left. I rock the gouge from corner to corner as I move the stone up and down, while sighting in between to keep the stone flat against the bevel. It’s very natural, really. Here, I’m using the face of a hard Arkansas slip stone, lubricated by oil.
I flip the gouge over and do the same sort of thing with the rounded edge of the slip stone. My left thumb and forefinger rotate the gouge and serve as stops for the stone so as not to go beyond the corner of the gouge edge. I hold the gouge out a bit to create a slight inner bevel of maybe 2 or 3 degrees.
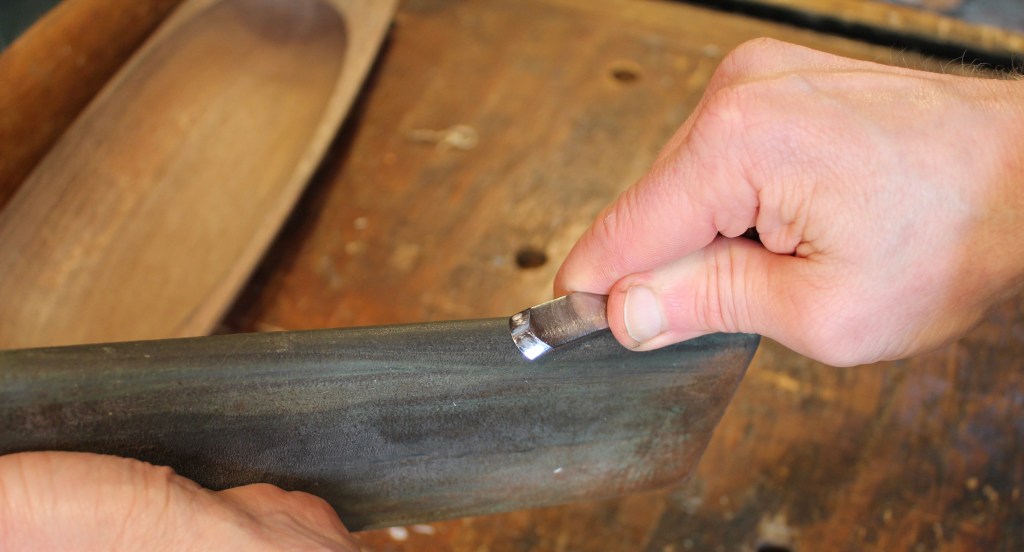
I strop the outside bevel by dragging backwards, flat on the bevel, while rotating the tool form corner to corner.
Same for the inner bevel on the round edge of the strop.
Time to carve some leaves!
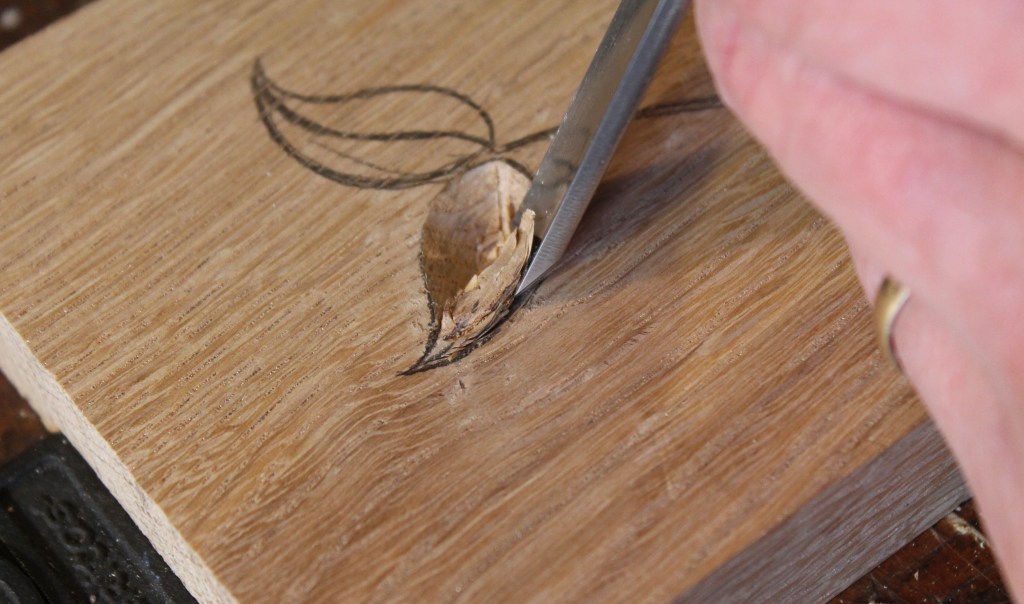
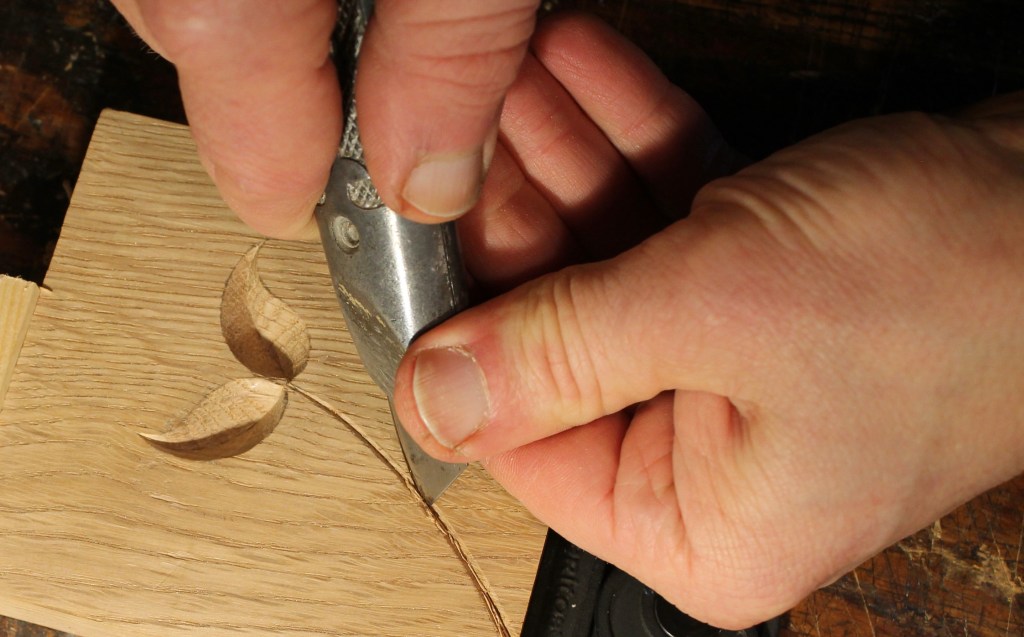
With a scrap block of the white oak from the sign, I carved a little sample of two leaves on a stem. The leaves are about 1 1/4″ (32mm) long and 9/16″ (14mm) wide. The safest thing to do first is to make a stop cut along the center line to prevent the fibers from lifting across your outline when cutting from the first side. This can be done with a vertical gouge stab or with a v-tool. In this case, I just began with a small safe excavation in the middle of the leaf, which will expand outward with successive cuts.
In the photo above, I’m making the second cut from the opposite side of the first cut.
The cambered edge shape of the gouge allows the cutting edge to reach the center while not overcutting near the corners. The chip pops out, revealing a simple leaf shape. You could quickly create a whole tree full of leaves of this simple shape, even varying the sizes, by making these two simple cuts.
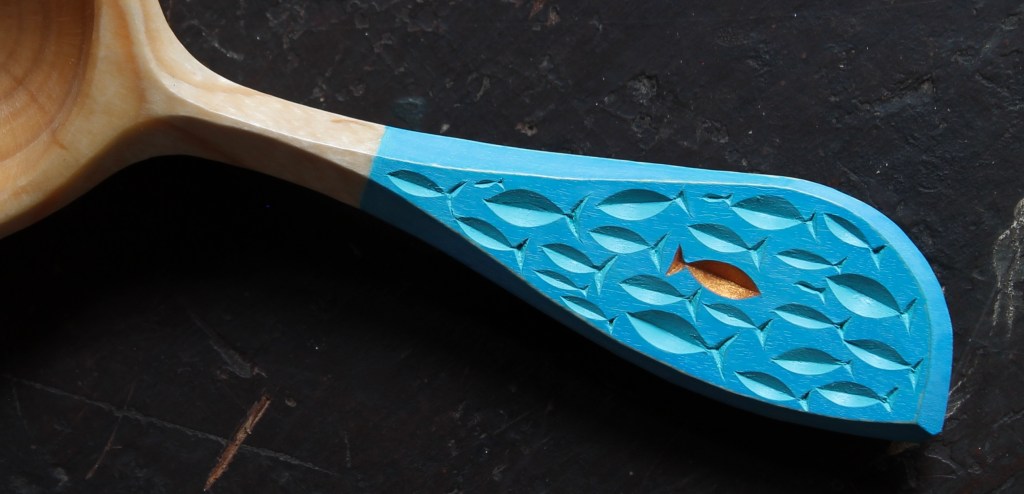
And there are many other possibilities. Eyes, footballs, fish… Here is a spoon handle employing the same technique to create fish of various sizes. The tails are triangular chip cuts, from a knife.
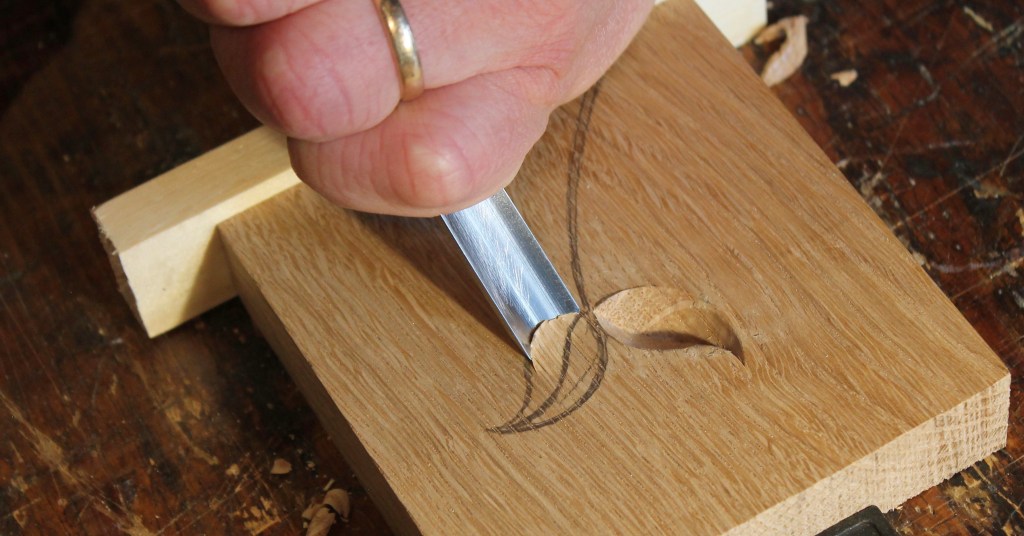
These leaves I’ve drawn are a little more complex in shape, so I maneuver the gouge around a bit, coming back to my drawn outline. I skew the gouge slightly now and then in consideration of grain direction.
On the second leaf, I’m making the first cut right at the outline. I’m confident in how the wood is behaving and that I can get away with it.
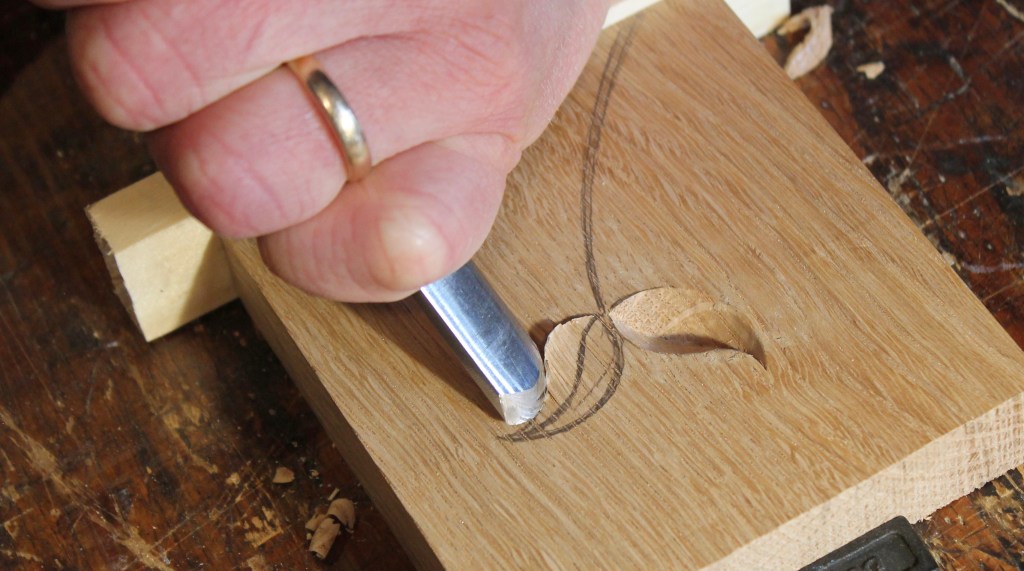
For the reversing curve approaching the tip of the leaf, I can flip the gouge upside down and press down while slicing forward.
You can see the cut and the fibers waiting to be released from the other side of the leaf.
The first cuts on leaves this size will rarely reach all the way to the bottom along the central vein of the leaf. By working back and forth from one side to the other, you’ll end up with clean sides and a defined curving central valley. Each leaf can be different, so just nibble around a bit until it’s a shape you like. Unintended shapes will probably look even more natural than your plan, so just have fun and see what happens. Leaves are low pressure!
The stem can be carved with a v-tool, gouge cuts from opposite sides, or other ways. Here I’ve decided to use a utility knife with a modified blade. It’s a standard Stanley blade, but I’ve ground a slight curve to the edge and re-sharpened it. Bevels on both sides of the blade. I think I first got this idea years ago from a video produced by Drew Langsner, featuring Swedish carver Bengt Lidstrom. The video is wonderful and packed with techniques and ideas. It’s now on YouTube here (I originally watched it on VHS). It’s at about the 58:30 mark that Bengt pulls out his utility knife to cut some designs and lettering on the bottom of a bowl.
The white oak is hard, but with a couple successive cuts I can reach the bottom of this narrow stem from one side, then the same from the other.
Here, I’m trimming and expanding one wall with a different grip.
The pencil lines are a guide, but what matters is the the carving itself. Erase the pencil lies and see what you’ve got.
Over twenty years ago, I designed and built my first bowl horse and it has been an important carving partner for me ever since. I use it for every bowl, but also for shrink pots, spoon blanks, and all sorts of other things. It is an integral part of my workshop.
For the past year or so, I’ve put a lot of thought and effort into developing an improved design to share, with detailed plans and clear instruction. This horse is built with common materials and simple techniques, yet it performs better than my previous horses. A few critical details really matter. With very little woodworking experience and less than $30 of lumber, you can build this bowl horse that will remain solid and serve you well for many years to come.
Once I had developed the design, I asked Jeff Lefkowitz to convert my rough drawings into beautiful, clear plans. Jeff’s work and attention to detail is legendary. He has produced plans for Curtis Buchanan, Peter Follansbee, Tim Manney, Peter Galbert, and other amazing craftsmen. Jeff’s high standards resulted in excellent plans that assure success for those building and using the bowl horse.
To accompany the plans, I wrote an extensive step-by-step tutorial detailing the building process, with over 50 photographs. The tutorial and the plans are found on the Bowl Horse Plans page. The full tutorial is available to all for free there.
I’m selling the plans on that same webpage as a PDF download. This makes them available everywhere instantly. All credit cards should be accepted, regardless of country. Once you purchase access, the download links for both pages will become available/visible to you on the webpage — like a curtain has been lifted. You could download and work with the plans from your computer screen, but if you wish to have the plans printed at full size, you can simply email the files to your local print shop. My shop charged me $10 for the two pages (42″x24″, and 36″x24″). Then there’s no need to pay for shipping on top of that, or to wait for a tube to arrive in the mail.
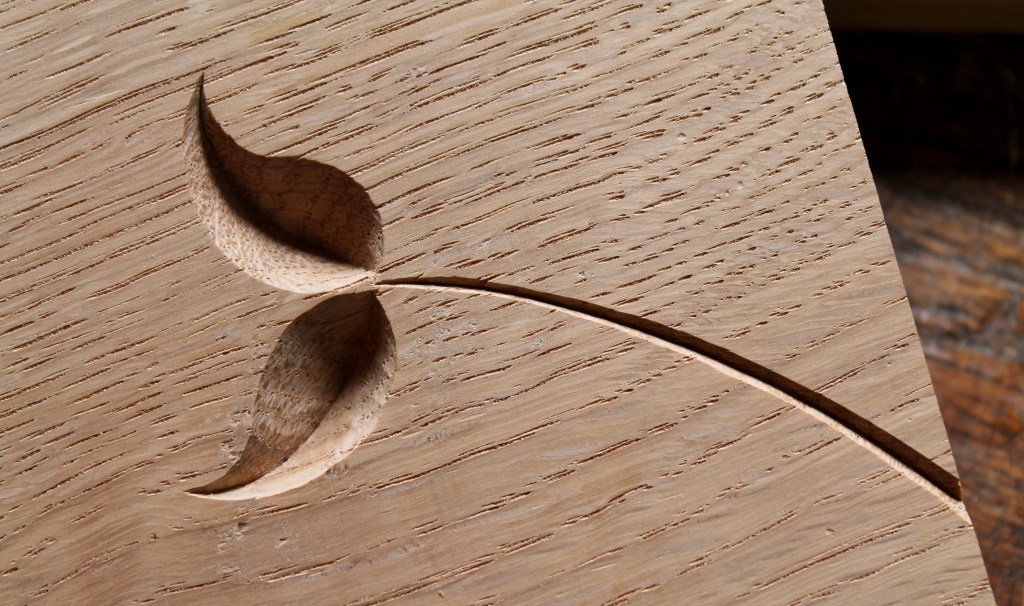
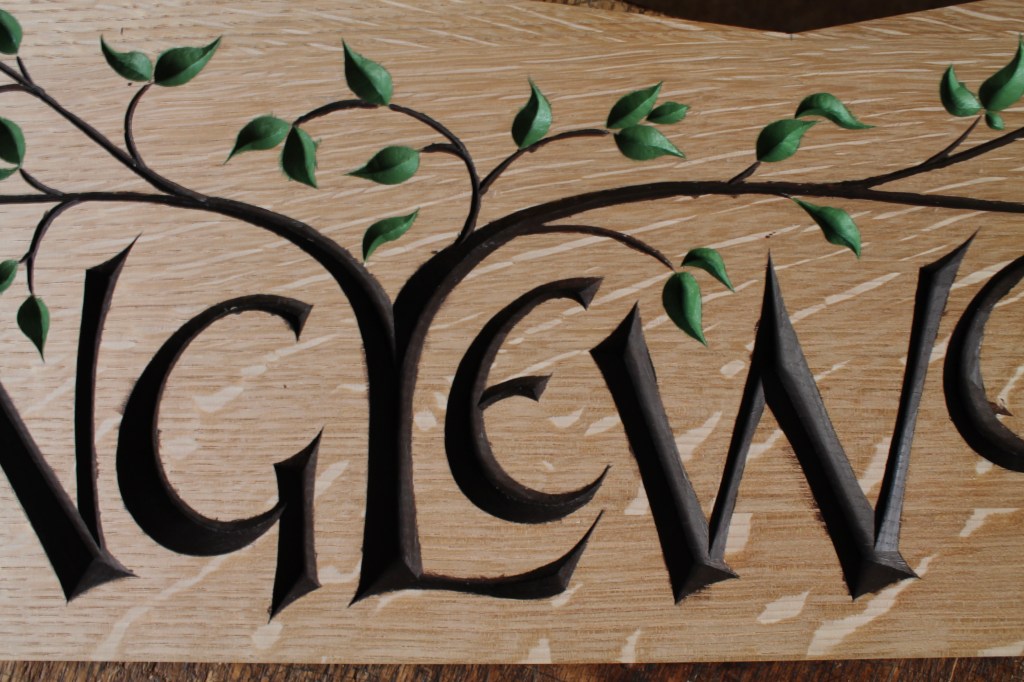
A couple weeks ago, I wrote a post about carving this exterior sign in white oak. Since then, I’ve painted the leaves and letters, built and installed the cap, and finished it with exterior oil. Here’s a few shots from my learning experience.
There’s the main body of the sign all carved. As mentioned in the previous post, I wanted to add color for interest and contrast in varied lighting conditions.
After a lot of research, consultation of folks with exterior sign experience, and personal testing, I went with the artist acrylic paints above, although other very good brands would work as well. These pigments are all from the larger list recommended by Martin Wenham in his book. I’m trying to learn more and more about color theory and practice and Martin is a master. I mixed the brownish color from the first three, and the green from all four. Professional artist colors like these list the specific pigment used, along with the opacity (vs transparency) of each color. Notice the opacity square for each of these pigments is a completely black square, meaning very opaque/solid. Also, all of these pigments have the highest lightfastness rating, so they will be naturally resistant to fading. I thinned my mix just a touch with an acrylic medium to the consistency I wanted to work with.
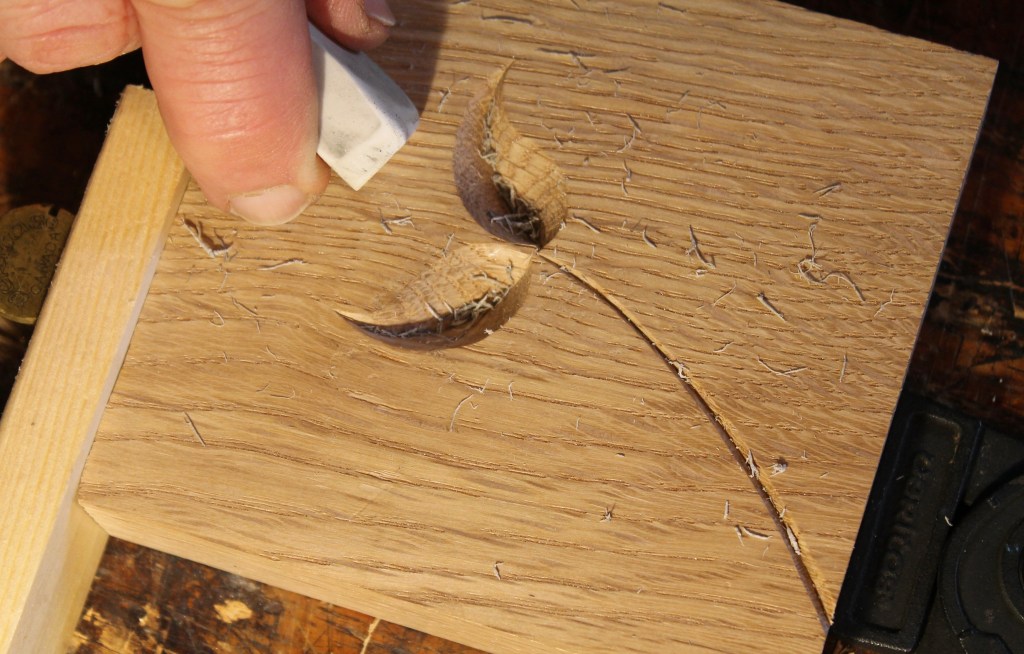
The painting was painstaking, and I did a couple coats on everything. However, I found in my experiments that I could go over the edges slightly (see the photo above) here and there and clean up in the next step.
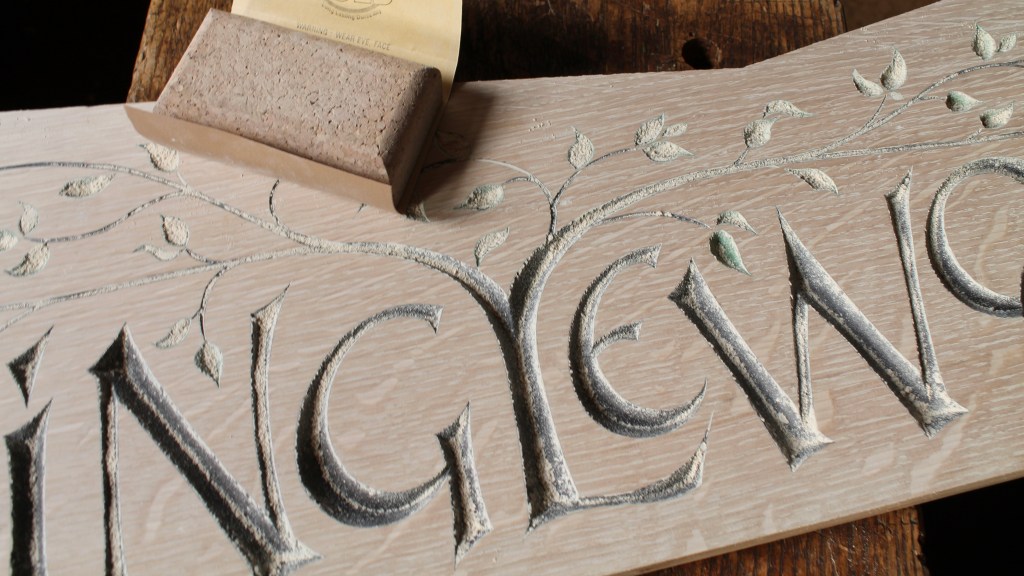
After all of the paint had dried thoroughly, I sanded the smooth surface of the sign with a flat cork sanding block and fresh 400 paper. Looks like a lot of dust, but it was actually a very light sanding.
There it is after vacuuming the dust and wiping down with a rag. Crisp edges as if I had that sort of painting skill and control.
I sighed in relief that the colors turned out the way I had hoped, and then it was on to the cap.
I wanted rain falling on the cap boards to drain mainly toward the back of the sign, so I cut and planed a bevel to the two top surfaces of the main body of the sign. That meant the joint between the two cap boards would be a compound miter. After marking, sawing, test fitting, and block-plane-tweaking, I got the fit and wondered how.
Wanting to join the cap boards to each other tightly and securely, rather than just to the sign body, I dusted off my simple pocket screw jig. With some Titebond III to seal the joint, three screws held the joint tight. The angle of these cap boards actually worked out perfectly with the angle of the pocket screws.
Strong enough for the purpose, for sure. I plugged all of the pocket screw holes, and two of the three are hidden by the sign body.
There’s the cap held in place with stainless steel screws that can be removed if needed for maintenance.
There it is after treatment with Watco Exterior Oil — Natural. The oil and solvents have no effect on the paint. I opted against exterior varnish and for the oil that can be more easily maintained with another application anytime. The white oak itself is naturally decay resistant.
The ray fleck comes out more at certain angles to the light. That groove I plowed under the front edge is meant to force any water that wraps around that edge to drip off before making it to the body of the sign itself. Can’t hurt, I guess. The finished sign with cap boards is 35 1/2″ long and weighs a little over 10 pounds.
All ready for the “Minglewood” retreat that I suppose is ideal for anyone “born in a desert and raised in a lion’s den.” (A comment on the previous post spurred me to take a closer looks at the lyrics of New Minglewood Blues.)
I’ve got other projects underway. One that’s been ongoing, and has taken a lot of time and work, is the development of the plans and tutorial for building my new bowl horse design. Without Jeff Lefkowitz‘s genius and hard work, I don’t think I’d have ever been done. But they’re finished! Now I just need to sort out some more technical computer details and I hope to make them available by the end of the weekend. So, more on that soon I hope.
And…
Eventually, I’m going to find the time to get to these hickory posts and rungs I shaved down months ago. I’ve bundled them now with Superman duct tape to grab my attention. It’s been a few years since I’ve made a JA chair, but I’ve got my new version of the MACFAT book, and I’m excited to see that Peter Follansbee just put out a video series on making the JA chair. Who better? So, with all that help, I’ll sort it out.