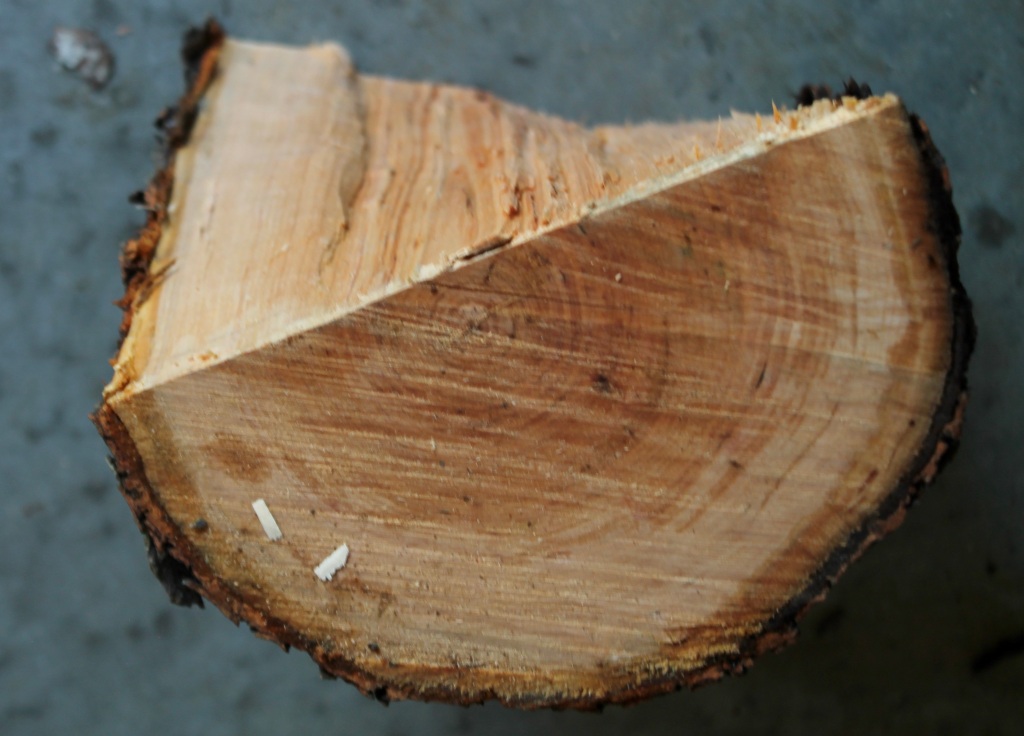
Yesterday, I was splitting a small straight cherry log for a potential bowl. I was planning on using the upper half above this chunk. As the log split apart, my plans changed.
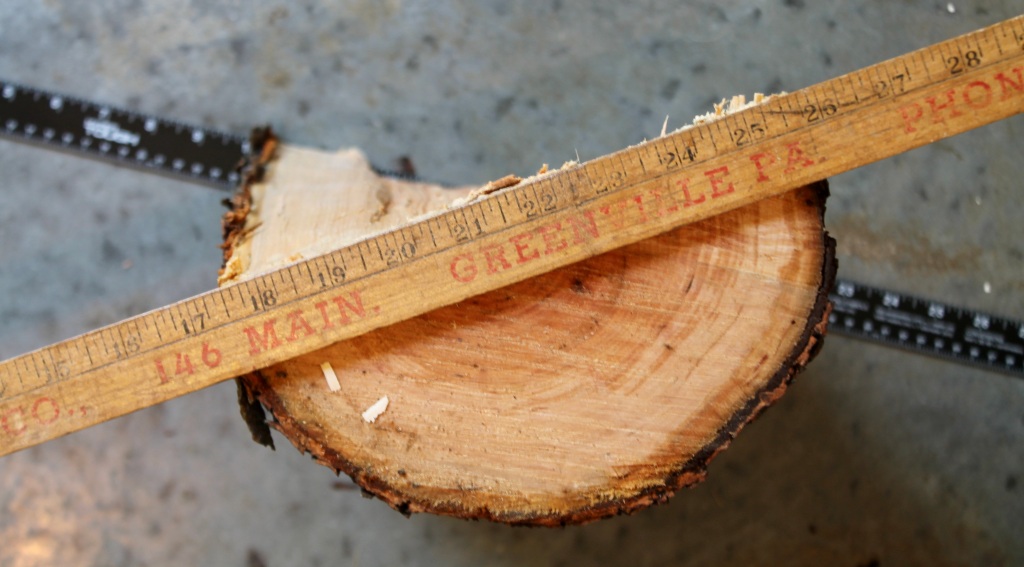
Just about every tree grows with at least a small amount of twist, but this is beyond the average. In the photo above, I’ve put a yard stick on the straight edge of the split at both ends of this 15″ log. The log twists about 30 degrees in that short length. At that rate, the twist would wrap 360 degrees, all the way around the trunk, in a length of just over 16 feet.
I wouldn’t have noticed this at all had I just cut the log into two halves with a chainsaw, but I would have noticed it as I began to carve the bowl. The flow of the grain is far from what was expected and a chunk of the bowl splits away in front of your drawknife. And even if you successfully tackle the twist of the fibers, things can change during the drying process. I have had bowls sort of “unwind” a bit as they dry when carved from a dramatically twisted blank. A bowl carved straight ends up with some wind from end to end. As I mentioned, a little bit of twist in a log is no big deal, and usually unavoidable. But I reject one like this.
Chairmakers have to pay particularly close attention to the flow of the fibers through narrow chair components. Peter Galbert has a great article on understanding grain and the effect of twist hidden within straight boards in the April 2024 Issue (#309) of Fine Woodworking Magazine. He has also tackled the subject in his Substack blog, including video.
Speaking of Pete, I’m looking forward to my August trip to his shop for the bowl carving course. That one is full; a big thanks to all who have signed up. So, we’re planning to do it again October 7-12. Here’s the link. Registration opens tomorrow (Wednesday) morning at 8:00 am EST.
And what to do with my twisted log…
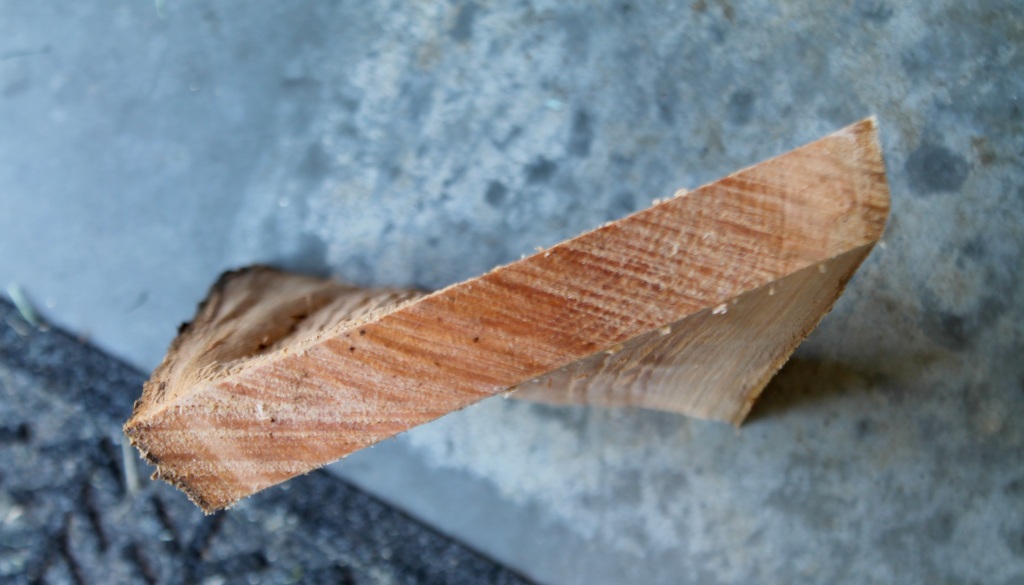
I was getting ready to chuck it onto the firewood stack, but then I went at it with the froe. That’s one of the boards I split out above. Imagine how much trouble it would be to saw a board like that. I’ve stacked a few to dry in the shed. Twist may just the thing I’m looking for in some future project.
It reminds me of that old joke- you know, a guy walks into a psychiatrist’s office and says, hey doc, my brother’s crazy! He thinks he’s a chicken. Then the doc says, why don’t you turn him in? Then the guy says, I would but I need the eggs.
― Woody Allen, Annie Hall: Screenplay
That joke from the ending of Annie Hall came to mind when I set up for the photo. Actually, it’s about all I know from the movie; I suppose I should watch the whole thing sometime.
It had been a couple years since I had carved a hen bowl. This chunky bit of cherry showed up and it seemed ideal for the form. Due to some deep checks and knots in the log, I was only able to get a good blank that was a quarter section of the log.
In the photo, above, it may be clear how this one came from a quarter section. The growth ring pattern follows the outer shape of the hen’s body. The head is near the pith of the tree. This is an example of what I’ve called a “roof-top” orientation. The first bowls I made with this orientation, hens and otherwise, were more like 1/3 sections. It was Drew Langsner that encouraged me to experiment with more acute blanks, and it was interesting to see the effect that varying the angle had on the design. Drew included some results in his 2020 book Country Woodcraft: Then and Now. It’s just a brief part of the 40 page chapter on bowl carving that Drew wrote based on his long experience.
I also played around with the design of the head of this one, including some chip carving as a suggestion of the hen’s crest.
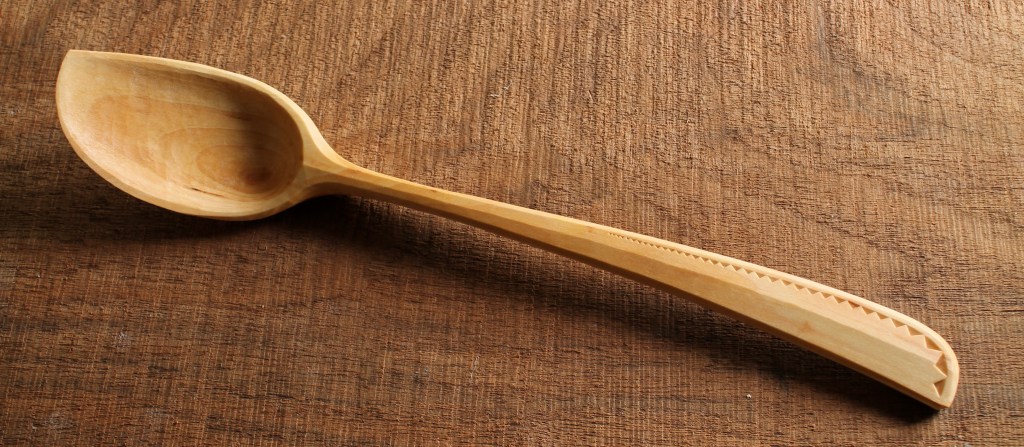
I carved an egg into the foot and emphasized it with milk paint. I also carved the flutes a little deeper/steeper this time, so I decided to leave a narrow flat between flutes. Like the flutes themselves, the flats are widest at the midsection and taper as they approach both ends.
I took a few shots along the way. Above is the blank laid out and ready for carving.
Excavating this hollow is not as straightforward as with a more open bowl. The adze can hog away the upper material and get down in there a bit.
But, pretty quickly, I go to a bent gouge and mallet, just chunking away as much as it will reach and getting some depth.
Once the shank and handle start to get in the way, I switch to a swan-neck gouge to begin the undercutting and navigate into the center.
Leaving the hollow for now, I start hewing the outside with an axe. I used to rub pine tar on the handle to improve the grip, but lately when I’m roughing, I’ve been wearing this fishing glove. Lots of companies have this sort of glove. This one happens to be from Berkley and a pair costs six bucks. I think it significantly reduces fatigue when you’re really swinging away.
Here I’m working down the side of the tail with an adze, across the grain.
Then more refinements with the axe. Smaller strokes.
I sit at the bowl horse with a drawknife to clean up and further shape the exterior. Then I wrap the bowl in an old sheet to begin to dry slowly.
I let the bowl dry partially before roughing the flutes and refining the hollow.
In order to undercut the hollow, I work mainly with a spoon bent gouge. I put a series of four photos in the slideshow below, beginning with the gouge at the start of the cut, nearly upside down, then proceeding through the stroke. The last couple images show a scorp from Lee Stoffer that does a good job of cleaning up the deepest portions of the hollow.
Then it’s on to the finer details of the flutes, head, tail and so on.
This one already has a home in mind, so she’s about to fly the coop.
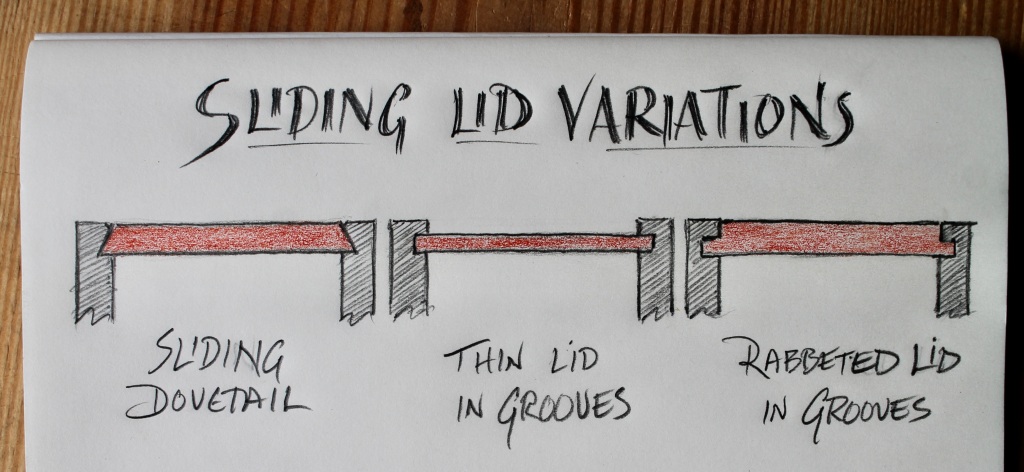
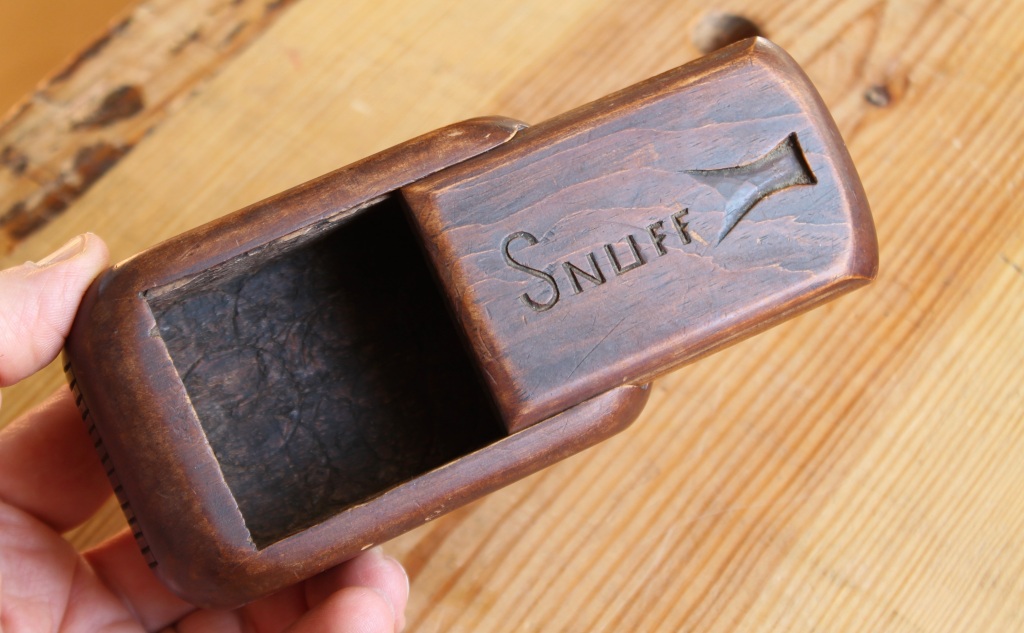
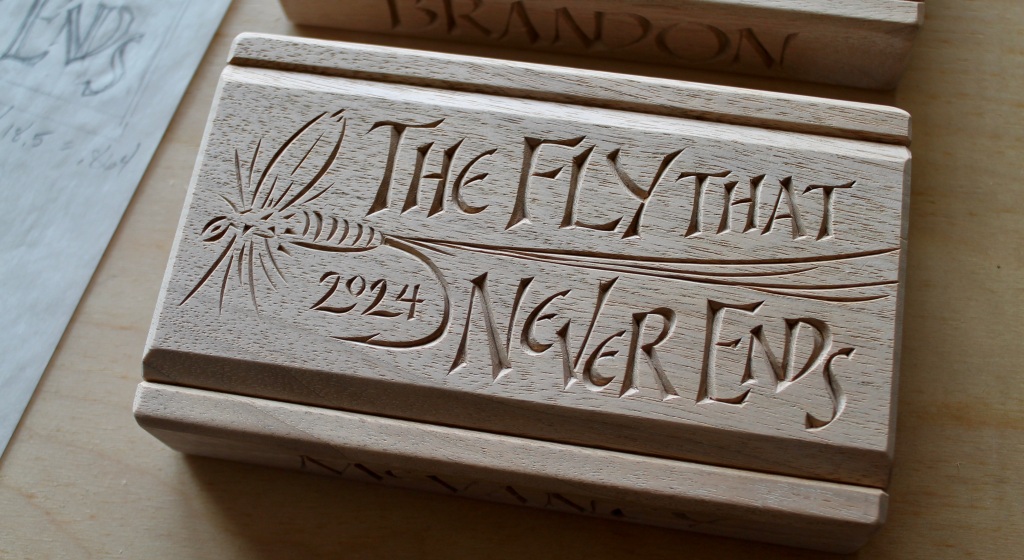
Box lids can pop off, swing out, hinge up, wedge in, slide over, and who knows what else. This post is about the sliding kind. The box above is one of a pair that I recently made at the request of a friend. He and some fly-fishing companions had planned a themed (see the box top) excursion and he was looking for some gifts.
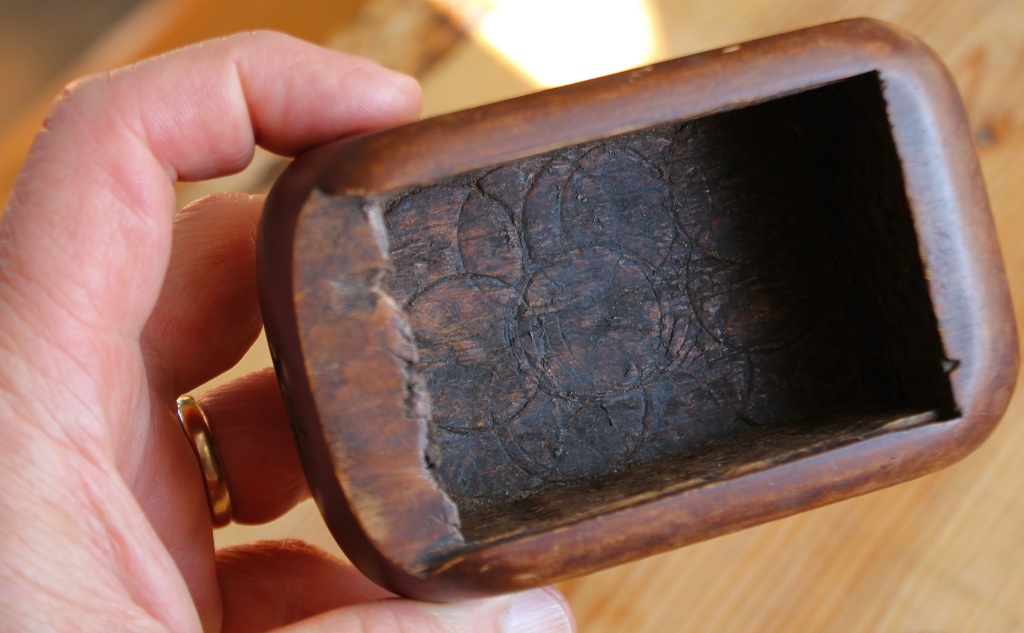
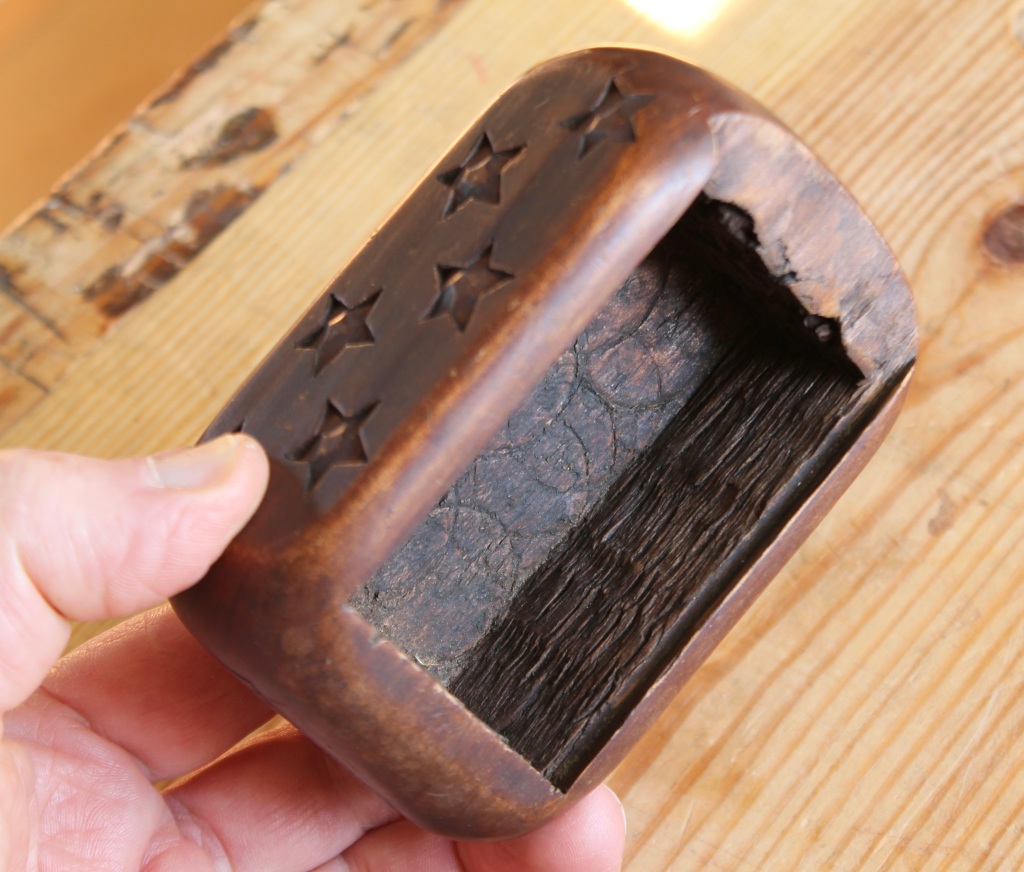
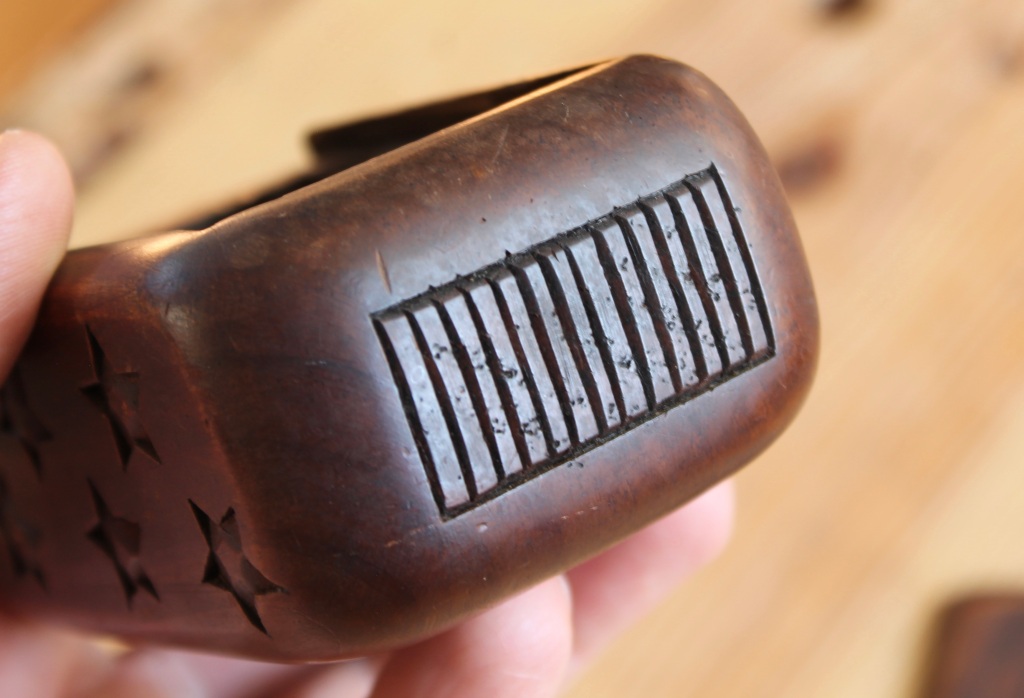
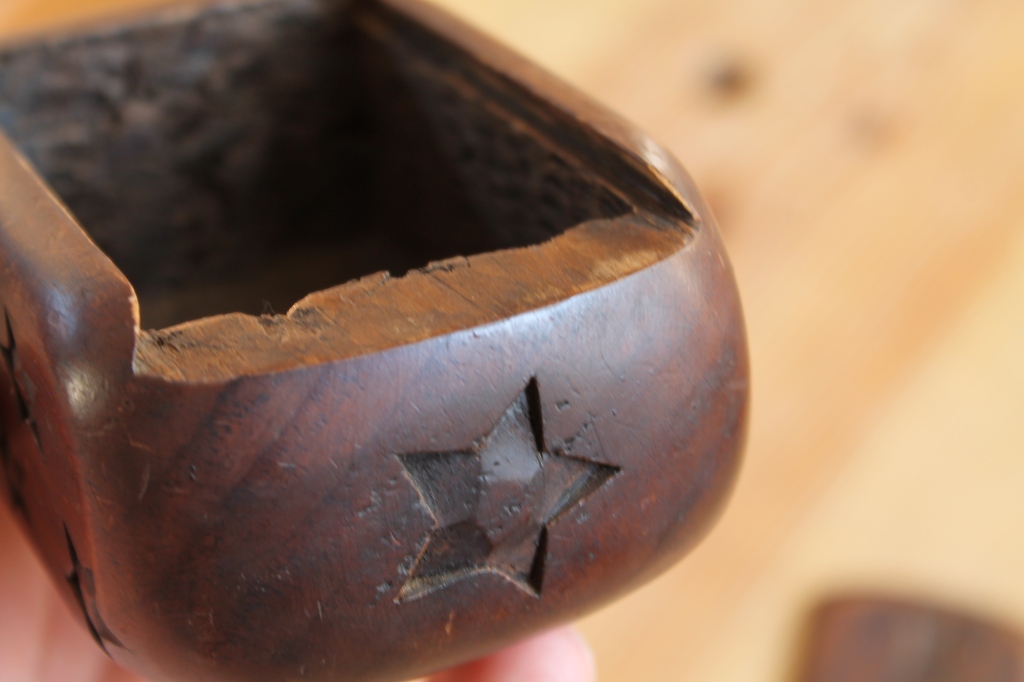
I decided on sliding-lid fly boxes with amadou strips to hold the flies. Before I go on to show how I made them, I want to share a little sliding lid box I found at a local flea market. The box itself is carved from a single piece of white pine. I like the box, but I’m also intrigued by its stated purpose. Many early snuff boxes were highly ornate, made by trained specialists. This one seems likely to have been made by the user or another person who was handy with a few tools. It is a lovely example of folk carving and the carver took care to achieve a good fit and make crisp knife cuts.
The top is held in place, and allowed to slide, via a sliding dovetail arrangement. This is the most sensible solution when carving the box from a single chunk of wood. When joining a box from boards, the top is typically held in grooves plowed into the sides (and, sometimes, far end) before assembly. The little sketch below shows three typical situations.
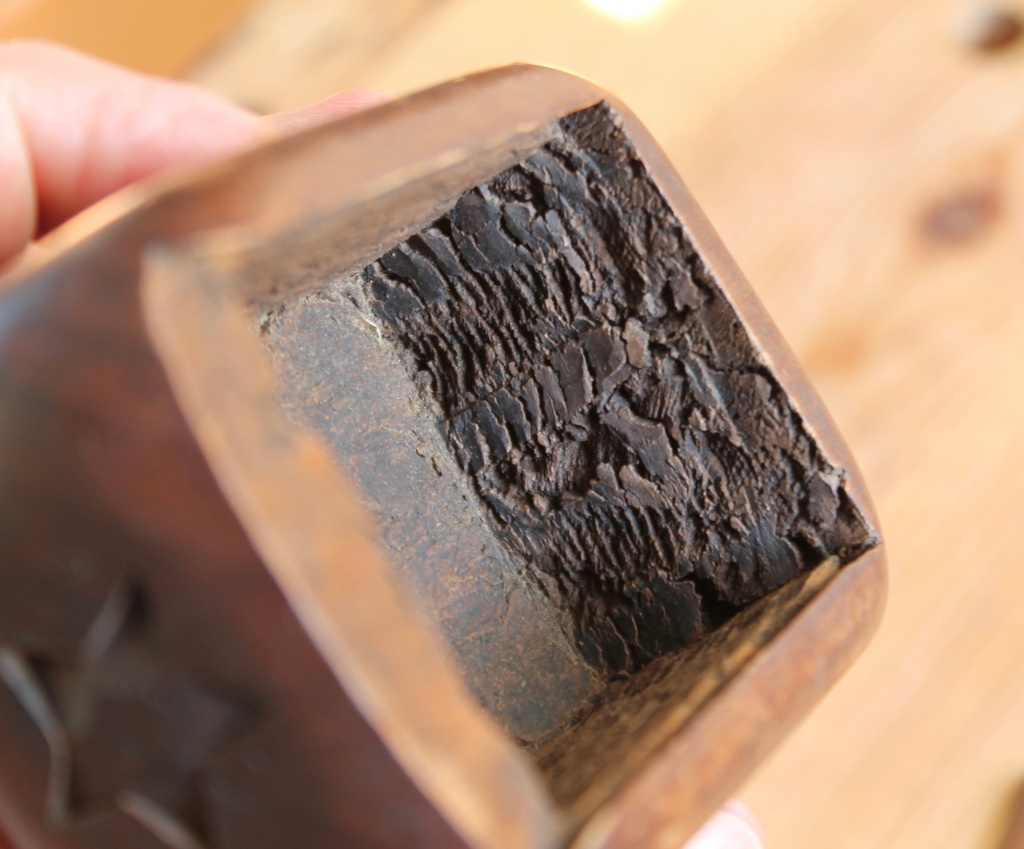
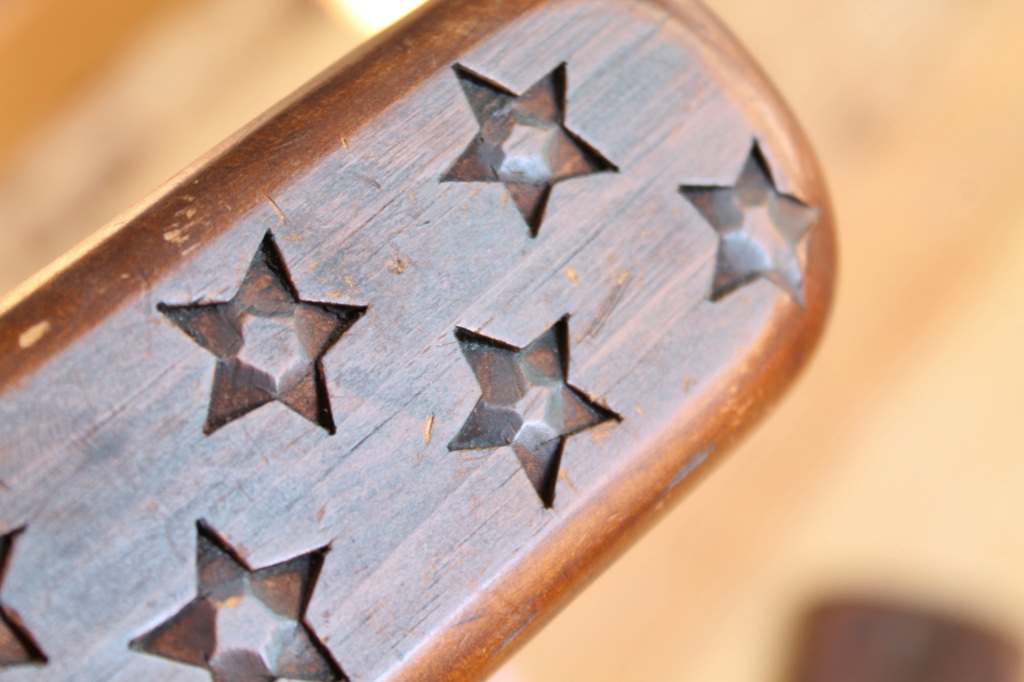
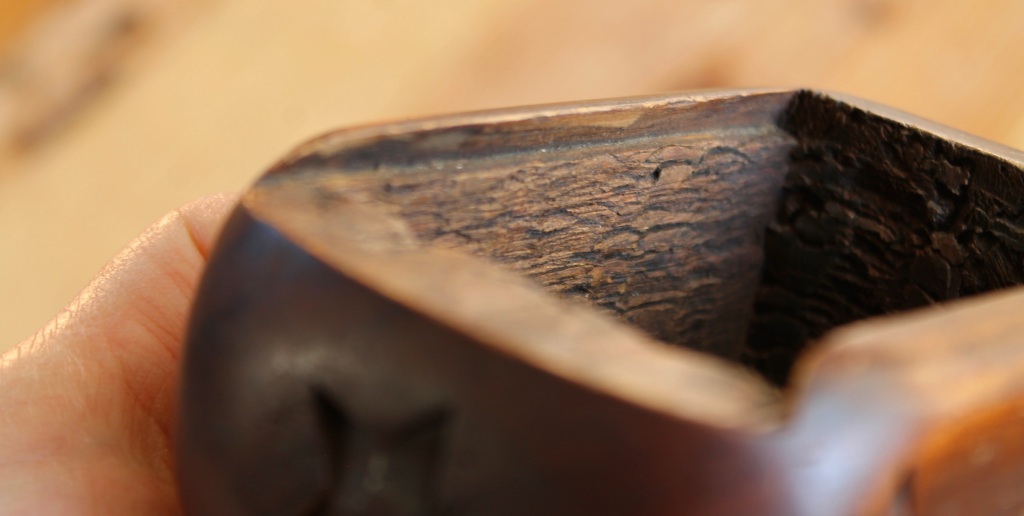
The cavity of the snuff box was bored out with overlapping holes. Based on the marks left behind (no lead screw and a very shallow rim mark), I’m guessing a Forstner bit was used, but I’m open to suggestions. Forstner bits go back to the 1870’s, which is further back than the box, I’d bet. Whatever bit was used, it might not have been very sharp. The end grain of this soft pine shows a lot of crushing. Some of that could also be from the chisel used to clean up the walls. The five-pointed stars are an interesting touch. Just five two-wall chip cuts, leaving a little raised pentagon in the middle. The knife was definitely sharp. Looks like they were laid out meticulously, probably with a small template. I’ve thrown several shots into the slideshow below:
For the fly boxes, I decided to allow the lid to slide either way so that flies could be retrieved from either end of the box without necessarily removing the lid entirely. I wanted the fit to be pretty tight, just right to slide with a little pressure, but hold its position otherwise.
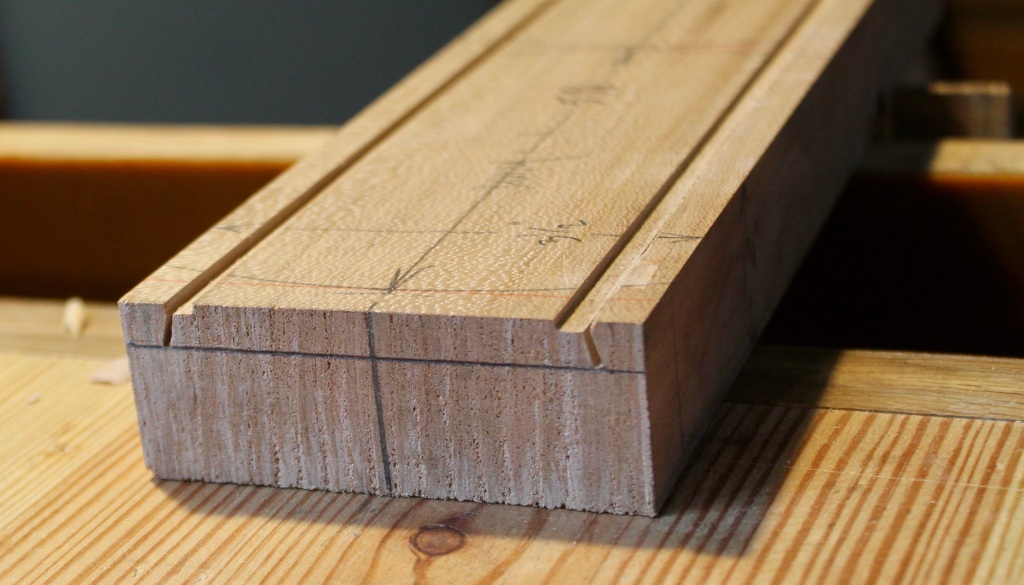
I started with a board about 2″ thick and 3 3/4″ wide. The 13″ length would yield both fly boxes, and allow me to do some of the prep more accurately with a longer board. First, I resawed a 1/2″ thick board off the top with a rip saw. After planing the surfaces clean, I made some marks, plowed a shallow groove on both sides of the top surface, then used the outer corners of those grooves to guide my backsaw. I set a bevel gauge to the angle I wanted for the dovetail and kept the saw blade parallel to it (see the above photo).
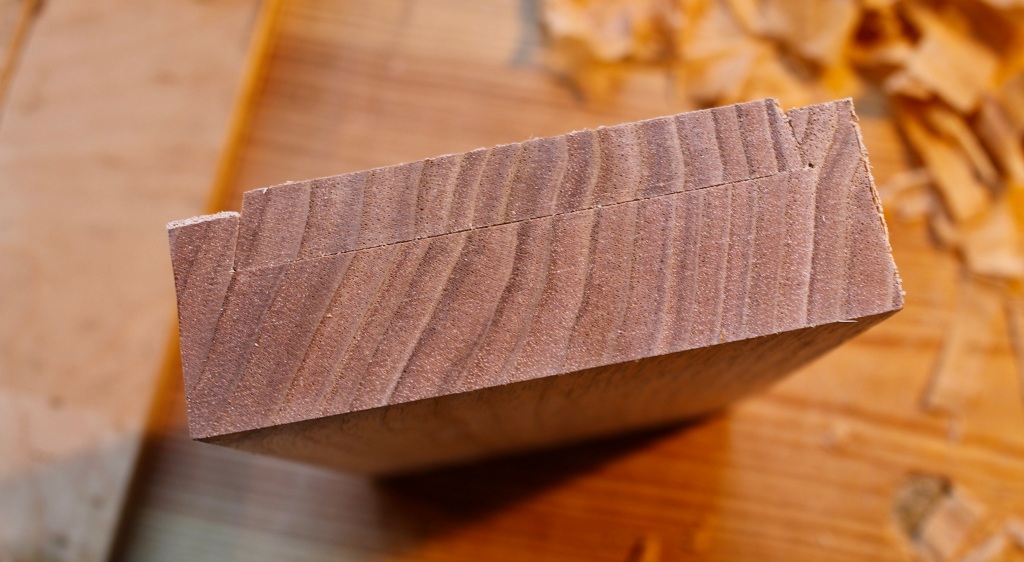
There’s a shot above after the sawing. I used a rabbet plane to remove the material between the saw cuts down to the pencil line. Actually, I ended up rejecting this cherry board, then started over with one of butternut. The edges of the lid were planed to match the dovetail slope and carefully fitted.
I chose a butternut board that was quarter-sawn to avoid warping and movement as much as possible. Since the lid and the base were oriented in the same way they had been before the resawing, any movement should be harmonious. Fingers crossed. With the lid fit to the base, I cut the length in two.
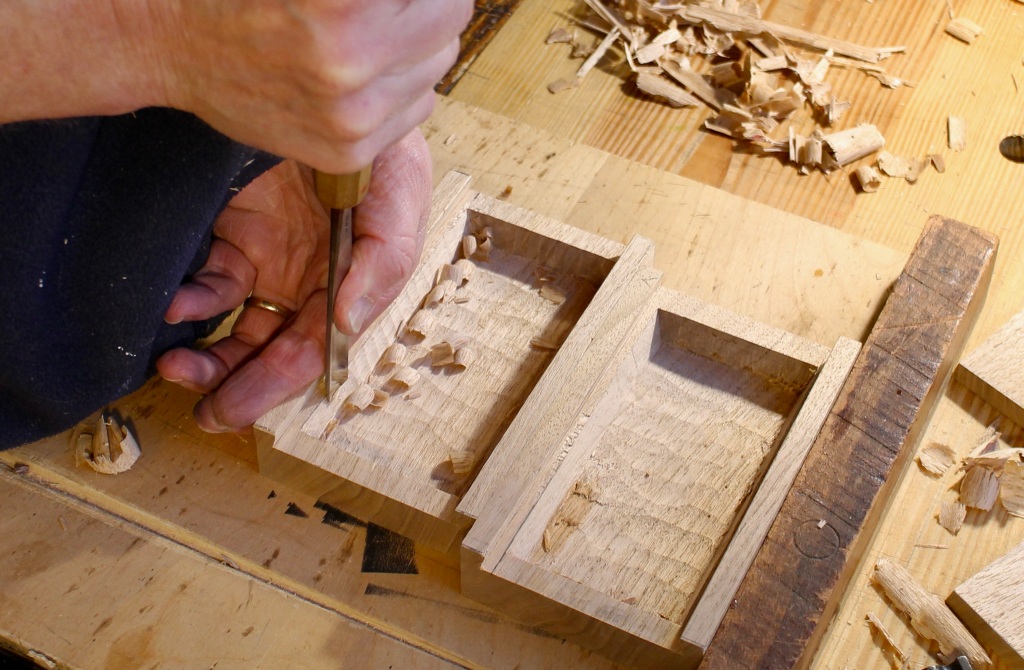
Like the maker of the snuff box, I bored out the majority of the cavity with overlapping Forstner bit holes. Then I cleaned up the bottom and sidewalls with gouge cuts, leaving a little texture.
Then some heavy chamfers and easing of edges to make it comfortable in the hand, followed by some lettering and image design/carving. Finished dimensions are 6 1/4″ x 3 3/4″ x 1 3/8″.
Sliding-lid dovetailed cherry box 2024. 81/2″ x 4″ x 3 1/8″
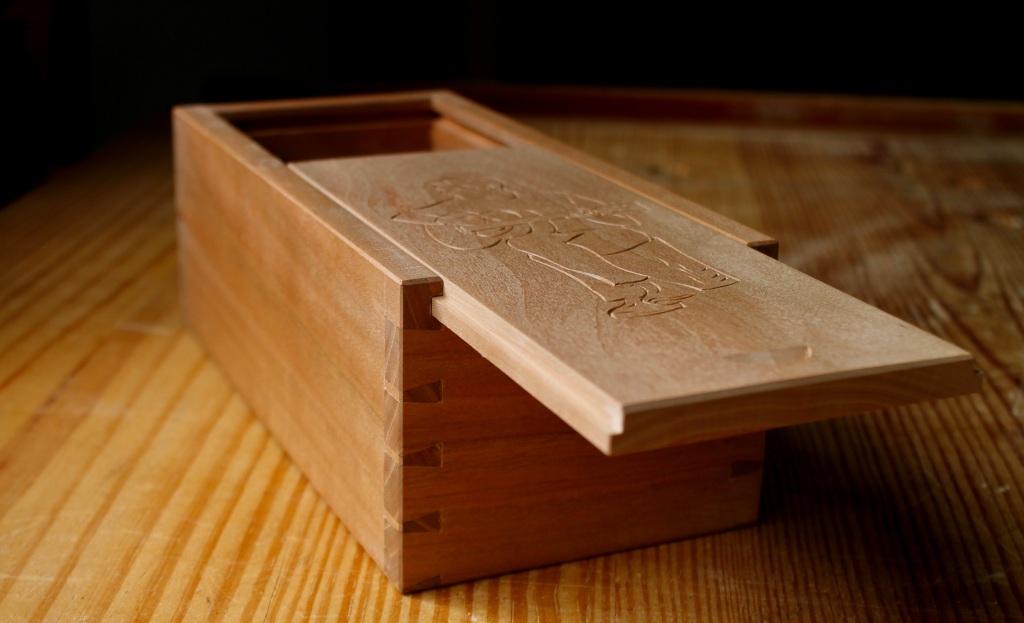
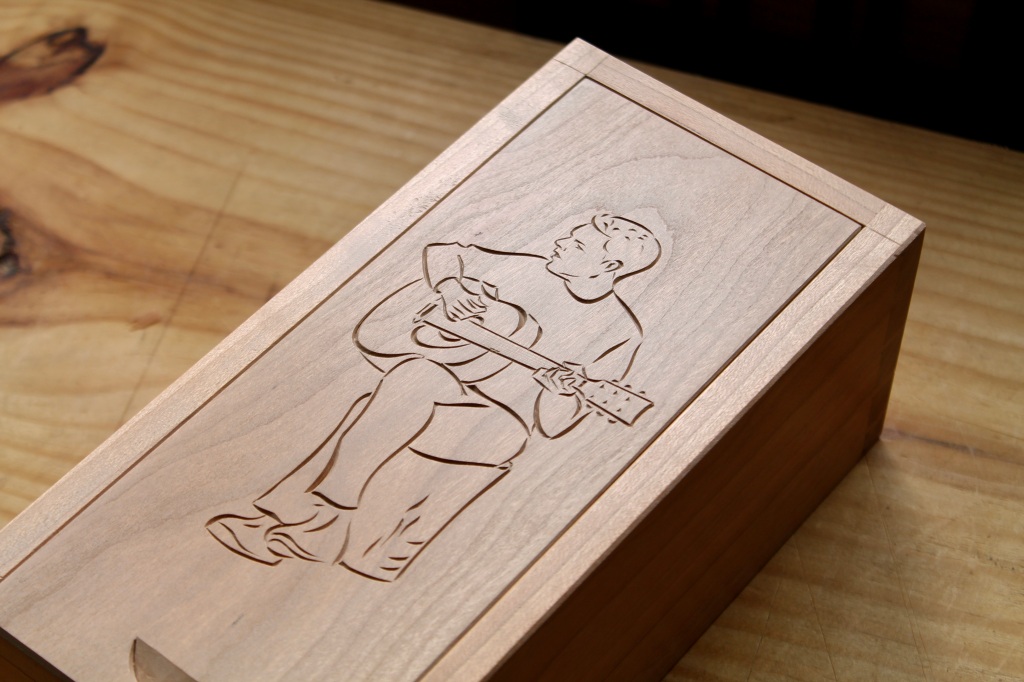
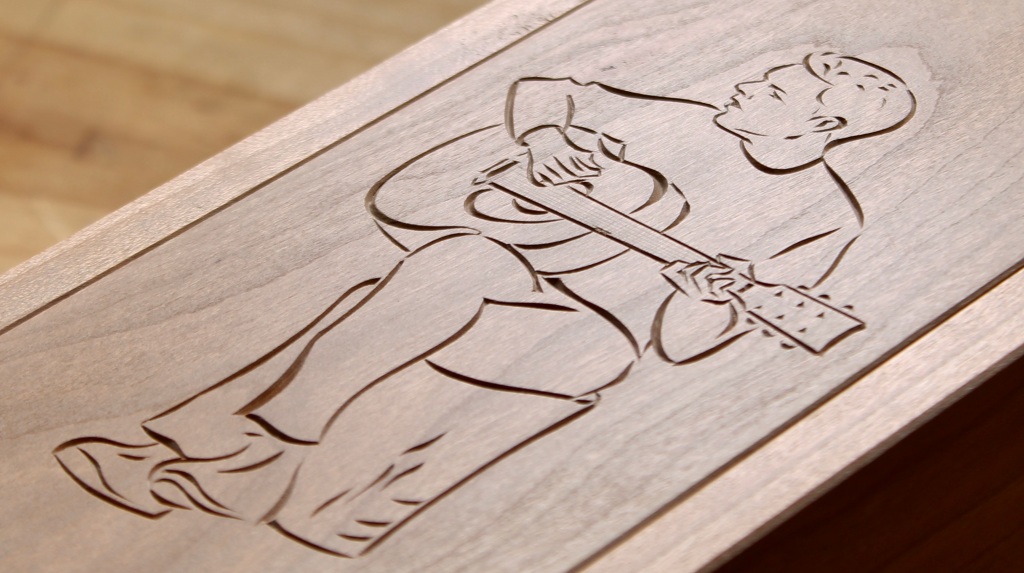
And, while we’re on the subject, here’s another sliding-lid box I just finished, still to get a coat of oil/wax. This one is made from six pieces of black cherry. A graduation gift for our son. The tongue created by the rabbet in the lid rides in grooves in the sides and also engages at the end.
The carving on the surface, based on a photograph of Noah, is simply made up of v-grooves of varying width and depth. Two opposing cuts from the tip of a penknife.
This post shows a couple other applications of a sliding lid.
Emerging black cherry (Prunus serotina) leaves and flowers, late April.
The Trees are coming into leaf
Like something almost being said;
— Philip Larkin, The Trees (1967)
Over the last few weeks, the view from my workshop window has been transformed by the annual miracle occurring on every twig. Leaf by leaf, the woods have become thick and lush with green. A few weeks ago, when the leaves were just emerging, I took just a few shots; that’s black cherry above.
This is spicebush (Lindera benzoin) and those leaves will be a treat the rest of the year. I like plucking one or two on walks in summer and fall, rubbing them between my fingers to release the refreshing lemony spicy scent.
And there’s no mistaking the shape of those little tulip tree (Liriodendron tulipifera) leaves.
Black cherry leaves and flowers, mid-May
The cherry leaves and hints of flowers in the first photo have found their voices now. Among other things, they’re reminding me that I have a couple cherry bowls to finish. Time to sharpen up.
If you’d like to read the rest of Philip Larkin’s poem, you can find it here, along with an animation of Larkin’s reading of the poem.
Another post about processing crooks. For the others, check the category menu (to the right) under “finding wood.” This time I want to show a couple decisions I made when finding a spoon in a piece of the crazy magnolia branch above.
When I crosscut this bend, I still wasn’t sure which end would be the handle and which would include the bowl. One thing I was almost certain of was that the lower part, the outer part of the bend would not become a spoon at all. The reason has mainly to do with how most crooks form (at least according to my observations).
The sketch shows why the outer part of the bend almost always includes a broken branch stub. Sometimes it’s just the decayed remnants of the branch stub. Sometimes the tree has been able to grow completely over the stub in time. Regardless, the fibers don’t flow unimpeded through the outer bend, but they do through the inner bend.
Back to the chunk of magnolia. The split follows the fibers along the pith.
To the left side of the sharpest part of the bend, the fibers are pretty straight, but to the right side there’s some zig zag going on, especially in that area where the pencil is pointing. Bummer, because I was hoping for that side for the handle because it was a bit longer. But it may have been difficult to deal with. As a side note, you can see the end of the broken branch on the surface of the outer bend.
So I cut the right side short about where I thought the end of the bowl should be.
Then I started working down into the bark side of the inner bend and drew a general layout for a spoon it could hold. Then the usual axe and knife work.
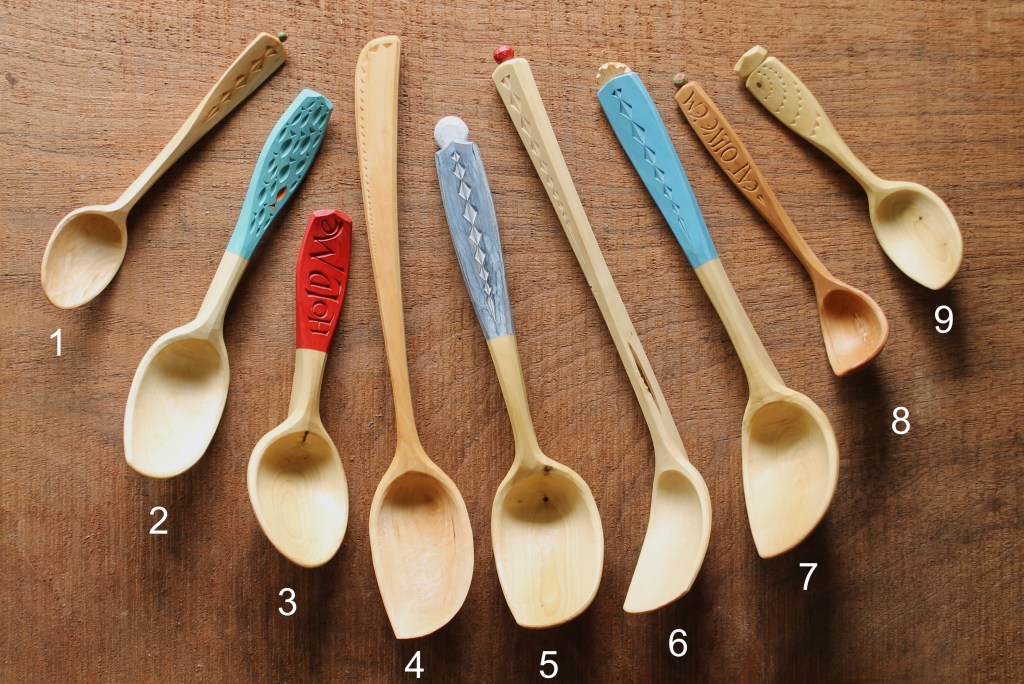
A little more color in this group, partly because of the wood species of the crooks I found and partly because I was itching to experiment more with milk paint. So, all of the paint on these is milk paint, then the whole spoon treated with pure refined linseed oil and kiln-cured. All surfaces are straight from the knife except for the inside of the bowl of #8.
If you’re interested in purchasing, send me an email at dandkfish@gmail.com and let me know which spoon(s) you’d like, and if you’d prefer to send a check or receive a PayPal invoice. I’ll get back to you to confirm that the spoon is still available. Prices include shipping in the U.S. International shipping will be an added charge, but probably not much. I’ll post individual photos of each spoon further down. Thanks for looking.
Four of these spoons came from this magnolia branch that someone had tossed aside. Nice wood for spoons. I’ll share some photos of the splitting and other processes in a future post. This one’s already going to be long enough. Here are the spoons:
#1: Cherry (sapwood) Eating Spoon, 7 1/2″ x 1 3/16″. With a little green finial. $110 includes shipping. SOLD
#2: Silver Maple, 8 3/4″ x 2″. With one independent fish. $160 includes shipping. SOLD
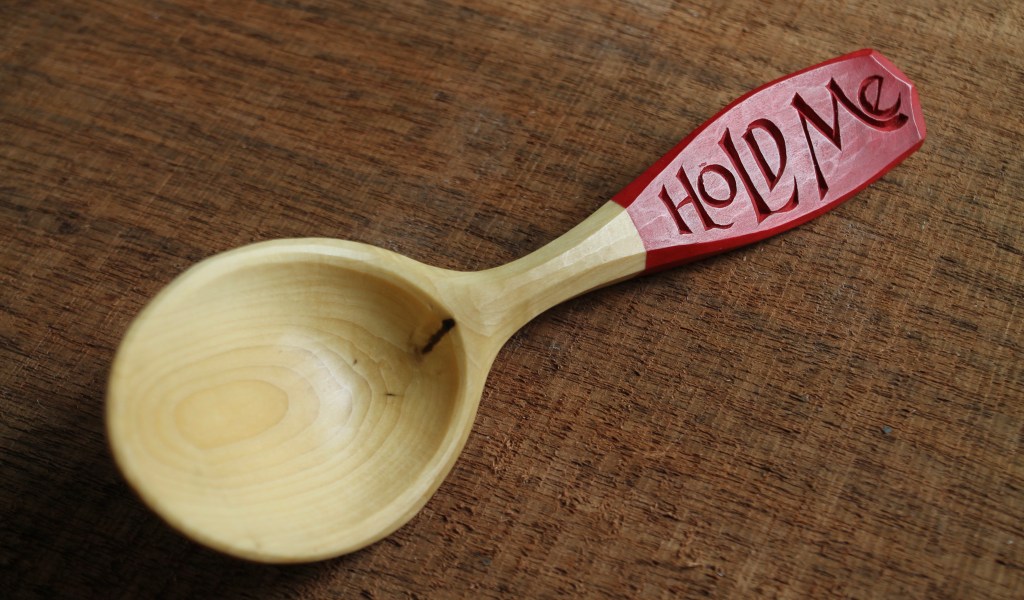
#3: Magnolia, 7 1/2″ x 2 1/4″. “Hold Me” serving spoon. $175 includes shipping. SOLD
#4: Cherry (sapwood), 12 1/2″ x 2 1/8″. A nice cooker/server with a tapering line of chip carving wrapping around the back end of the handle. $160 includes shipping. SOLD
#5: Magnolia, 11″ x 2 1/4″. I had moonrise in mind. Deep bowl with a lot of crank. $170 includes shipping. SOLD
#6: Red Maple, 12″ x 1 7/8″. A slender server/ladle with a red ball finial. $150 includes shipping. SOLD
#7: Magnolia, 11″ x 2 1/4″. Sunrise. Deep bowl with a lot of crank. $170 includes shipping. SOLD
#8: Sugar Maple, 7 1/4″ x 1 1/2″. This one came from a tight little crook. As I started carving it, I was wondering what such a small ladle form could be used for. The thought of dipping olives from a jar or bowl was what came to mind. The lettering and finial followed. The hard maple holds the detail of the small letters well. A quirky little spoon for sure. $190 includes shipping. SOLD
#9: Magnolia Eating Spoon, 6 1/2″ x 1 1/8″. It was the pin knot on the handle of this short eating spoon that sparked the chip-carved design. Like ripples on a pond. $120 includes shipping. SOLD
I’ve mentioned before that I use a light bulb kiln to cure the oil on my spoons and bowls. My old kiln got kicked around a bit during the move, so I decided to convert my old shop heater cover into a new kiln. You can get really fancy, but anything that holds some heat in will work. So, just a box with a porcelain light bulb fixture and a recycled electric cord and plug.
There are nine recently-finished spoons in there. I still have to take some photos, then I plan on posting them for sale Monday.
I used to use incandescent light bulbs. They are being quickly phased out. But I’ve found these reptile aquarium heating elements to work perfectly. You can find them many places easily, including pet stores. The come in different wattages and screw right into a light socket. My kiln is about 4 cubic feet of space, insulated somewhat. I find that the 75 watt element keeps the kiln at about 130 degrees Fahrenheit. According to what I’ve heard, wood can start to degrade over 140 degrees, so I keep it below that. And that’s plenty hot enough to decrease the curing time by at least 20x (for both linseed and tung oil). Of course, a kiln like this can also be used to dry chair rungs and things like that.
My new kiln doesn’t take up much space. It tucks into the corner of the shop where it does double duty as a stand, typically holding a bowl of dog treats and other stuff.
The doors are secured with a wooden toggle controlled by a simple handle on the outside.
Inside, the toggle is really a semicircle with a bit of a spiral shaved off one side to serve as a cam
When the handle moves up, the cam catches behind the top rail of the cabinet and pulls the door tightly closed. The rabbet holds the narrower door to its left closed.
And, this time, I got really fancy and dropped $25 on a digital temperature controller. These things are made for greenhouses, pets, and all sorts of uses. I plug it into the wall, then plug the kiln element cord into it. If the temperature gets over the max setting, then the power is cut to the element. Once the temperature gets below the minimum setting, the power kicks back on. There’s a cord with a temperature sensor that I’ve run through a little hole into the kiln. On the display above, it shows that the ideal temperature has been set to 130 F (+/- 3 degrees, thus the 133 and 127 numbers). The actual temperature is currently showing 129 F.
As it turns out, the combination of my box and the 75 watt element keeps the box at around 130 anyway, without the controller, but it’s still some peace of mind. With a little experimentation with different heating elements, you can manage the temperature without a control.
Or, this time of year, you can do as I often do and just let oiled bowls and spoons sit in the sun on a hot day. Just be sure to wipe off excess oil from the surface before it cures!
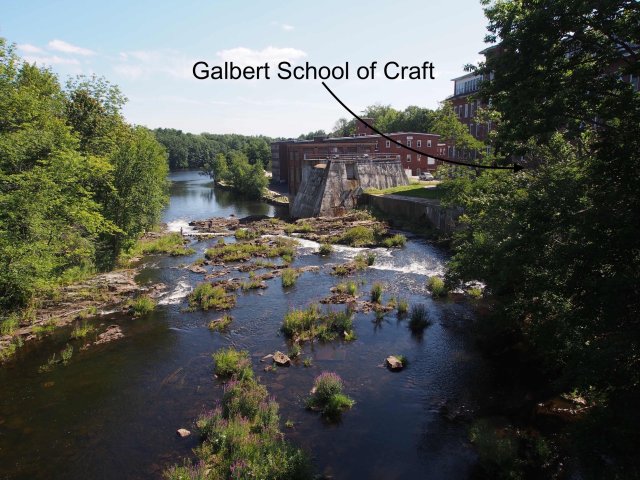
I’ll be teaching a bowl carving course at Peter Galbert’s school in Rollinsford, NH, just 12 miles from the Maine coast, August 12-17, 2024. Pete and I have talked about this possibility for a couple years, and I’m so happy that I’m finally able to do it. The spots will become available on Wednesday, May 8 at 8:00 am. Here’s the link to register, along with the course description, for when the time comes. Registration is handled through the Galbert website.
Galbert’s school overlooking the Salmon Falls River in Rollinsford, NH. Photo from Petergalbert.com.
I’m looking forward to this six-day format at Pete’s, with time to devote to important topics like sharpening, design variations, finishing and so on.
By starting with a dry plank, we’ll be able to go through all of the steps in carving a bowl, including the final details that make such a difference. So, you’ll leave with a beautiful, useful serving bowl like the one in the top photo of this post. But, more importantly, I want you to take home an understanding of concepts and techniques that will allow you to design and make bowls with whatever wood (green or dry) and facilities are available to you. And the know-how to sharpen your tools, and get the most from your compass, and see the potential in a bit of tree. Then throw in the memories of a special week spent creating and sharing laughs with a handful of interesting people.
This is the first time I’ll be teaching this particular course, so I want to maintain some flexibility at this point to respond to ideas as the class approaches and during the class itself. In addition to the main bowl, I envision each student leaving with a sample board of sorts with decorative carving motifs to use on future bowls or other projects. Maybe an additional small project…we’ll see. I’ll have several bowl examples there to explore and discuss. There will be time to respond to your interests and questions as they arise. We’ll all learn a lot and it will be a blast. I know I’m looking forward to the experience. I hope to see you there.
We’re calling the course Bowl Carving Exploration. If the class happens to fill up, make sure to get on the waiting list. That will give me even more reason to go back. And be sure to check out the other courses on the schedule. Pete has an incredible lineup, including a just-added 17th century oak box making/carving course with Peter Follansbee.
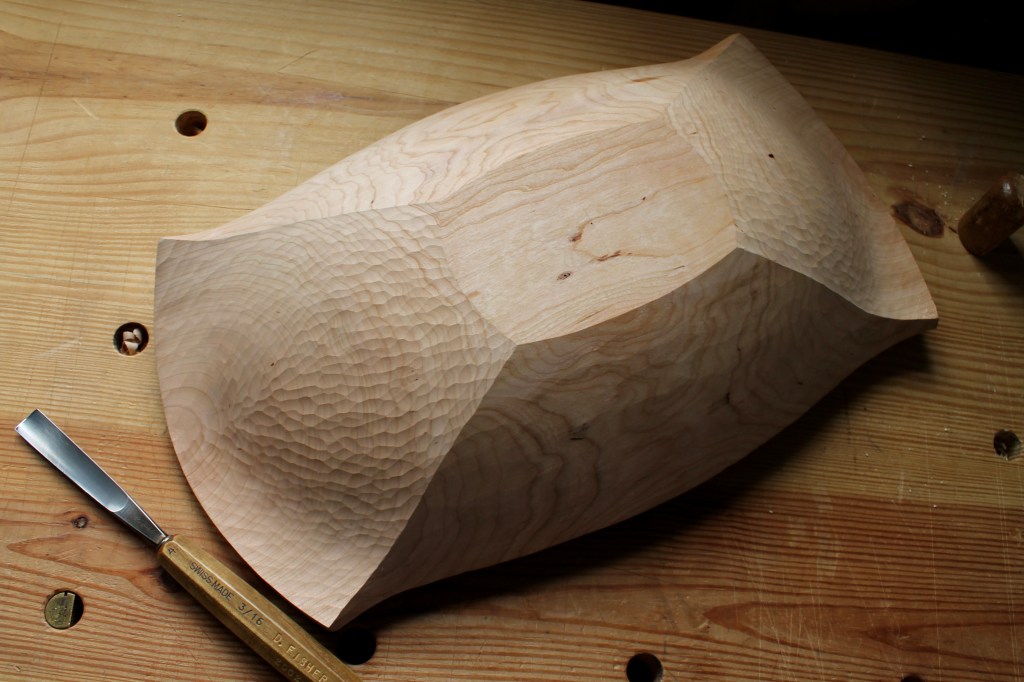
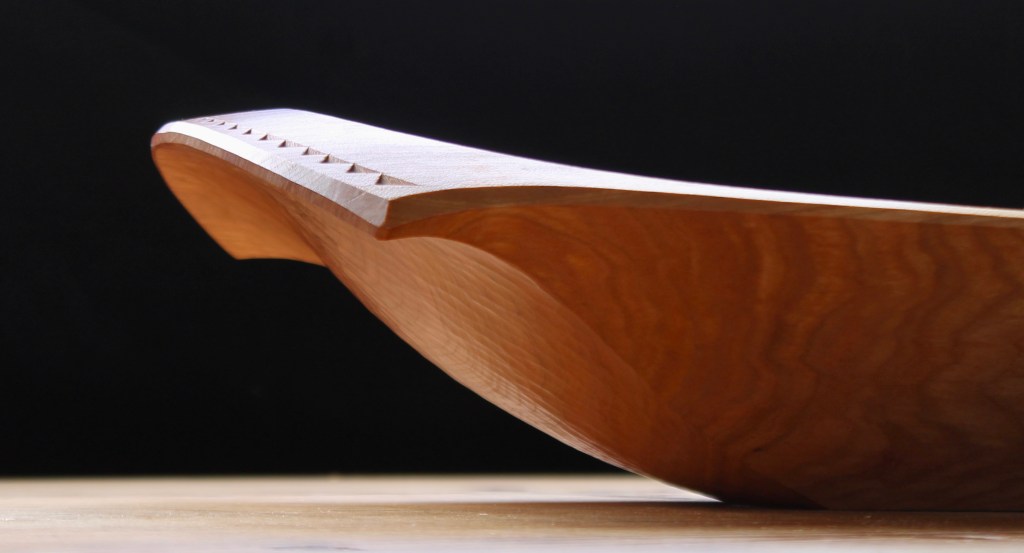
Black Cherry Bowl 18.5″ long x 10.5″ wide x 4″ high
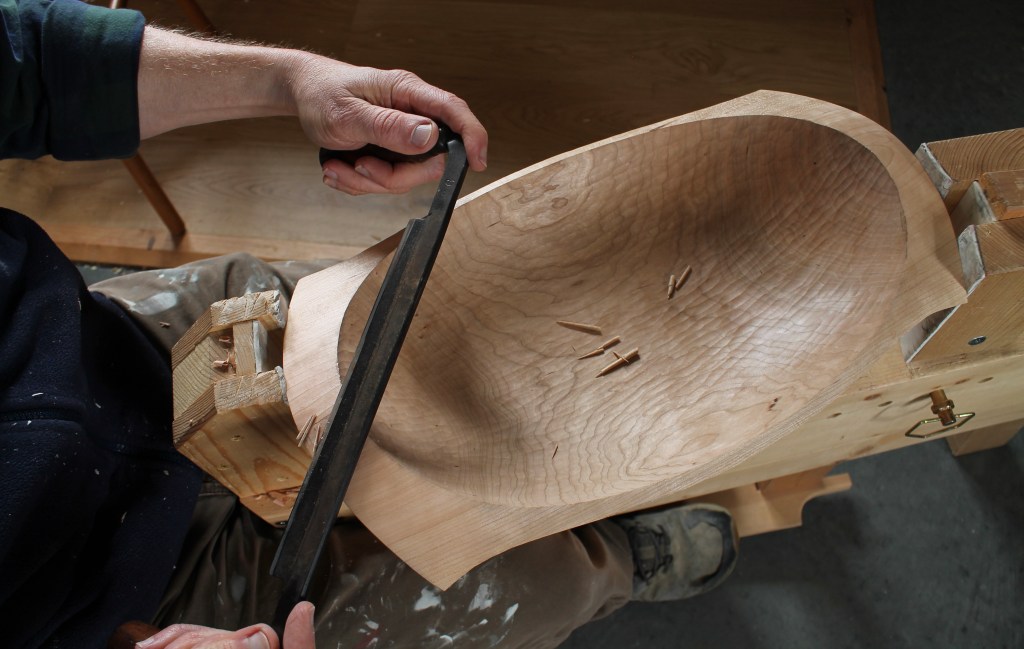
I’ve finished the cherry bowl that I mentioned in my recent Drying Revisited post. The oil has cured and it’s ready to serve. I’ll share a few more shots of the finished bowl below, but first some photos of some of the after-drying carving, which I spend much more time at than the green carving.
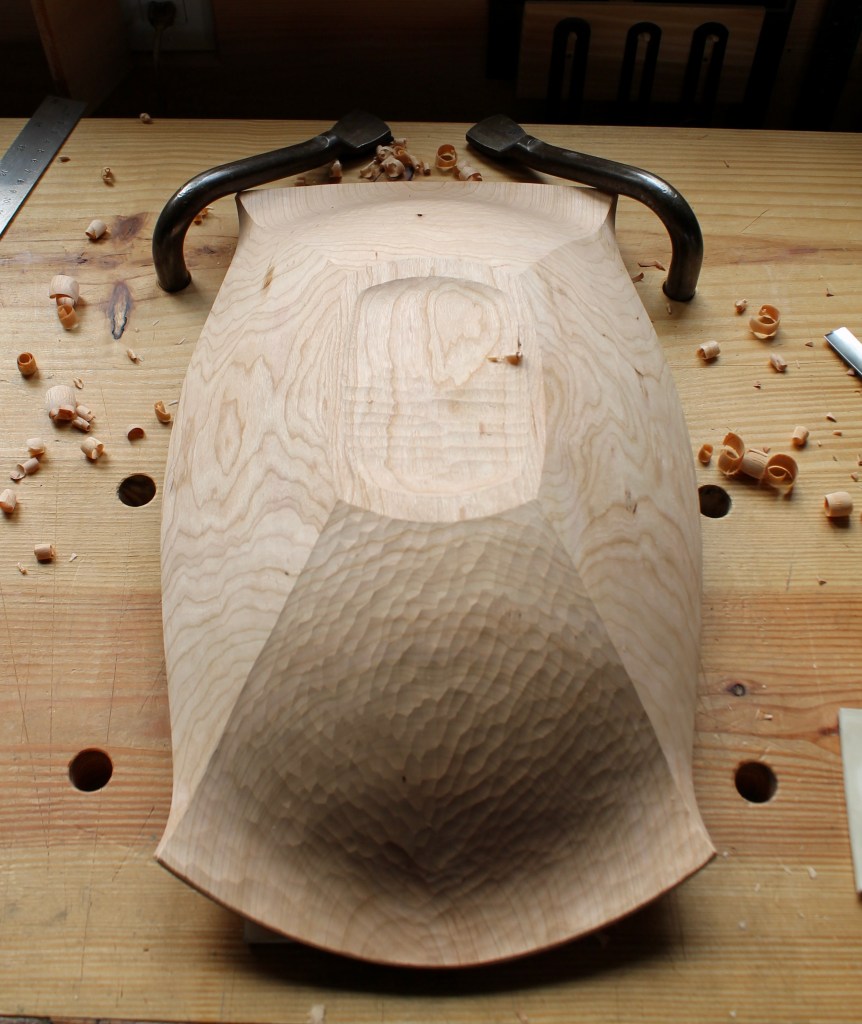
Spokeshave to fair the contours.
After paring the final surface of the hollow, I plane the foot flat since it moves during drying. Then I redraw the perimeter of the foot and do the final shaping of the exterior from that edge. This bowl design has four distinct exterior surfaces or “panels” as I sometimes call them. In the photo above, I’m using a spokeshave to finalize the form of the end panels. The junction between the side panels and the ends are a key visual feature.
For this bowl, the side panels were left from the drawknife. The grain direction reverses at the handles, and a knife is particularly nimble for managing the transition.
The end panels were finished with a dappled texture from a shallow gouge.
I worked the upper surface with very fine cuts from a sharp drawknife.
Gramercy holdfasts in use holding a bowl.
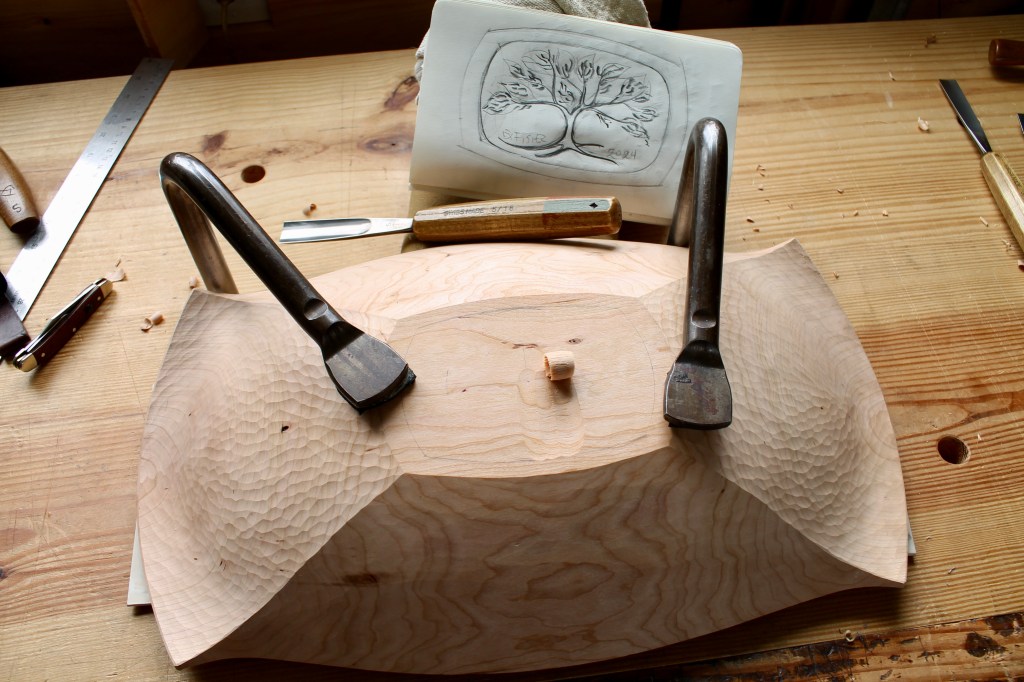
I sketched a little tree design then began excavating a shallow hollow in the foot as a canvas. I’ve written about them before, but I don’t know what I’d do without holdfasts.
I finished the foot hollow by carving with the grain. By arranging the holdfasts like this, I was able to push forward while also keeping the forward edge of the bowl from lifting up.
There’s the finished, oiled, bowl from the bottom. There are a few more photos of the bowl below. Of course, being cherry, the color will deepen over time. It’s available for purchase. 18.5″ long x 10.5″ wide x 4″ high. If you’re interested, email me at dandkfish@gmail.com. $975 includes shipping. SOLD Thanks for looking.
Joel Paul hewing a bowl in Buzzard’s Bay, Massachusetts. June 2019
We were wrapping things up at the end of the bowl carving class. Joel Paul and I were talking about bowls and tools when he handed me this:
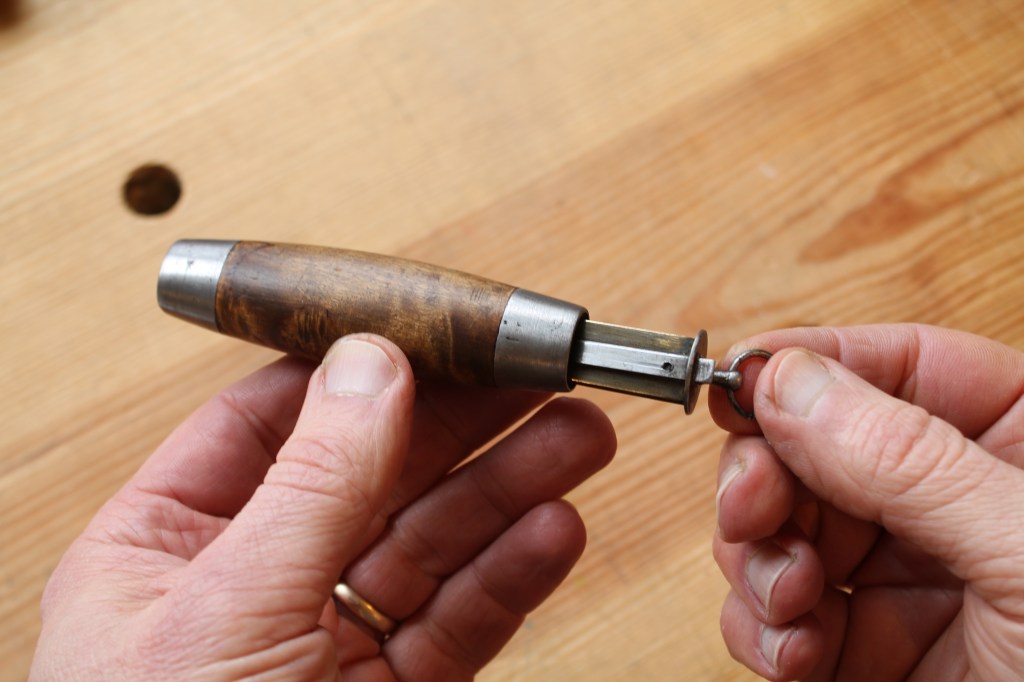
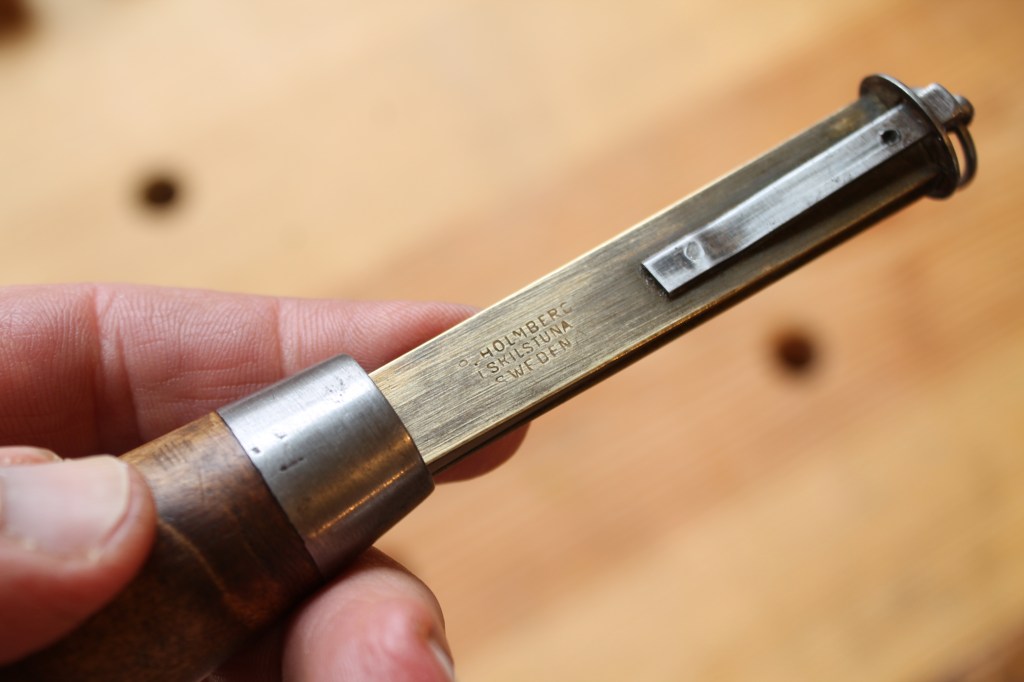
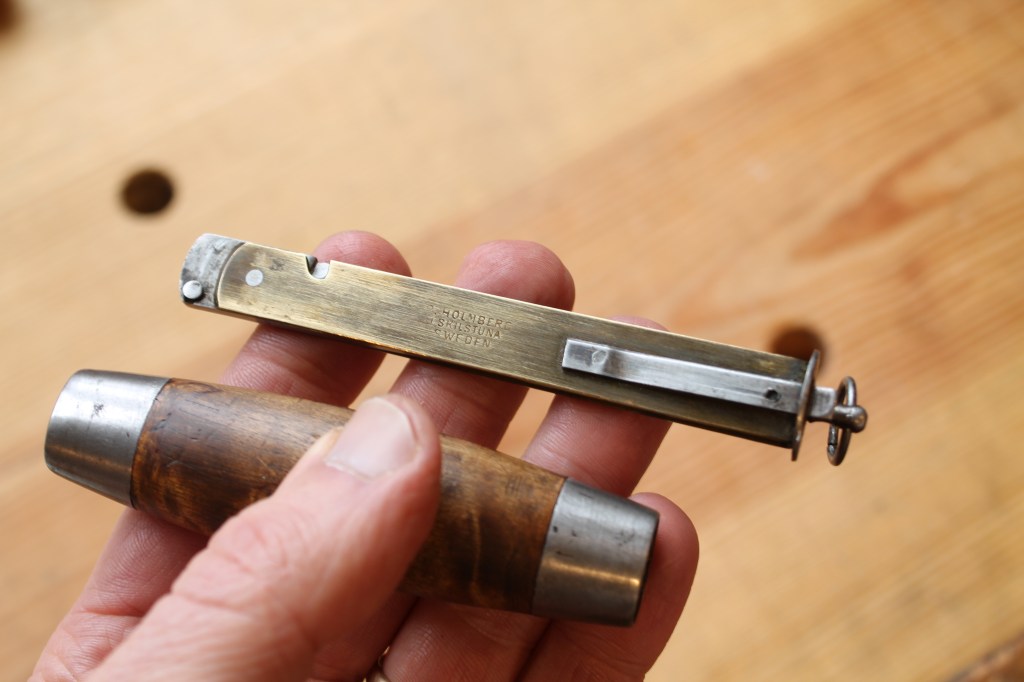
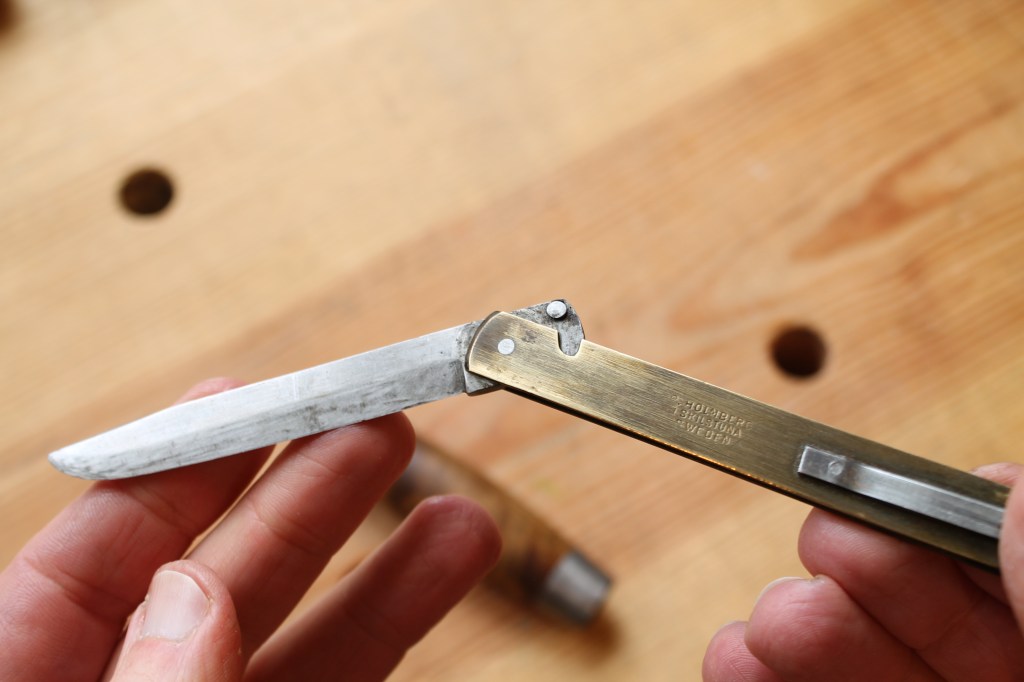
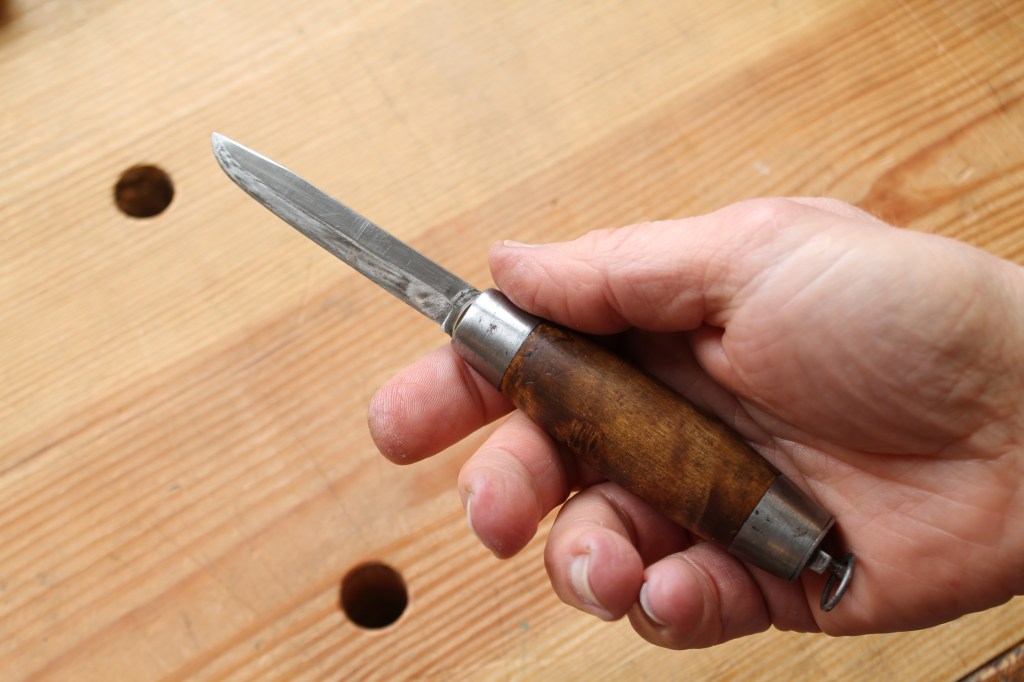
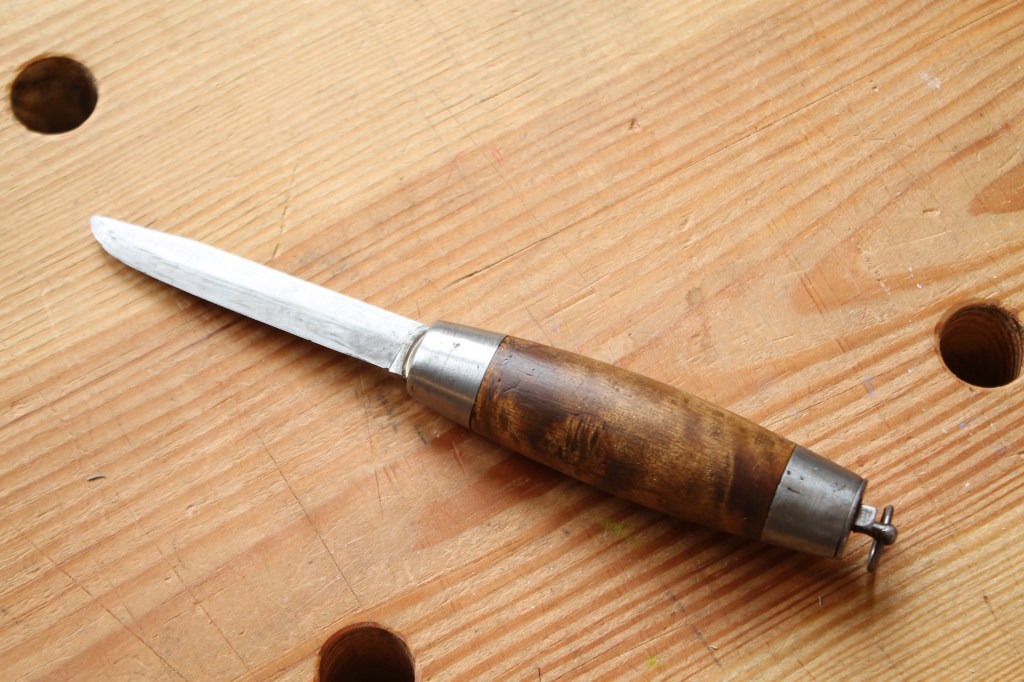
I had no idea what it was. Heavy. A fancy plumb bob? Joel, with his typical enthusiasm, explained that it was a Swedish barrel knife and proceeded to reveal its secrets.
The knife was made by P. Holmberg in Eskilstuna, Sweden. Holmberg made these from 1900 to 1950. The slӧyd blade is ingeniously housed in the handle, ready for carrying in a pocket. By depressing a spring, the brass housing containing the blade can be retracted. The blade is then flipped forward and the whole assembly pushed through the handle. The same spring locks the blade in place, ready for carving. I’ve put together a photo slide show below showing the procedure.
When Joel showed me, it was like a magic show. Then he explained it was a gift for me.
Speechless. I have treasured it and have come to know that this sort of act is typical of Joel.
A few days ago, Joel was helping a neighbor fell a tree. Things went wrong and Joel was pinned under the tree. He has been in the hospital since then with extensive and serious injuries. Joel has a long road ahead, but is feeling the support of his friends, family, and community. If you can offer any financial support, a gofundme has been set up to help Joel. It will be deeply appreciated.