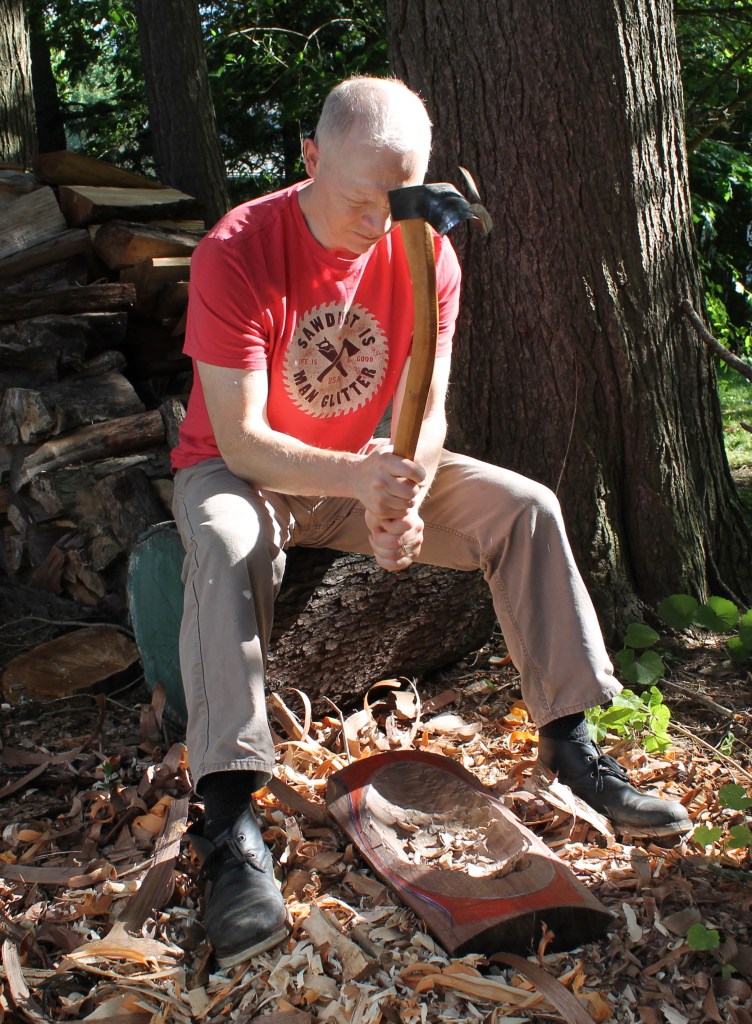
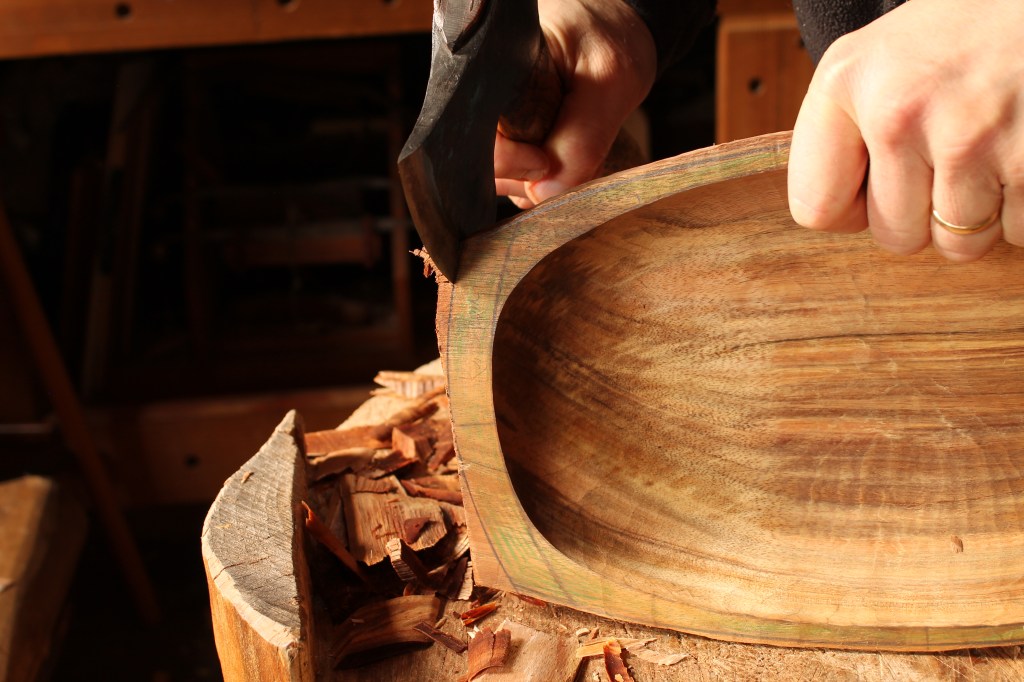
Although I rarely use it, I do have a hollowing adze meant to be swung with two hands. For large bowls, it can help to hog out material a little faster. It was looking lonely, so I pulled it off the wall to begin hollowing the walnut bowl that led my last post. In his book Country Woodcraft Then and Now, Drew Langsner has an extensive bowl carving section that includes a low base for securing a blank while using an adze with two hands. That would be better, but I haven’t gotten around to making one, so I just took a seat on a convenient log and set the heavy bowl blank in front of me. With my elbows on my legs, I swung the adze by pivoting at my elbows and rotating my wrists. The hardest part was concentrating, what with the neighborhood kids laughing at my pants, asking where the flood was.
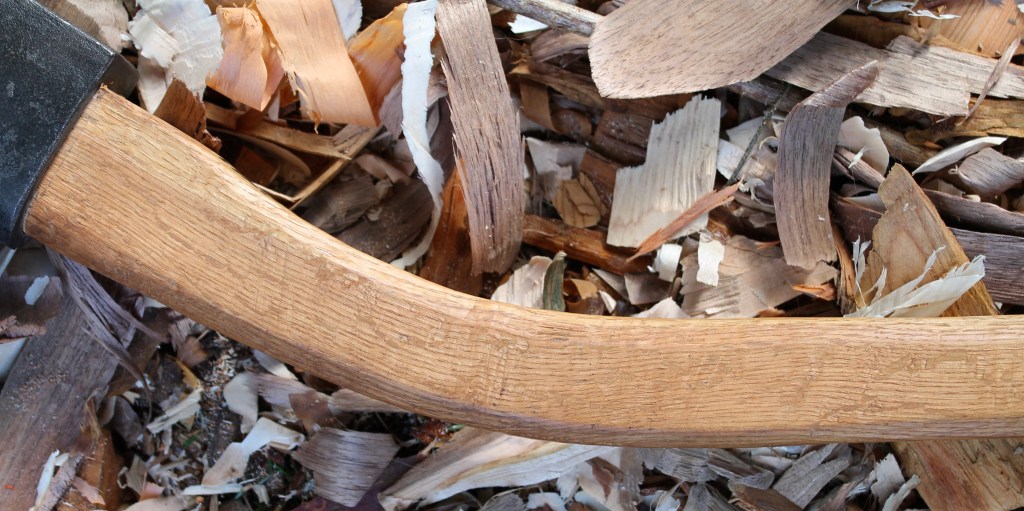
In the shot above, it may look like the handle is breaking at that sharp bend, but it’s not.
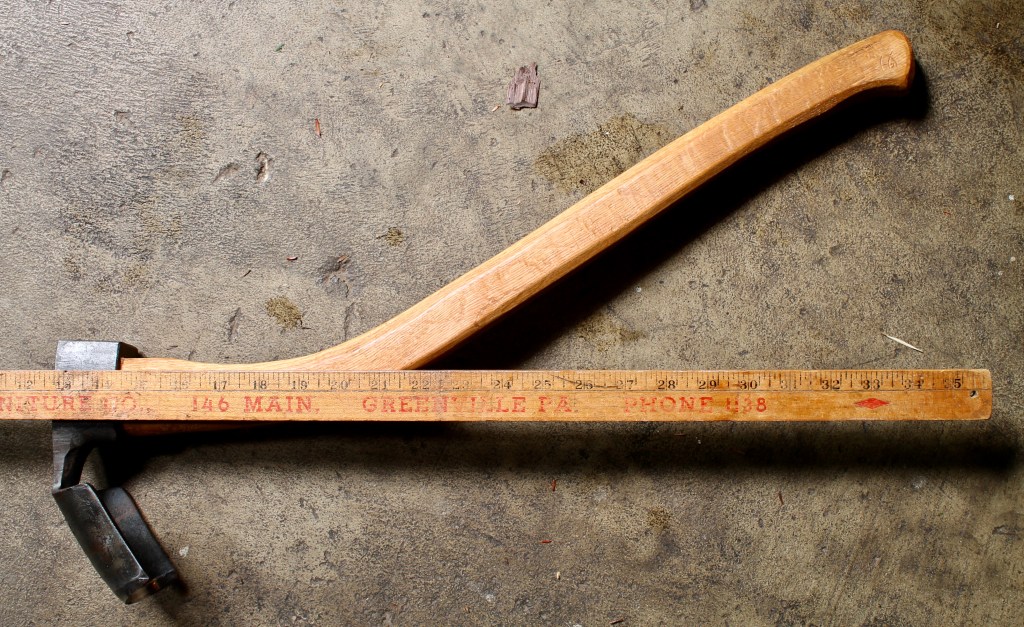
When I bought this adze, I expected I would have to change the handle. The geometry of the head and the handle were not in harmony. In the photo above, I’ve used a yardstick to represent the original handle. It came straight out of the eye. When swung naturally, the cutting edge was tucked at an inward angle and the area behind the edge just slammed into the wood. So it was either reforge the head to open it up with less of a tucked profile, or make a new handle that brought the geometry of the head into harmony with the swing arc. I’m not a blacksmith, so I went to the woods.
I found a limb in a fallen oak with an appropriate bend in it, split it, and made this handle from it. Drew Langsner used to offer a similar handle design for an adze in his Country Workshops catalog. He steam bent the handles from straight grained wood, which makes more sense when you have multiples of the same thing to make.
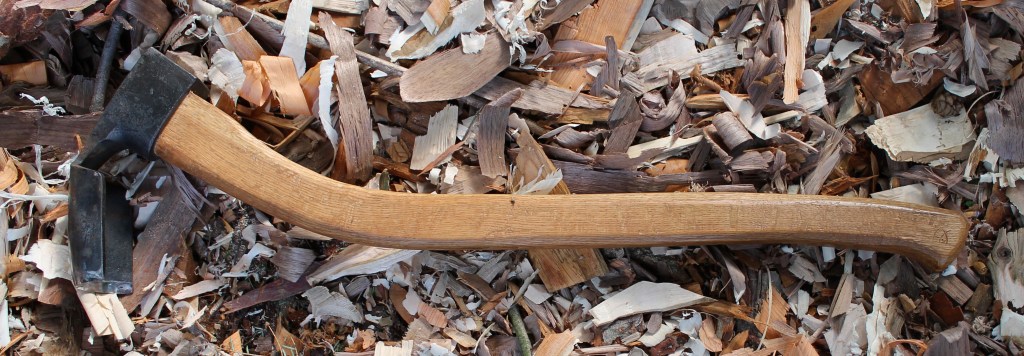
In the detail photo, you can see the flow of the fibers through the handle.
I don’t think this exact one is available any more. The cutting edge is deeply curved and nearly 3″ across. I found some Biber adzes, but it looks like they’ve been radically redesigned. They have a short-handled one now with a design that seems to have been modeled closely on Hans Karlsonn’s adze. But, no matter. Whatever adze you use, consider the proper relationship between the head and handle, something I’ve written about and illustrated in other articles.
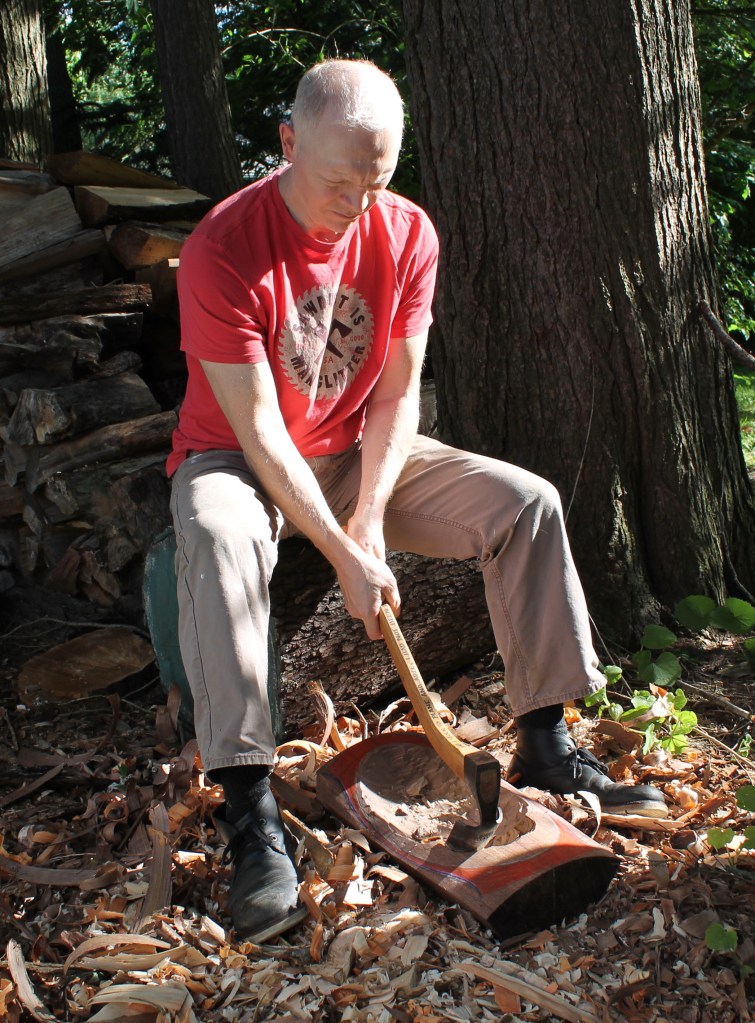
Like I mentioned, I tend to use this only rarely, but some folks rely more on a long handled adze. I find that the short one hogs away nearly as fast and I have to go to to it for more precision anyway as I near the line. The photo above shows about as close as I want to get with the big one. That one cut almost required a bowl re-design.
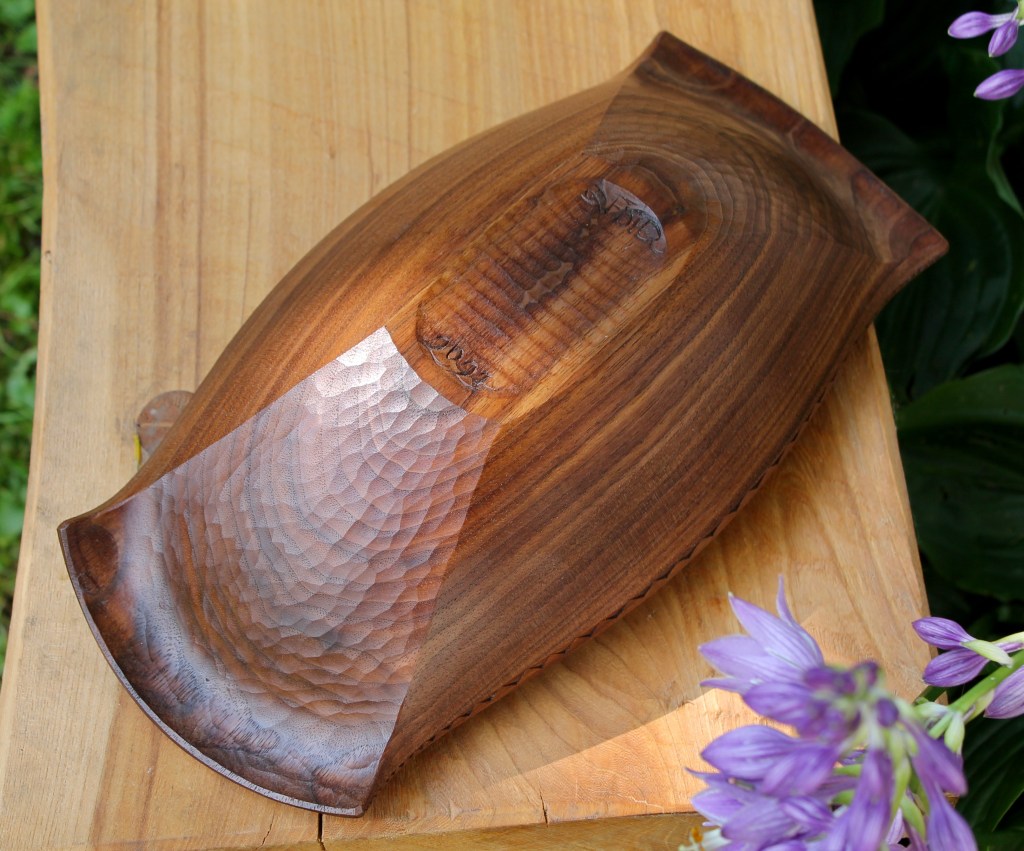
Earlier this week, I was preparing to take some photos in the shop of two recently-finished walnut bowls, but the light filtering into the shop wasn’t really bringing out the color variations in the wood. I looked into the back yard and saw the light hitting the hosta flowers, and took the bowls out there.
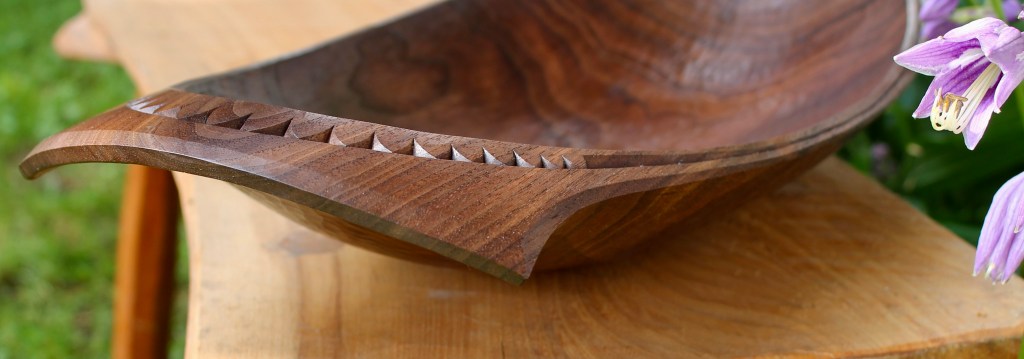
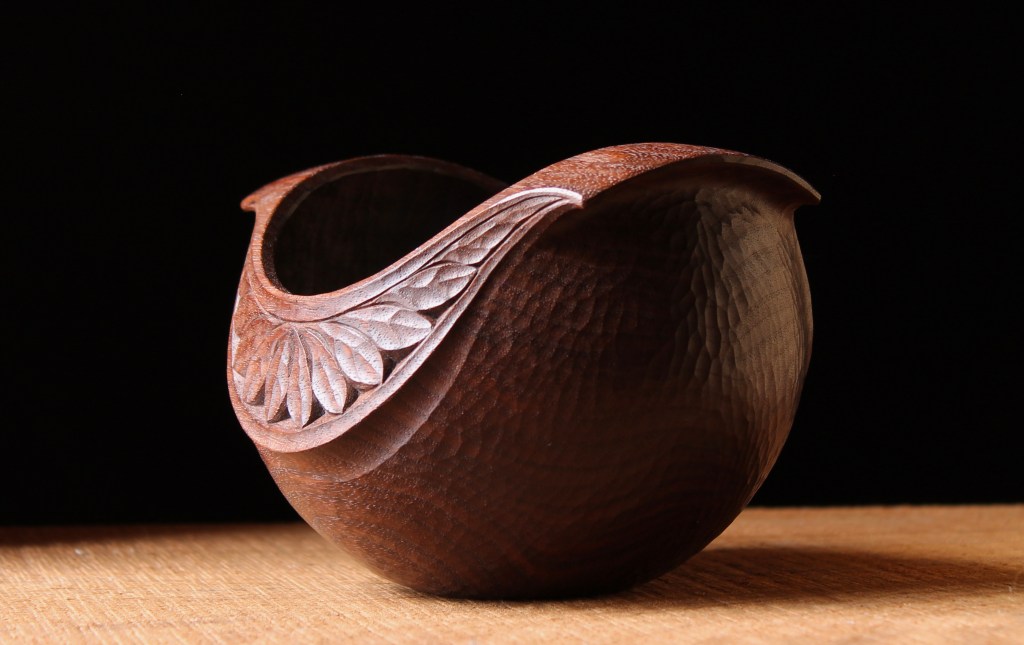
This first one is a long open form in a style that I’ve done many times, but it had been a little while.
I was reminded of the time required to carve the complex exterior form and to get the flow of the lines just so. And I think you can see what I mean about the right light revealing the color variations in the walnut.
And then it’s on to the necklace. I wrote an article for Fine Woodworking Magazine (Issue #263) five years ago about carving this bowl form as well as the necklace. It’s still a fun challenge, and I learn some subtle thing every time I make it.
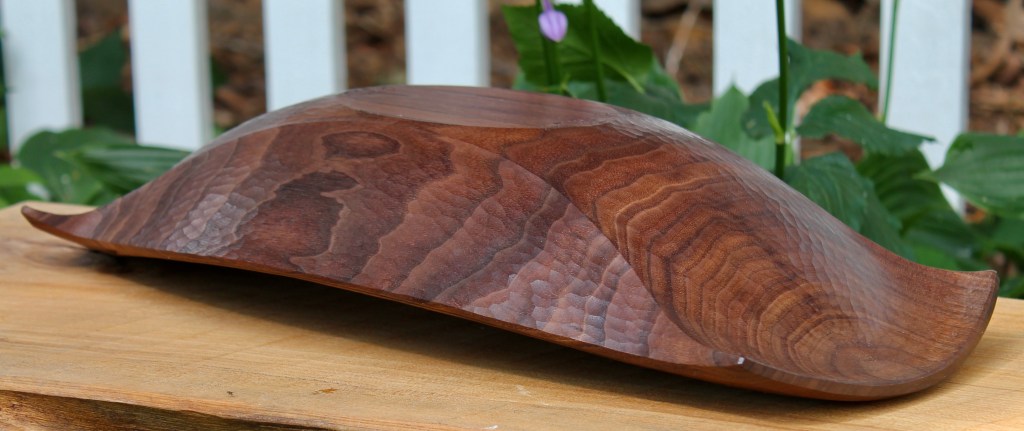
The proportions (usually determined by the particular piece of wood) within the design can vary widely and still work well. This iteration is 19 1/2″ long, 9 1/2″ wide, and about 4″ high.
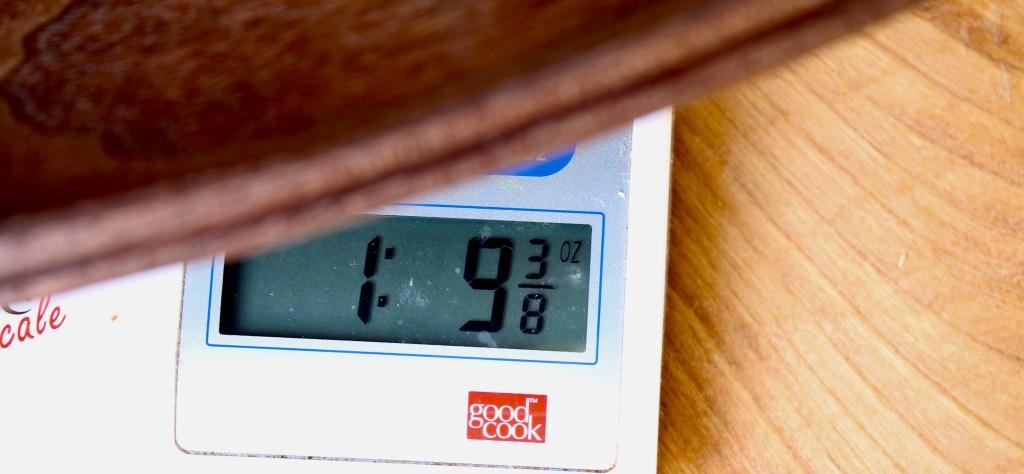
I weighed the finished bowl out of curiosity; 1 lb., 9 3/8 oz.
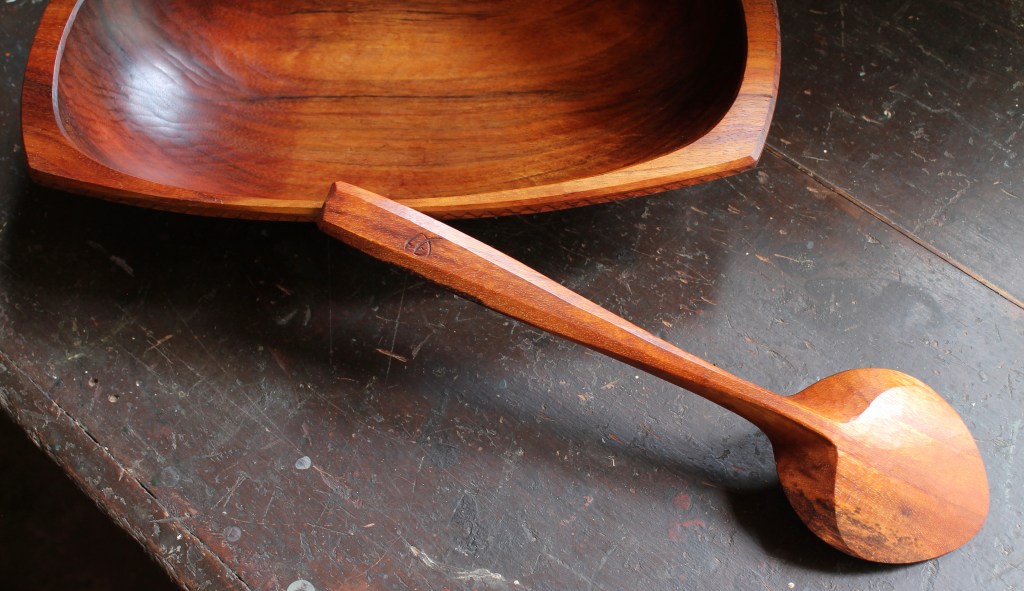
And the shot above is for all of you using that newfangled system.
Chip was patiently waiting as I snapped the photos. He read that hostas are poisonous to dogs, so he doesn’t eat them. He lays on them instead.
I already have a home for that first walnut bowl, but his little brother is available:
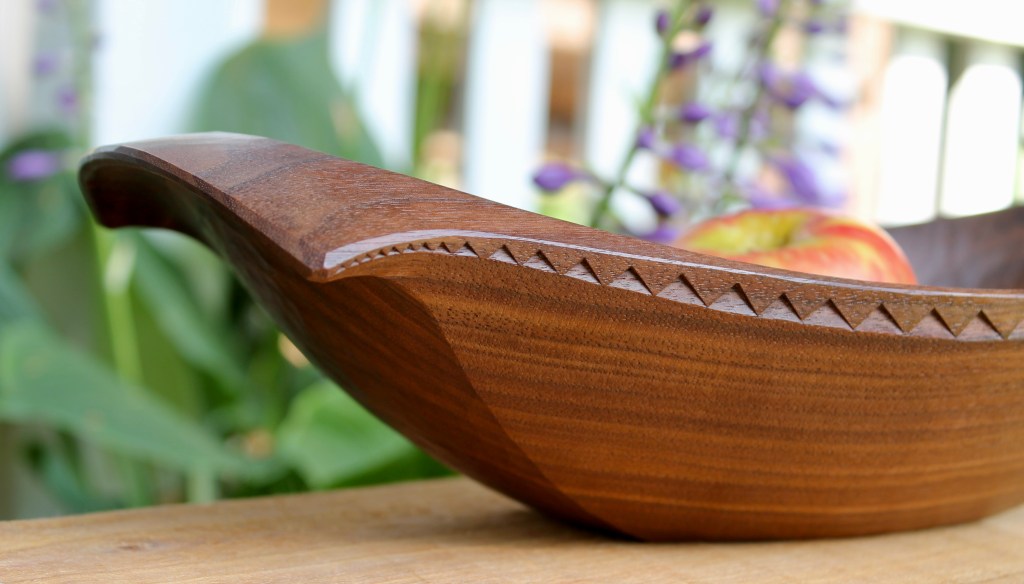
Still walnut, but many different elements to the form and detail that make it more straightforward to carve. Smaller too, at 13″ long, 6 1/2″ wide, and 3 1/2″ high. Three more shots below.
Update: SOLD
Hosta flowers weren’t the only ones on display. The first rose of Sharon flower bloomed at the edge of the yard. The bumble bees will be happy, like the one I showed in this post a few years ago.
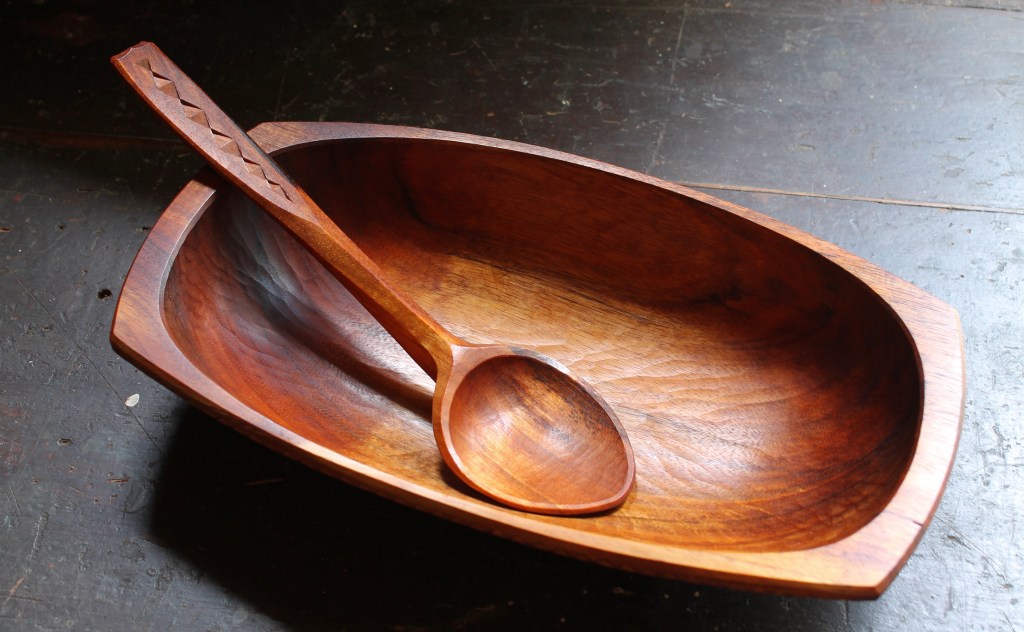
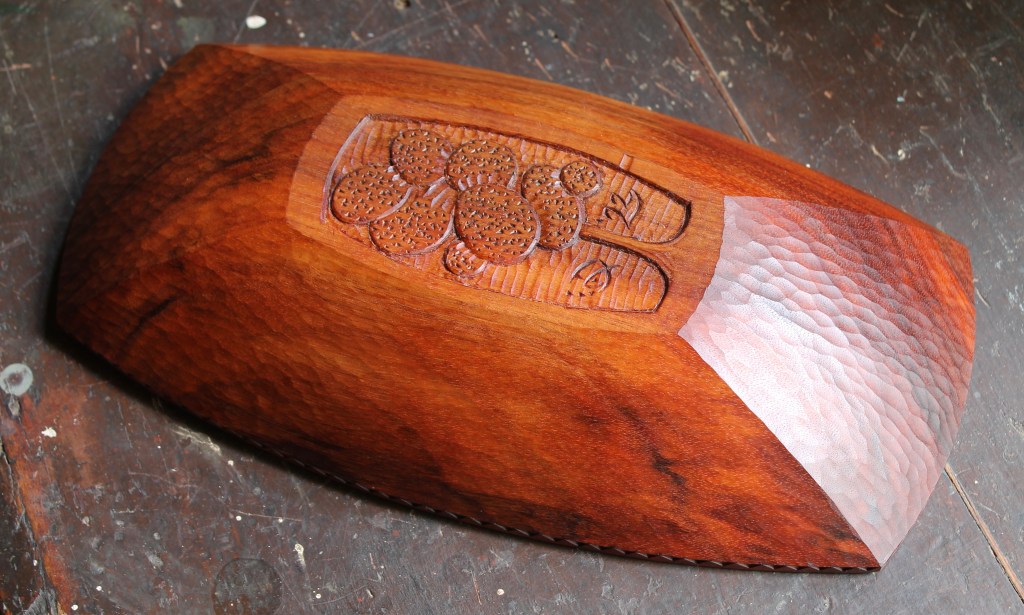
Koa bowl (13.75″ x 7.5″ x 2.75″) and koa spoon (12″ x 3″)
The wood for most of what I make comes from trees that grow within a few miles of my house, which is more than enough to make me happy. I’m fortunate to live in an area with so many diverse species flourishing all around me. Acacia Koa isn’t one of them. In fact, Koa only grows in one place far away: Hawaii.
One day two unexpected boxes showed up on my porch, each containing a block of green koa wood wrapped tightly in trash bags. I did some research on koa lumber and realized I must have been a better boy than I had thought.
There is an interesting chapter about koa in the book Around the World in 80 Trees, by Jonathan Drori, a beautifully crafted book with lovely illustrations by Lucille Clerc. Drori discusses the rich history of koa in Hawaiian culture. It was the wood of choice for the ocean-going canoes that could be 100 feet (30 meters) long. Chiefs would commission a team led by an expert canoe-builder called the kahuna, to carve the vessel with stone adzes from a single trunk. This bowl doesn’t even make me a tiny kahuna.
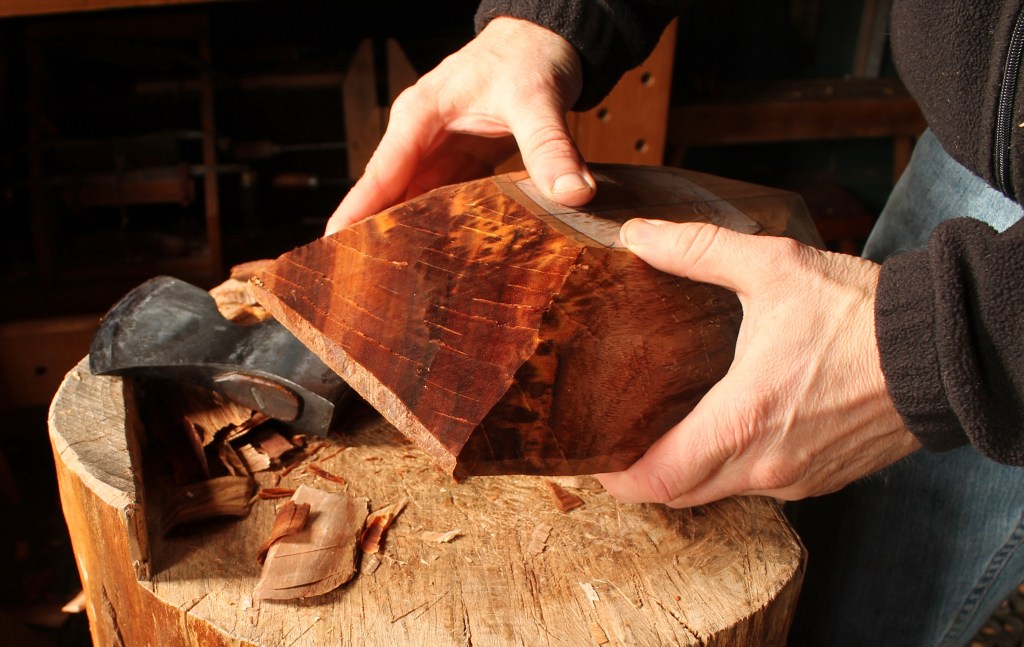
Since I had, essentially, a 14″ x 8″ x 3″ plank to work with, I decided to make the most of it and keep the top flat. I have been calling this shape a “rectoval,” and I assumed that wasn’t a “real” term. But I just googled it, and what do you know — cookie cutters. Turns out, it’s even a hashtag on Instagram with five posts! (Yes, I know what an Instagram is.) But I digress. The hollowing went well. Working with koa seemed similar to cherry or walnut to me, although there were some areas of reversing grain and figure to deal with.
To maximize the hollow, I went with no extended handles. Care must be taken to avoid blowout at the rim especially when hewing any handle-less bowl. A sharp axe makes a big difference, but the main thing is to avoid chopping all the way to the upper rim of the bowl (which is face down on the chopping block in the photo above). With no wood below it for support, especially if part of the bowl is lifted off the block, a chunk of wood can split off along the short grain near the rim. To avoid that, I begin by rough hewing the sides first, then I chop away most of the end material, leaving maybe a 1/2″ of the end grain below the rim untouched.
Above, you can see the results. The rounded final form of the end is under there somewhere, but that is not my concern right now. Removing the bulk of that wood makes the next step, shaping the curve of the end of the bowl, possible.
A sharp axe handles this well. Once you get the cut going, the left bevel just continues to register against the newly cut surface, stroke after stroke, making it easier than it may look. Stop at the center line, then flip the bowl up to do the other side. Cutting like this keeps the fibers supported and prevents blowout. If you don’t feel comfortable doing this with an axe, you can get close with a saw, then trim to the line with a spokeshave.
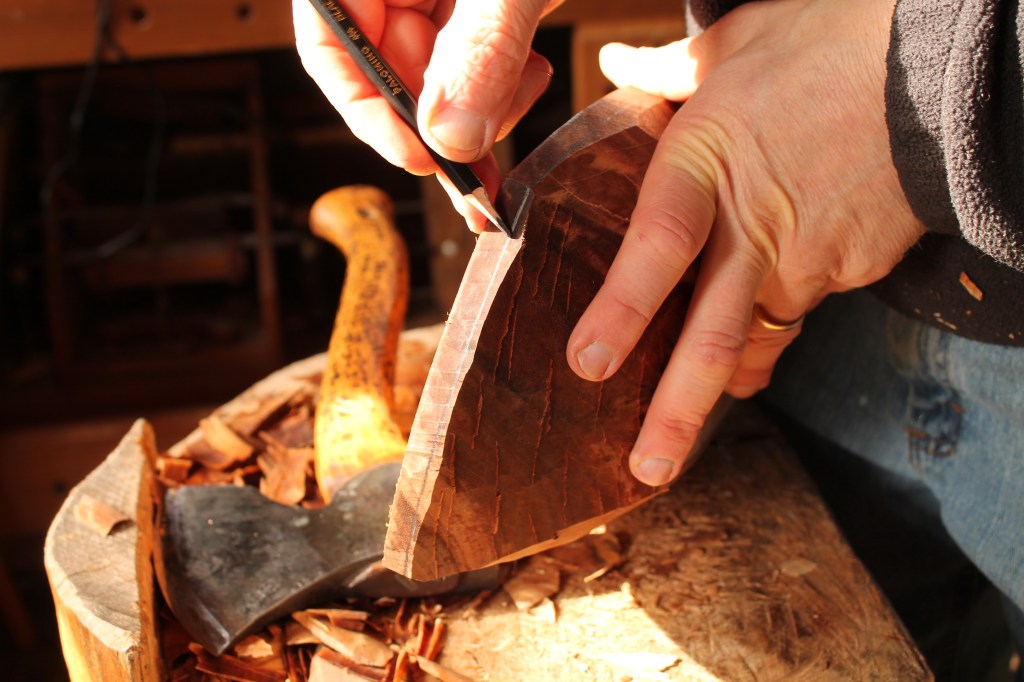
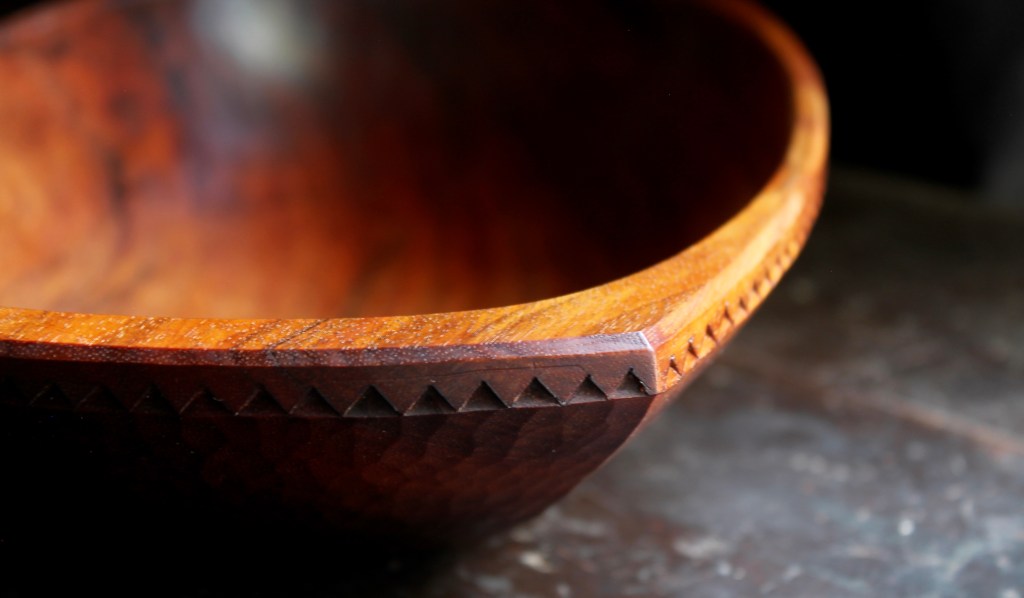
Now that the final end surface is established, I’m marking a line below the rim where I want the lower end wall to stop. This leaves me a narrow band below the rim for some chip carving, but I could go right up to edge of the top surface with no problems now. A drawknife and/or spokeshave can do the final shaping of the exterior walls.
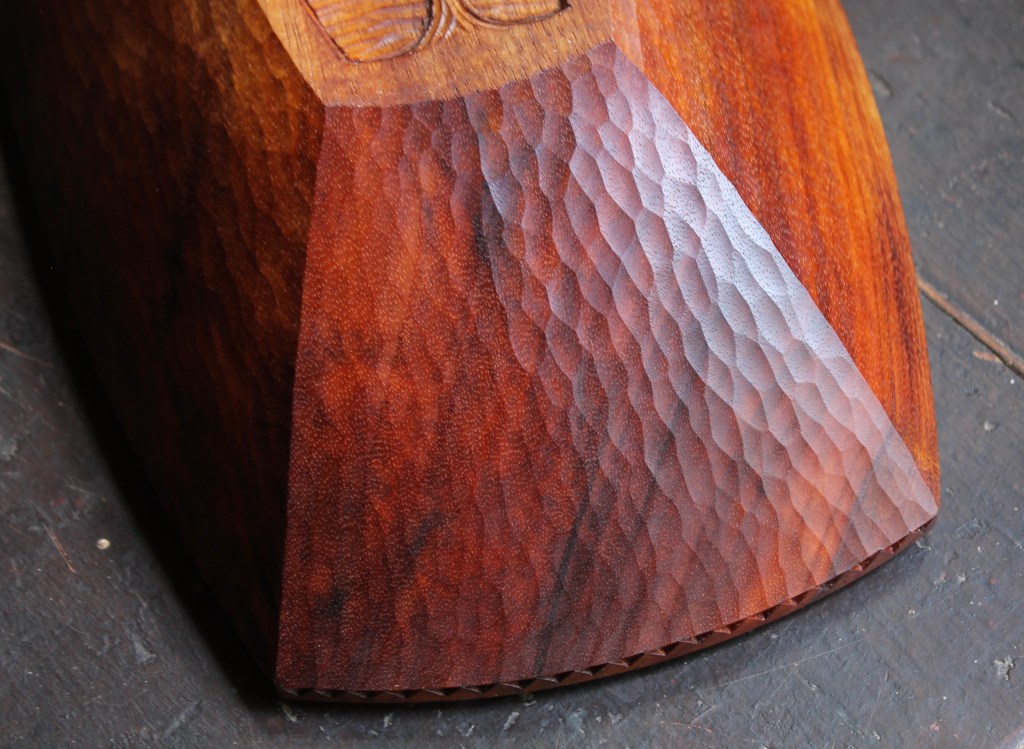
Above is a shot of the final end wall. The surface texture and chip carving were executed after drying.
I had just enough thickness at the foot to do this fun little tree in shallow relief.
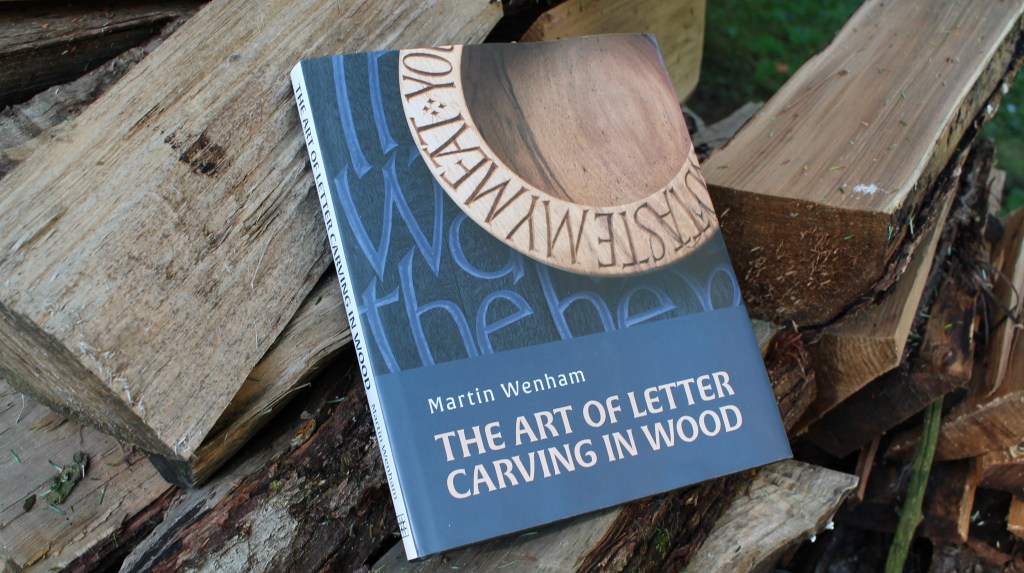
When I first encountered Martin Wenham’s work several years ago, it expanded my awareness of the wonderful possibilities that letter carving offers. Martin’s pieces are testaments to his attentive sensitivity to wood and language. Many of his works can be explored here. Better yet, start with this video in which Martin tells his story and discusses his approach to lettering. You also get a few peeks at his methods and see a lot of his finished pieces:
I’ve mentioned Martin on the blog before, and now because, just a few months ago, Martin’s book The Art of Letter Carving in Wood was published. I purchased mine from Blackwell’s here, and the price includes shipping to the USA. Here is a link to a print interview in which Martin discusses the book. And you can see a few more shots of the book, including the table of contents, at the Crowood Press site, here.
The book is a culmination of what Martin has learned since he began carving letters in 1967. He explains, in clear detail, the methods he uses, including the shape of his tool edges and the way he sharpens them. There are many possible ways to carve letters, or to carve, period. Martin’s approach has proven to be effective through his work and his methods are accessible and achievable even if one is just beginning to explore. Note that Martin uses no knives and the methods are most suitable for letters larger than, say, those on spoon handles and such.
Far more important than the carving method, Martin offers great insight into letter design, spacing, variations, and much more. The back cover gives you an idea of the topics covered as will the links provided above. Throughout the book, Martin illustrates his points with examples of his own wonderful work. Highly recommended.
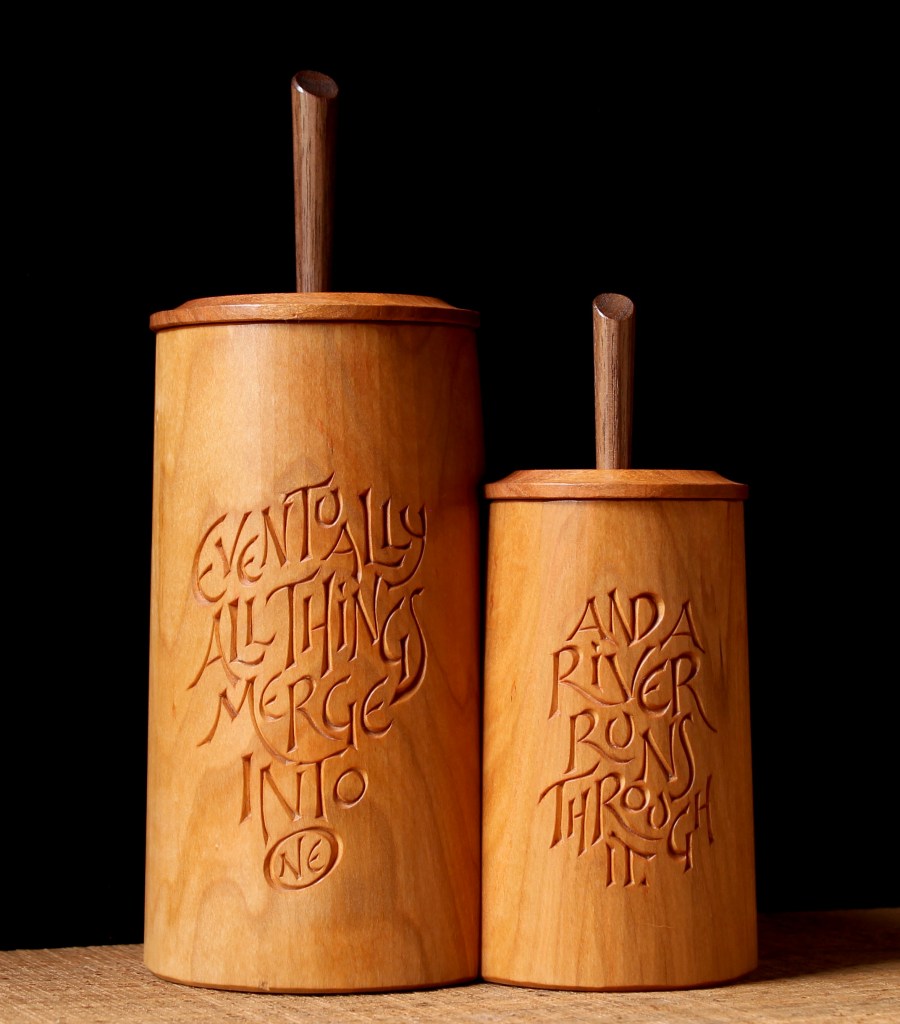
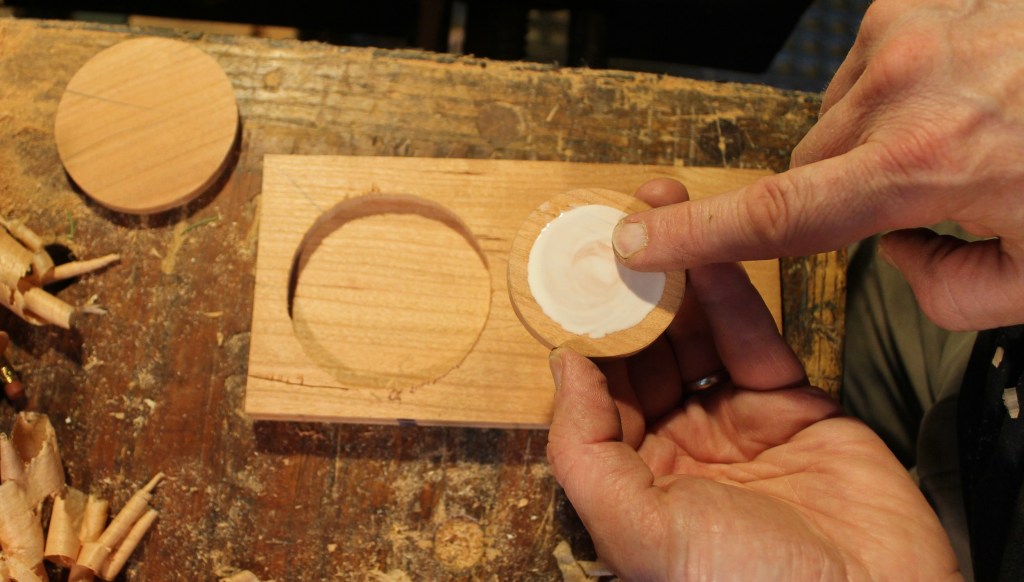
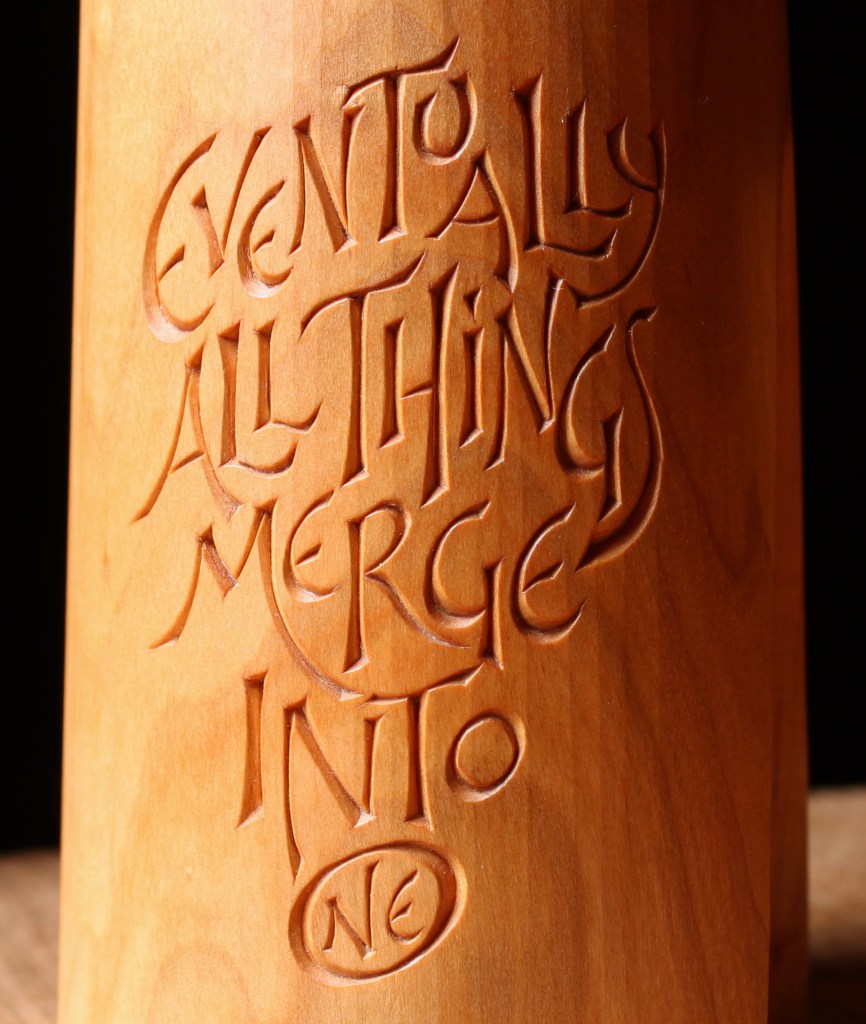
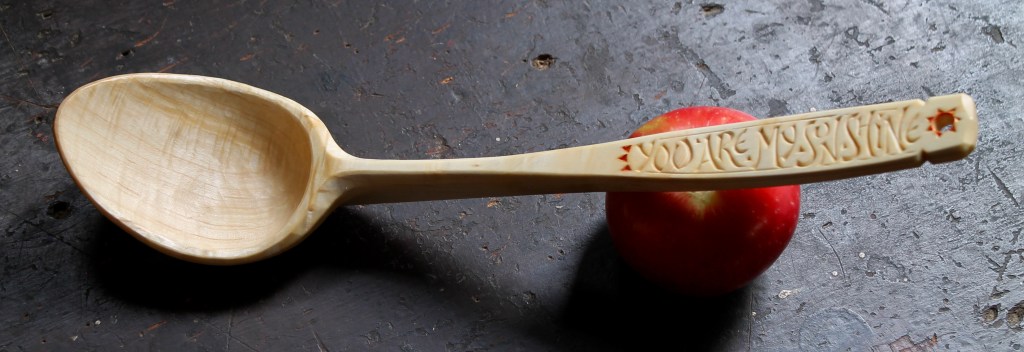
The five-year-old said he loves his dad’s hugs and fly fishing together, so I came up with this pair of merging shrink pots carved with a line from Norman Maclean’s novella A River Runs Through It. The larger pot is about 10″ (255mm) tall with the finial, 7″ (180mm) without. Diameter is a little over 4″ (115mm).
After lots of sketchbook sketching and head scratching, I cut a fresh cherry log into two sections and drilled a hole through each with a 2″ T-handle auger. (I’ve written many other posts about making shrink pots; check out the “shrink box” category from the menu to the right.) Notice the fresher cut on the piece to the right where I had just sawed the one length into two. On the piece to the left, I have marked my plan for shaping the base of the larger pot to accept the circumference of the smaller pot. I sized the outer circle of the larger pot to maximize the heartwood while eliminating the sapwood.
There’s the view from the bottom of the finished pots nestled together.
Matching the shape at the bottom was easy compared to the rest of the way up, especially considering that both pots are hand shaped. It came down to shaving a bit more here and there with a gouge, checking the fit, repeat….
Following the 2″ hole, the rest of the material was removed from both pots with a gouge. The larger pot’s interior was shaped to reflect the form of the exterior.
After I cut and trimmed the top surfaces level, it was time to make tight-fitting lids. You can make rabbets on this type of lid by carving from a single piece, or turning on a lathe. In this instance, I laminated two pieces together to form the rabbet. Here’s a captioned slide show (below) that details that process:
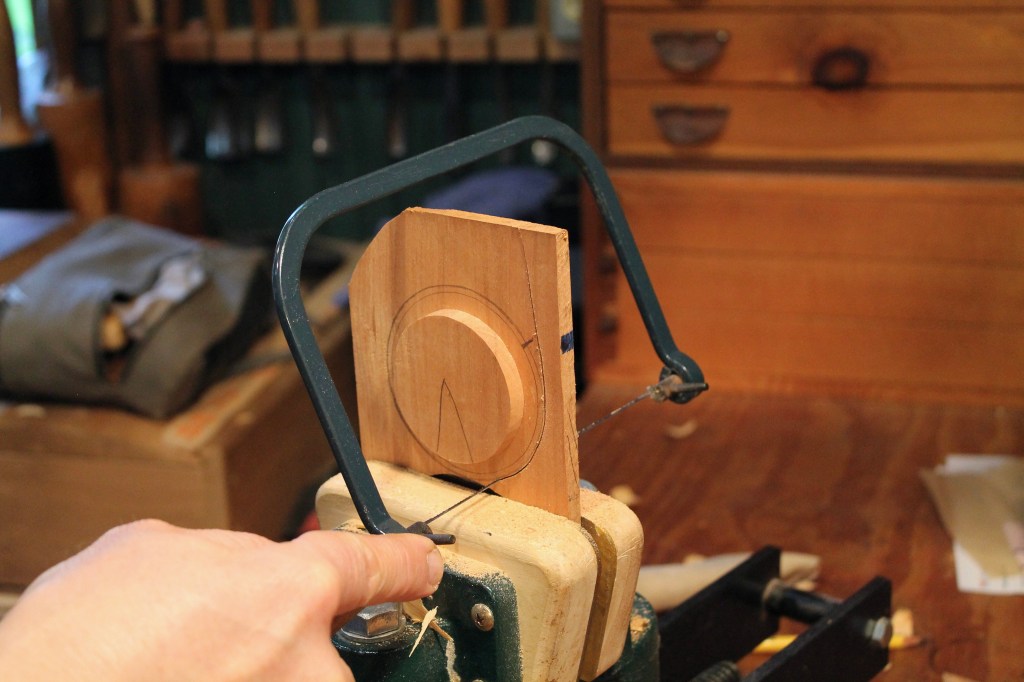
I resawed two pieces, maybe 5/16″ (8mm) thick, from a thicker dry cherry board.
After planing the surfaces, I marked and cut out (with a coping saw) the shape of the interior of each pot on one of the boards.
I leave a little outside the line when sawing, then trim to the line with a chisel. You could do this with a knife, but the dry cherry can be tough and cutting like this with a chisel makes it easy to see if the edge is pretty square to the surface.
To match the rabbets with the upper lids, I stack the two boards on top of each other again to orient the bottom circles for gluing.
Then I clamped them down with a couple holdfasts. There is glue only under the circles.
I made reference marks so that the grain orientation of the two pot lids would match up once the two lids were separated from the one board.
I freed each lid with a coping saw, then trimmed to the line.
For the profile on the edge of the lids, marked a circle on top and a line on the edge, then worked a gouge around between those lines. You’ve got to go four different directions to adjust for the grain. The gouge cuts leave a subtle texture to the profile.
The finials were carved from walnut, for contrast and as a nod to the dark brown hair of the father and son.
The finials are fit to the lid with a shouldered tenon, wedged from below. The interior side of the lid and pots were left unfinished so that nothing might effect the taste of the oats, tea, or whatever stored inside.
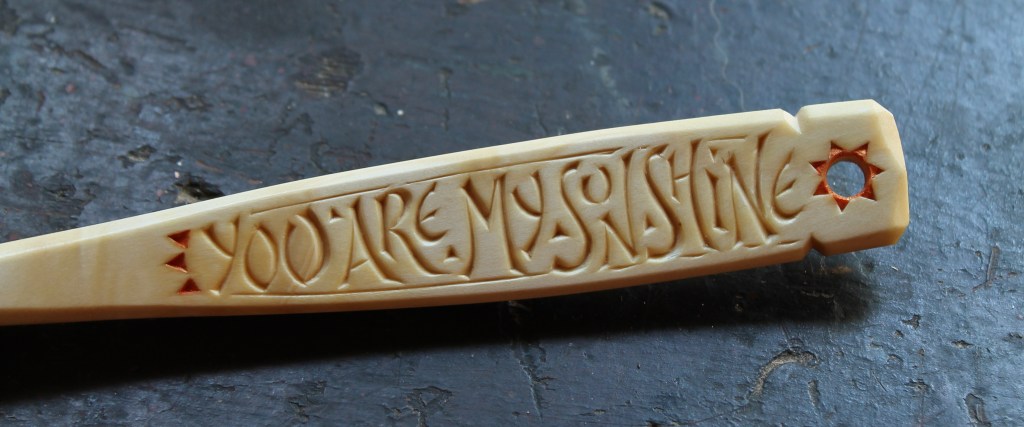
The lettering was cut with a knife, along with a couple small gouges for the tighter outer curves.
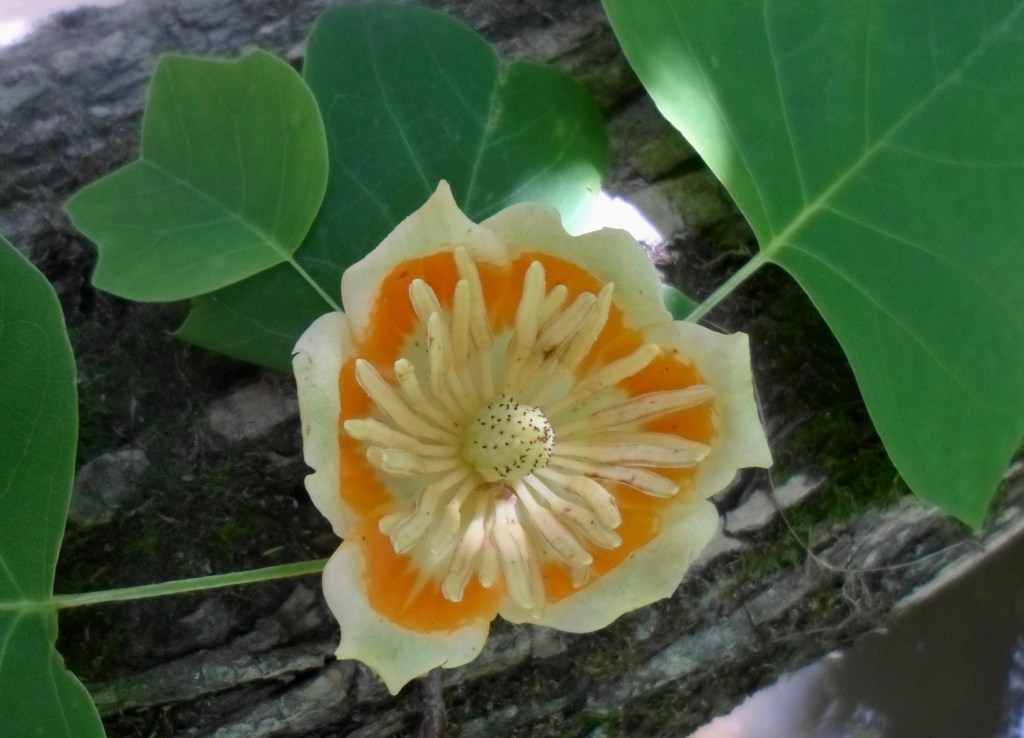
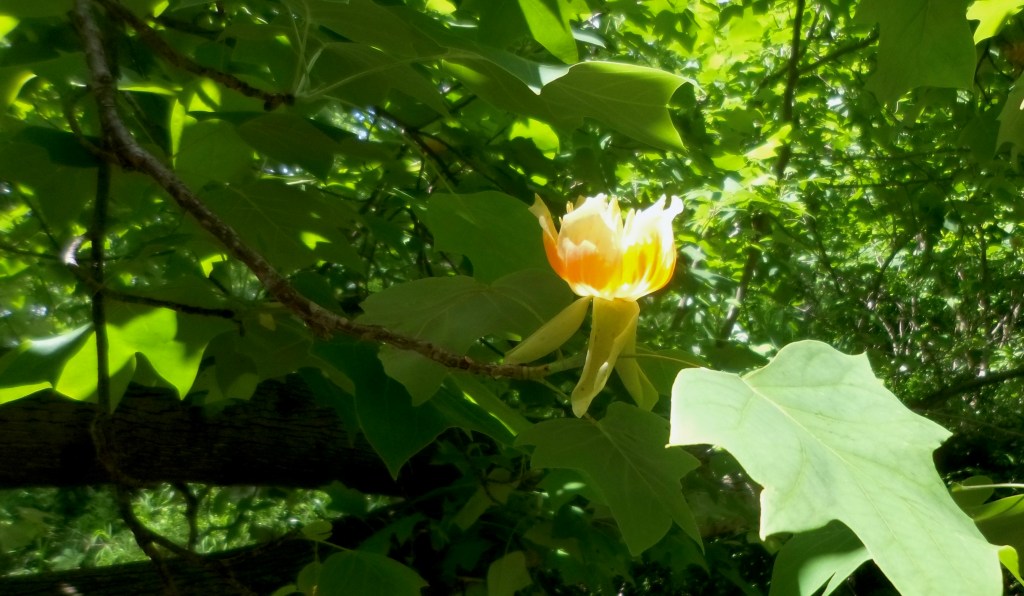
My son, Noah, and I got out to the river together for a couple hours of trout fishing a few days ago. As we waded through the water and weaved around the top of a tree now living horizontally across the river, I noticed sunlight striking a flower, one of several peaking out through the treetop leaves.
Tulip tree flower in the sunlight over the Little Shenango River.
We were treated to an unusually close-up view of the flower of the tulip tree, also know as yellow poplar or tulip poplar. No matter what one calls it, Liriodendron tulipifera is not a poplar, but it is a beauty. It grows tall and straight, and the leaves are a fun shape. But, contrary to Thoreau’s suggestion, it doesn’t seem that these flowers were made to be seen, unless by a bird. As Charles Fergus put it in his book Trees of Pennsylvania and the Northeast: “Borne high up in the tree, the blossoms are rarely seen; the woodland walker is more apt to notice petals from the spent flowers lying on the ground.”
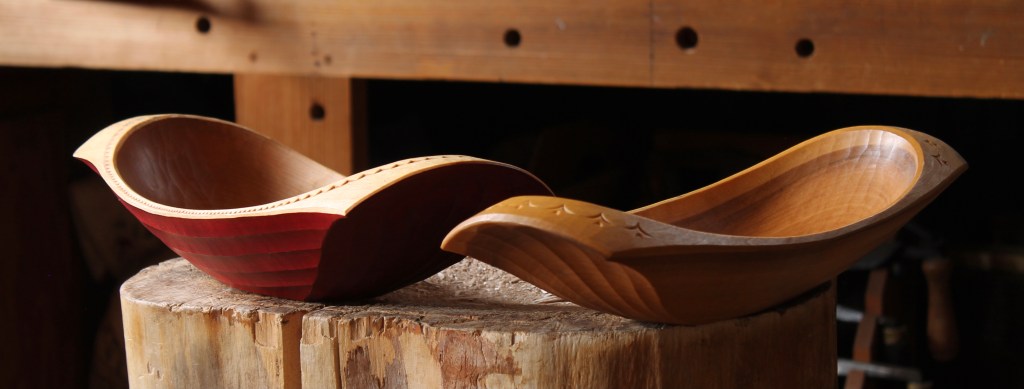
Fortunately, tulip trees have a wide range beyond Pennsylvania, covering most of the US east of the Mississippi. If you can’t find one alive and low enough to see the blooms, maybe you can find one that has fallen recently; tulip trees make nice bowls. There’s one on the right, below:
I found more flowers than trout. Noah caught seven, I only fooled one and fell flat into a patch of tall weeds and briars. And it was time well spent.
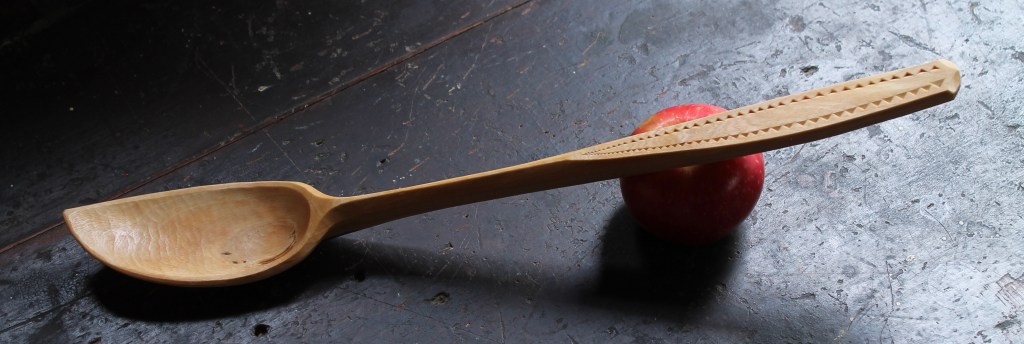
I’ve always got some spoons in the works. As good crooks are discovered, I rough the spoons out and set them aside, then finish carving them when I can. Here’s a group of eight I’ve got together now for sale. Unless otherwise noted in the description, these are all straight from the tool and carved from natural crooks. Finished with pure linseed oil cured in a kiln. If you’re interested, email me at dandkfish@gmail.com. You can pay by mailing a check or through PayPal; please let me know your preference in your email. Prices include domestic shipping. Thank you.
There are comparison shots above and below, heads and tails, respectively. Then I have an individual shot of each spoon further down.
#1: Maple, 8″ x 1 7/8″ A small server with a lot of crank. $110 includes shipping. SOLD
#2: Cherry, 14″ x 2 3/8″ A long multi-purpose spoon from cherry heartwood. $140 includes shipping. SOLD
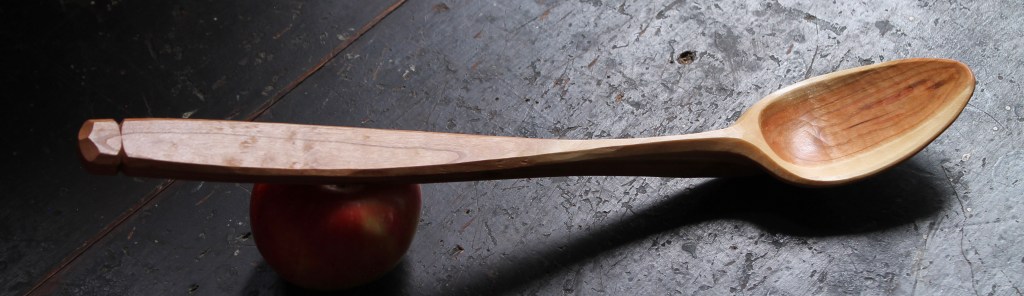
#3: Apple, 9″ x 2″ A small server or maybe an eating spoon if you’ve got a really big mouth. There’s a little pin knot on the right side of the bowl that leaves a narrow void on the underside of the bowl. $90 includes shipping. SOLD
#4: Cherry: 15″ x 2 1/4″. Mainly sapwood with splashes of dark heartwood on the back. Long spoon with a slender bowl dictated by the form of this unusual crook. Another one good for multi-purpose use in the kitchen. Gives you plenty of reach, too, if someone’s trying to steal a cookie. $145 includes shipping. SOLD
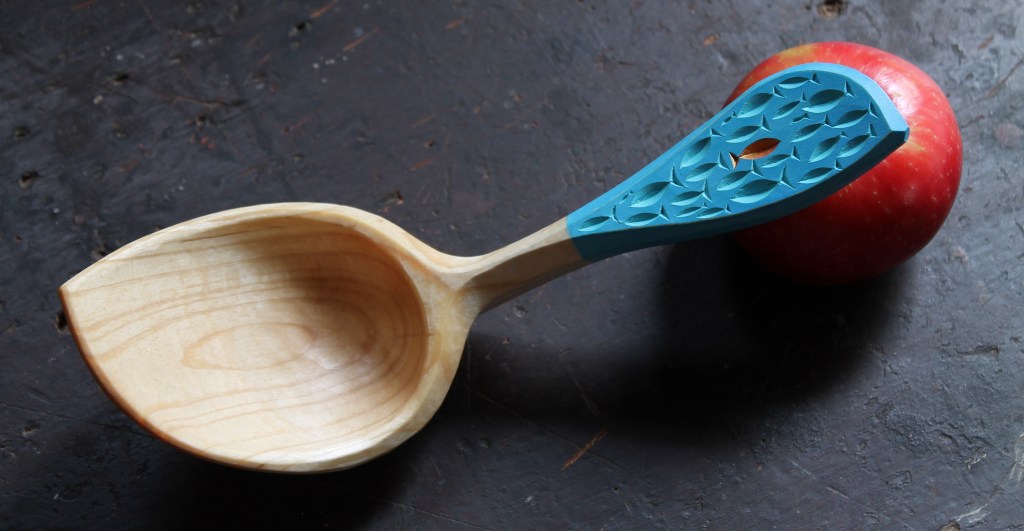
#5: Birch, 8″ x 2 7/8″. A short serving spoon/ladle with a deep bowl. Ideal for that person, or fish, who doesn’t follow the crowd. Artist linseed oil paint on the handle. $190 includes shipping. SOLD
#6: Cherry, 13 1/4″ x 2 1/4″ Another good long kitchen spoon that’s ready for anything. $130 includes shipping. SOLD
#7: Maple, 11 1/2″ x 2 3/4″ This serving spoon had such gnarly fibers running through the handle that a scraper and fine sandpaper was the way to go in that area. The forward portion has been left from the tool. Detail photo below of the carved lettering and touch of artist linseed oil paint. $200 includes shipping. SOLD
#8: Cherry, 11 3/4″ x 2 3/8″ The last one of this group is carved from a straight radially-split piece of cherry. Just a very little bit of crank and dish to the bowl. More of a spatula/paddle good for stirring and cooking. $80 includes shipping. SOLD
A few months ago, I wrote a post about carving this bowl from dry walnut and mentioned that it would be part of an American Association of Woodturners exhibition The Space Between, and the connected auction. Well, as of this evening, the auction is now open for online bidding up through June 25 when live bidding will also take place for the items at the AAW International Woodturning Symposium in Chattanooga, Tennessee.
From what I understand, anyone can peruse the auction site, but they must register to bid by using the “register to bid” button. Anyone can watch the live event, but must pre-register to bid. Online bidding continues until the end of the auction.
Even if you have no plan to bid on anything, it is worth taking a look at the pieces for inspiration. Just one example is Greenwood Fest alum Kalia Kliban’s redwood burl turned box. Absolutely wonderful.
And you may be asking yourself, “Why in the world is a carved bowl that has never seen a lathe part of a woodturning exhibition?” Honestly I had no idea, until I read the note at the bottom of my page, which explains that they invite a few non-turners just to shake things up a bit.
I’ve mentioned and shown drawknives in use in many posts. I use them for bowls, shrink pots, big spoons, chairs, and all sorts of other things. I thought it was about time I shared a few specific thoughts about this versatile tool.
If you want the whole scoop on drawknives, read Curtis Buchanan’s article in Fine Woodworking #268 (May/June 2018) “Master the Drawknife” or Peter Galbert’s 40 page drawknife treatise in his book Chairmaker’s Notebook. There’s also a good article by Drew Langsner in FWW #25 (Nov/Dec 1980) called “The Drawknife.” I’ll add my two cents here based on my knives while trying to not muddy the water.
Top to bottom: D.R. Barton, Spannsage, Baldwin, Veritas
Above are four of the drawknives I use regularly. The top three are no longer in production, although you’ll find similar forms being made today by other folks. Since I have tried only a tiny fraction of the modern knives available today, I’ll focus on some of the characteristics that I would look for, regardless of age or brand.
I prefer drawknives with the handles up even with the cutting edge rather than those with wings that sweep the handles back toward the user and away from the edge. I think putting one’s hands more in line with the edge makes the tool more responsive to subtle movements of the wrists, which is what I want for carving. I also like handles that are oriented generally at 90 degrees to the blade, rather than splaying out. One reason is that this makes it more natural to keep my elbows tight to my body for more control. With the little Veritas drawknife with a 4″ blade, a little splay helps to keep one’s hands clear on such a short tool. The middle two have a slightly curved edge, a little belly, which may be somewhat helpful in some circumstances, but I’m just as happy with a straight edge.
I’ve probably been using the red handled one the most lately, but I used the larger one, the D.R. Barton, for shaving the arch onto the top of this walnut bowl blank this week. Although it has the same edge width (8″/200mm) as the red-handled Spannsage, the handles are further apart which provides better clearance on a large workpiece. Also, the Barton is more hefty, and if you get some momentum behind that mass, it can help when you’re hogging off lots of material. The red-handle Spannsage weighs in at 12 3/8 ounces (350 grams) while the Barton triples that, at 2 pounds (908 grams).
Thumbs Up: Notice in the photo above that my thumbs are up on along the top of the handles, even up onto the steel. The balance between the downward pressure of the thumbs in front and the thumb pad (thenar) in the back are important for controlling the depth of cut. So I would not grip the handles as in the photo below, as there would be a significant loss of control and sensitivity. It’s also important to me that the drawknife design allows my index fingers to curl over the top of the handles without discomfort.
There is commonly a lot of confusion about whether to use a drawknife bevel-up or bevel-down. The answer is: it depends. First, it depends on what type of cut you’re trying to make. For example, working with the drawknife bevel-down will allow you to make a concave cut much more effectively, since the back of the short bevel acts as a fulcrum to lift the edge as the cut proceeds. But some knives may work better bevel down for other cuts as well; the handles are a big factor in which way will work best for a given knife.
In the photo above, the four drawknives are all sitting bevel-up. You can see in #1 and #3 that the handles are oriented around 20 degrees below the plane of the back of the blade. This is comfortable for the wrists and shoulders. #2 is comfortable to use bevel-up too, maybe because the red handles are so short and below the plane of the blade.
In the next photo (above), the bevels have been oriented flat on the bench. While #1 and #3 could still be used in this orientation (bevel-down), it would be uncomfortable for long use. #4 has a better handle angle with the bevel down, which is indeed how I tend to use that little guy. And Red, he looks good like this in the photo, but is definitely more comfortable in use the other way, which just shows what oversimplification will do for you. With many drawknives, you can bend the handles to an orientation that pleases you.
And then there are the factors influenced by sharpening. If you’re using a drawknife bevel-up, a little subtle rounding (or dubbing, or secondary bevel) of the edge on the “flat” on the bottom provides necessary control. Without it, the edge may tend to dive overly-aggressively.
That can also allow you to make a concave cut, even with the bevel up, especially if the blade is relatively narrow as opposed to deep.
Still, you’re working with essentially a wide bevel made up by the entire depth of the blade, so if you push it too far you’ll start to get jumps and chatter. You can see those on the surface of the cut in the photo above as I’ve now flipped the knife around (bevel-down) and about to make the concavity more steep and, hopefully, more smooth. The short bevel allows me to rock through the cut more effectively.
That’s better. If I wanted to reserve a drawknife especially for making cuts like this even more smoothly, I could purposely create a slightly convex bevel on the knife. Of course, the tearout near the end of the log is due to climbing back up there against the grain. Don’t do that.
The same cut viewed from the side. Now I’ll finish with sharpening, since the worst drawknife is a dull one.
Here’s the core of my sharpening equipment. DMT dia-sharp stones (1×4, 2×6, and one 3×8). I bought most of those from Country Workshops, probably in the ’90s, and they’re still going strong. The 2×6 size is what I use most often, and if the XXfine came in a 2×6, I’d have that instead of that way-too-big 3×8. The white stone is an ultra-fine ceramic that I think was once part of a set offered by Wayne Barton. These stay flat and I can easily apply them to the tool rather than the other way around, which I often do. I sometimes use Arkansas stones too, which I like. I tried water stones briefly, but since so much of what I sharpen is curved (gouges, adzes, etc.) they dished severely and quickly, so I turned away from them. There are many other options available since I settled on this years ago, but I haven’t had the opportunity to try them.
Curtis, Peter, and Drew all discuss sharpening methods extensively in their writing. They detail methods for grinding, honing, and polishing. All of their methods make perfect sense. Like Curtis and Drew, Peter also shows how to hone the edge by taking the knife to a stationary stone raised up in a holder and he also sells a drawknife sharpening aid called the Drawsharp that gets universally rave reviews. I haven’t tried it, but it certainly would work well. So, while you should probably use those methods, I’ll show you what I do so you can shake your head.
I like to use water with just a little cleaner like Simple Green mixed in when I use diamond stones. I keep it in a recycled spray bottle and spray it onto the tool or the stone. You can see in that photo that I once hollow-ground this bevel. Subsequent honings have reduced the hollow grind more in the central area of the blade where the edge wears more and needs to be honed more. The flow of the edge has been maintained throughout, albeit with a little less belly.
For the honing, my body becomes the jig to hold the drawknife steady. I grip one handle in my left hand, cutting edge up, with the other handle pressed firmly into my chest. It helps if your chest has some give to it, like mine. My right hand grips the back end of a 2×6 stone with my index finger extended further up. If you’re smart enough to worry about your finger slipping off, you should wear one of those cut resistant carving gloves on your right hand.
Depending on how much renewal the edge needs, I’ll begin with my coarse or fine stone. I put the stone against the back edge of the bevel and rotate it forward until it lies flat against the bevel. I can feel and see this. With all of my joints locked except my right elbow, I slide the stone along the bevel…
…to the other end, and back, and so on…you can get moving pretty fast.
I flip the knife and do the same on the back side.
In between switching from bevel to back or vice versa, I check for a fine burr all along the cutting edge. This tells me that I have honed away all of the steel that needed to go away on the opposite side. I draw my thumb lightly from the back of the bevel toward the edge. Obviously, do not go the other direction or slide along the edge. That queasy feeling you get just thinking about it is the reason why. You can see where my thumb has rubbed away the sharpening swarth from the bevel. You’ll feel a faint burr where a thin edge of steel has been raised from the rubbing on the opposite side. Where you don’t feel it, keep rubbing on the opposite side.
I do the same process with each stone through my finest stone, to refine the scratch pattern and polish the edge. My goal is to finish with light passes with the finest stone to completely sever the burr away, but the strop assures that I’ve gotten it all. This strop has been working for me for 27 years. Leather on a wood paddle with extra fine polishing compound on it.
I start in this position with the strop flat on the bevel and move the strop forward as I proceed along the bevel.
Ending up something like this. The strop, inevitably, rounds the edge slightly, which, in the case of a drawknife, has benefits for control — just don’t take it too far.
Once you get that nice edge, protect it. It takes longer to repair a damaged edge than to make a sheath. There are lots of options. I made the one at the top from a piece of wood and leather straps. The second one is a length of water supply line; simply slit it lengthwise and tie it with a cord. Third is a crudely made riveted sheath made from an old leather belt. The forth one is a snappy leather one that came with the knife.
Over the last several years, I’ve enjoyed a deeper exploration into the work and life of Wharton Esherick. There is much to admire and contemplate. Esherick believed he had been overtrained as a painter and discovered his most creative expression in wood. His work included woodcuts, sculpture, furniture, his studio itself, and much more. Mansfield Bascom, Esherick’s son-in-law, wrote a fantastic biography, Wharton Esherick: The Journey of a Creative Mind that I highly recommend.
A sketch of Wharton Esherick’s wood sculpture “Spring Beauty” based on a photograph in Wharton Esherick: The Journey of a Creative Mind.
Over the winter, I read about the Esherick Museum’s Annual Juried Woodworking Exhibition. This year, they requested submissions that, in one way or another, represent a self-portrait. You can learn more about the theme and its connection to Esherick, along with the process, here. It got me thinking. Mixed into my thoughts were a chunk of crab apple tree and lines from Walt Whitman’s “Song of Myself.”
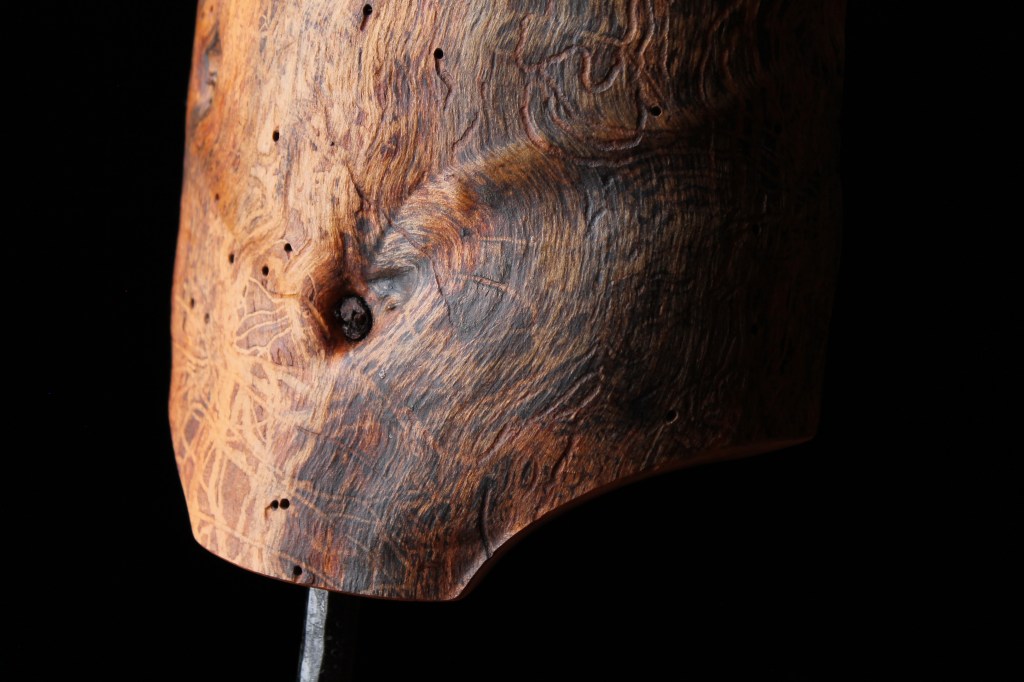
I had planted the crab apple tree in our yard, around twenty years ago. Eventually I had to cut it down, and I piled the trunk sections on the firewood stack. When I picked up this chunk to burn, the bark pulled away and exposed a form that brought to mind a human torso. I marveled at the color variation and surface texture, then hollowed the center away with an adze and set the piece aside, having no idea what I was ultimately going to do with it.
When this self-portrait idea came up, I reflected much more on that old chunk of crab apple, Whitman, transience, and oneness. Then I got to work.
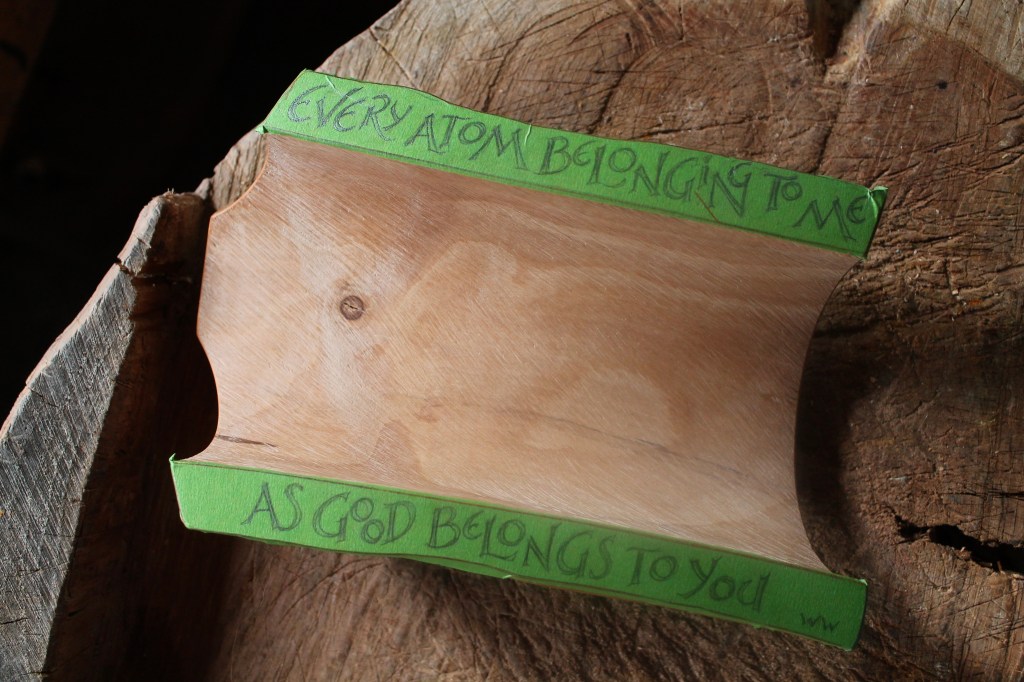
The shot above shows the result of the experiments with the design of the lettering. Placing tape over the surface lets me erase easily while working on the actual shape and size of the surface. Sometimes I’ll completely redraw after removing the tape. In this case, I slipped some bits of graphite paper under the lifted tape and transferred the outline of the letters lightly onto the wood. You can also see the texture left by a course rasp on the interior of the torso. The rasping began as a preliminary to further smoothing, but I liked the directional texture so much, and its contrast with the adjoining surfaces, that I decided to keep it.
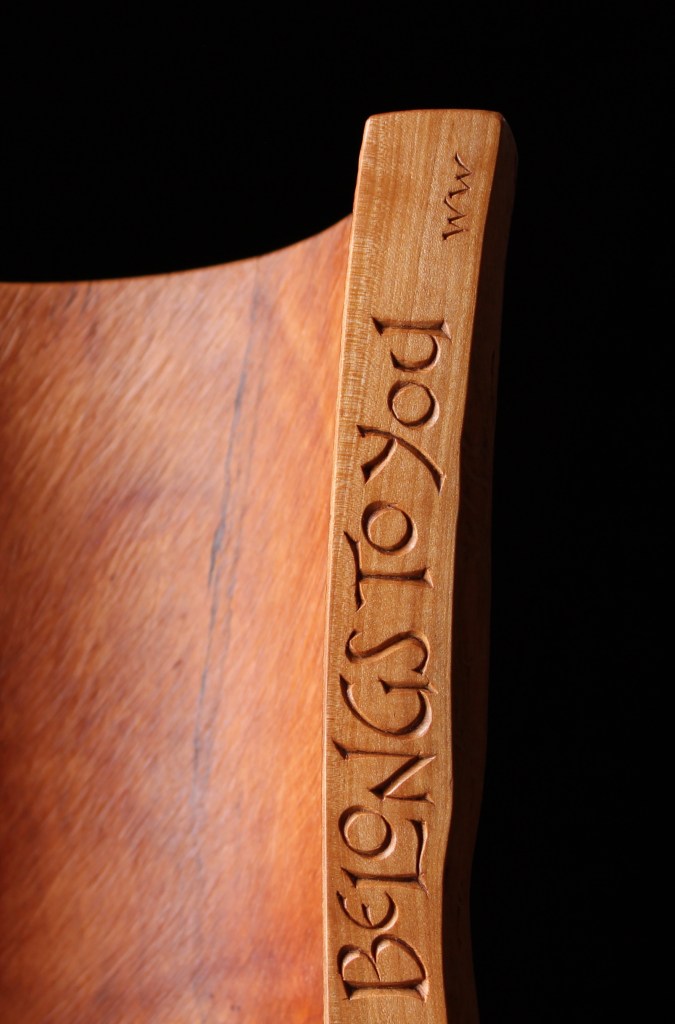
Apple wood is hard, but fine grained. It holds detail like this lettering well. Lots of work with the penknife and also some gouges for the tighter curves. Using our woodstove for a forge, and a chunk of railroad rail for an anvil, I did some shaping and texturing of some mild steel to hold the torso above the figured walnut base.
The Exhibition is online and just opened today, running through August 28. You can explore all 25 of the pieces that were selected here. Many of them are for sale, including this one; this link will take you to that specific page. And if you’re ready to Zoom, The Esherick Museum is hosting an online opening reception for the exhibition. It’s free to join in, but you need to register here.


