

Sometime around 1980 I borrowed a Charlie Brown book from the Greenville Public Library. Then I lost it, then found it three years later. I don’t remember if any late fees were ever paid. What a scoundrel.
This fall, I seized an opportunity for redemption as the Library sought a bench in honor of a longtime dedicated volunteer. The bench would also serve the practical purpose of offering a place for patrons to rest in the foyer.
I drew up a design and then went to my local sawyer, Lou, who came through once again. Lou Loreno and his son, John, are the kind of guys that can do anything, from restoring giant old machinery to rebuilding the foundation of a three-story barn. They also understand trees and how to transform them into sound beautiful lumber on their band mill.
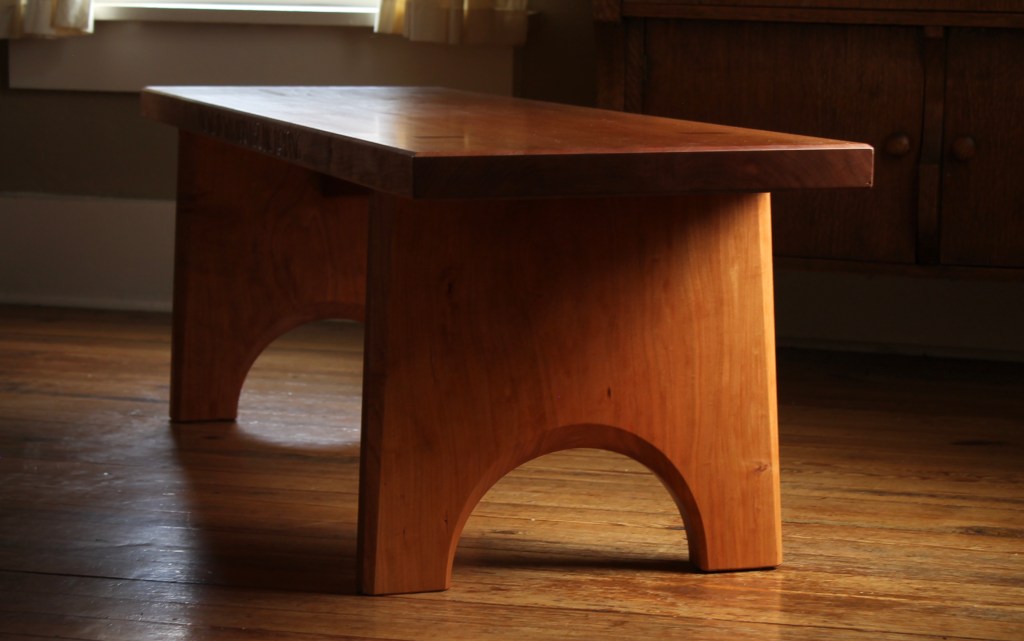
Lou and John had rescued some big cherry trees that had been taken down at a construction site. They had the perfect 8/4 plank for me, 10 feet long and 18″ of clear heartwood across. The bench is 5 feet long, 18″ wide, and 18″ high. Below is a slideshow with a few photos of the bench (when it was still at our house), along with some shots I snapped during construction.
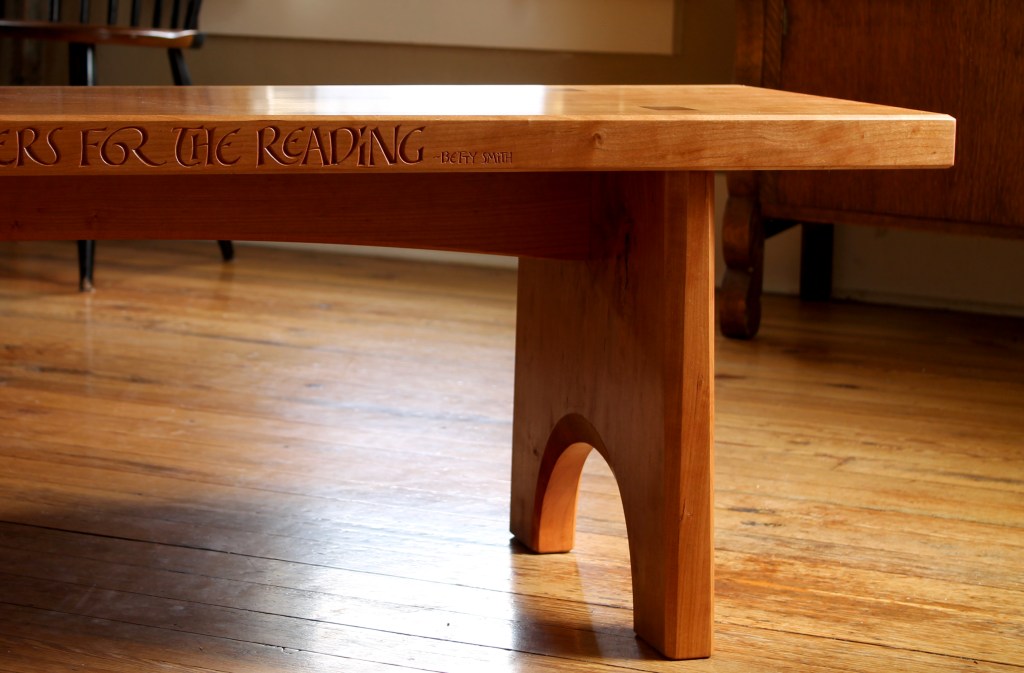
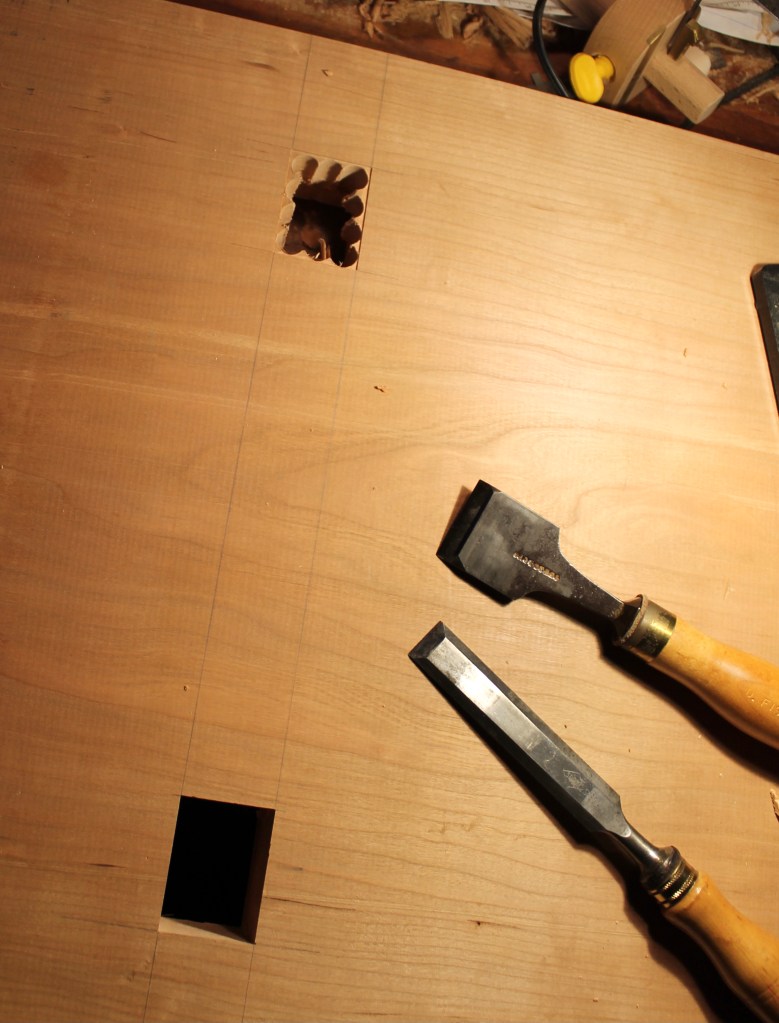

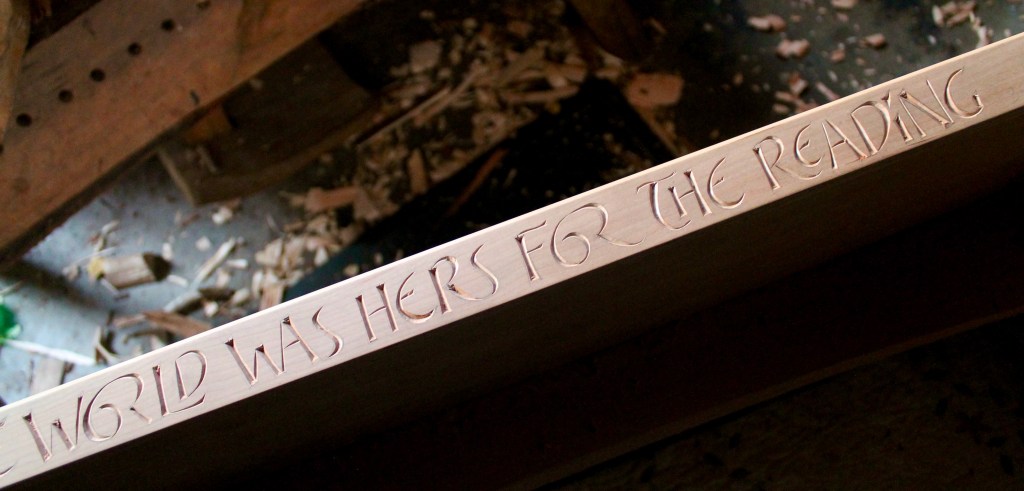
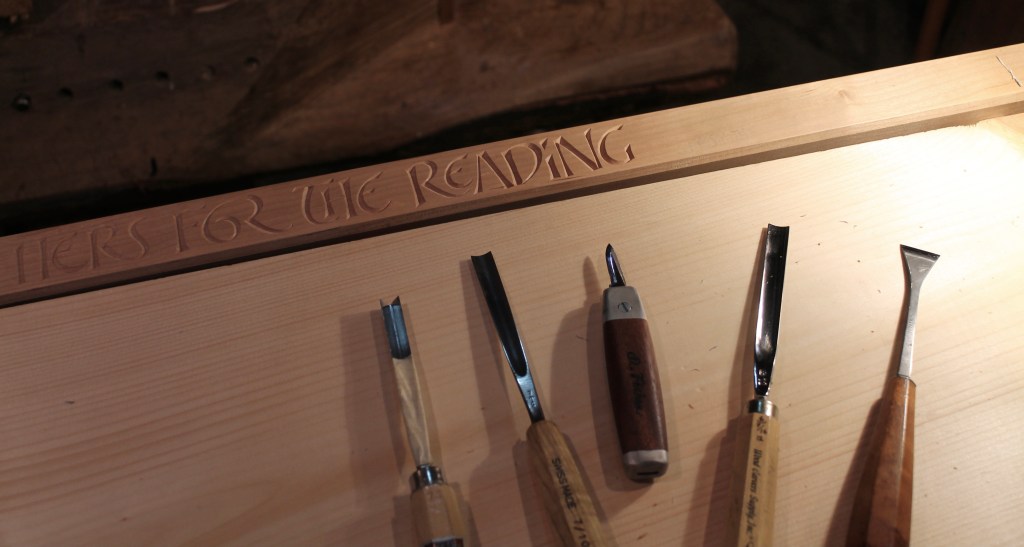
A quote from Betty Smith’s A Tree Grows in Brooklyn was selected for me to carve on the front edge of the bench. The bench top ended up at 1 3/4″ thick, so the letters are about 1 1/4″ high. In hard kiln-dried cherry, this requires more than a penknife. After drawing the letters with a pencil, I removed much of the material with a v-tool and mallet. The photo below shows the inscription after just the work with the v-tool, which goes relatively quickly. Certainly legible already, but with much attention still needed.
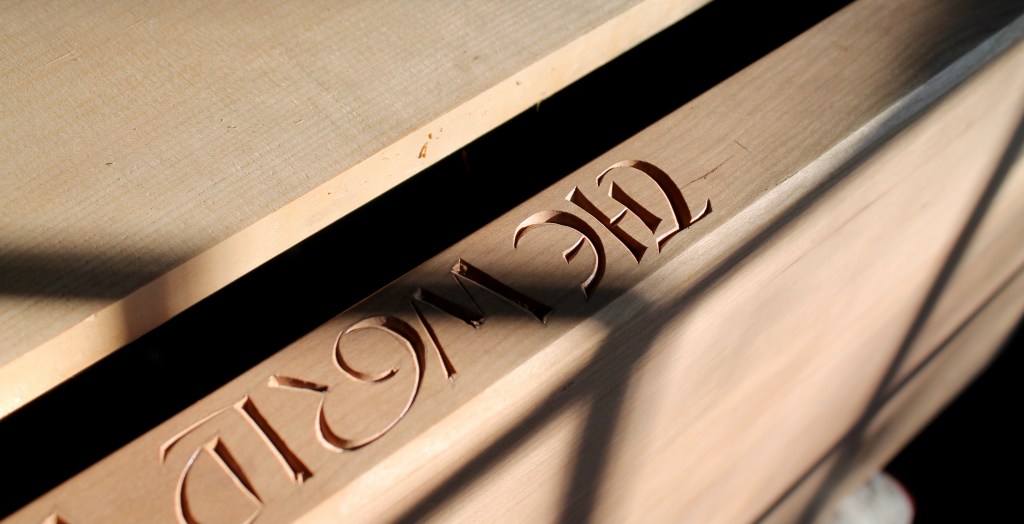
In the shot below the word “The” has been finished with knife and gouge, which shows the difference next to the letters still to go.
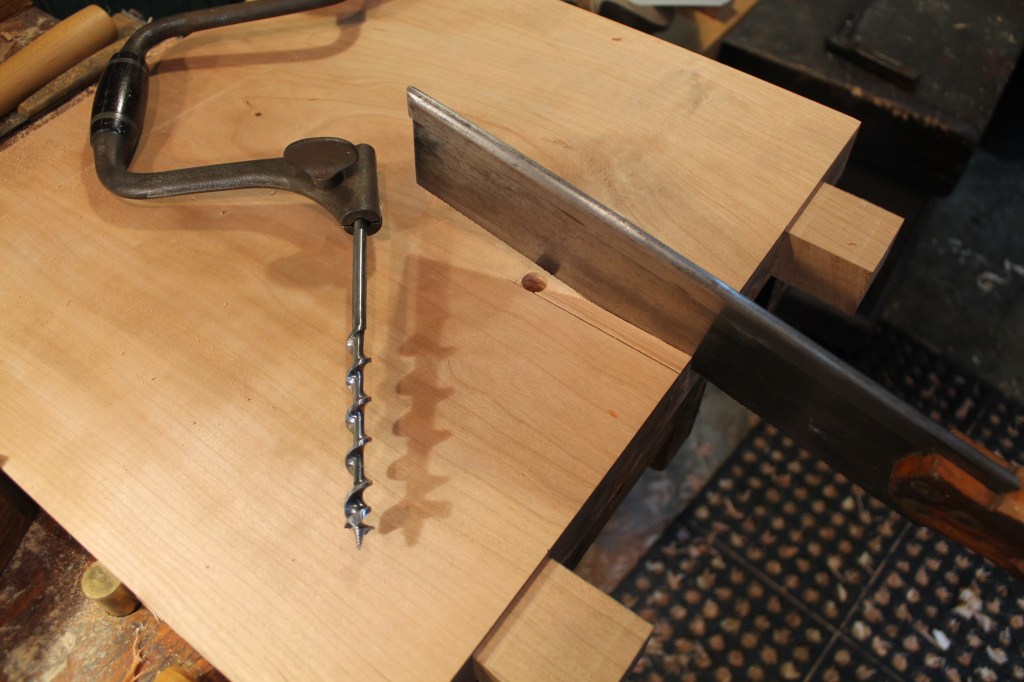
With the bench on its side and a board spanning the legs, I had a convenient rest for my tools as I carved.
It’s an honor to have been able to do the bench. I like libraries, and I’ve got lots of memories in this one, from working on (pre-internet) term papers to taking my own children there to pick out books, usually back on time.


So were you carving the letters upside down? I’m looking at the photo of “The” and the one w the tools. Am I seeing this right?
LikeLike
Good question, Peter. I switch back and forth from both sides because I tend to keep the surface that I’m cutting to the right of the knife, if that makes sense. in other words, the right bevel of the knife is against the good surface as the blade is drawn toward me, and the left bevel is pushing the chip. When I’m lettering a spoon or a small panel I can sit still and flip the piece around in my hand. In this case, it’s easier to move ME. Letters upside down, rightside up, doesn’t matter when I’m cutting. I’m not seeing letters then, just shapes, curves, lines, surfaces, junctions…
LikeLiked by 1 person
Thanks – that’s what I figured. They’re just shapes at that point. Nice shapes, though. Makes me want to visit the library – in the future.
LikeLike
Beautiful! I was wondering, is the font your own artistic imagination or is it a more established style?
LikeLike
Thanks, Gene. I don’t know anything about fonts or typefaces. Well, next to nothing. I just draw letterforms. Depending on the situation, I’ll design them differently, but I suppose there is probably something of a style that has developed over time for me. I normally don’t look at any references when I draw letters, but there have been times that might call for a certain style where I might take inspiration from a Roman inscription for example. Most fonts or typefaces were designed to be printed, not cut, and they often won’t work well scaled up and forced into another medium. Designing the letters is much of the fun. We all can do it. Kids do it all the time, with their own style. I am always amazed at how adept we are at sorting out the patterns of letters even in unfamiliar forms or combinations. The possibilities are staggering.
LikeLike
Gene, if you do want to use a computer font to lay out some lettering to carve, I would suggest a traditional Roman font like Trajan or Times New Roman. Just take a careful look at the spacing. Many programs don’t have sophisticated kerning which means the spacing can be disconcerting, especially for extreme examples like between A and V. You can always adjust the letterforms and the spacing as you’d like, but that may be a useful starting point.
LikeLike
Really love it !
Cordialement,
Hugo Baillargeon
LikeLiked by 1 person
Excellent as always, David! I enjoy your whimsical use of ligatures, altho my linguist wife complains that they make things harder to read.
LikeLike
Thanks, Bob. There are many opinions on that subject!
I feel that obvious clarity of text is vitally important for reading highway signs or when reading a book, but for short meaningful passages, having to work one’s way through the lettering a bit can be useful. Slowing. Lettering that encourages, or maybe requires, more than a mere glance. We glance too much.
In fact, I enjoy some calligraphic examples that are much more cryptic in nature that bring a thrill of discovery.
Dinner conversation for you and your wife!
LikeLike
It was a short dinner. 🙂
I still like the ligatures
LikeLiked by 1 person
Ha! I should add, Bob, that I realize I have a lot to learn and discover, and that I could demonstrate a little more restraint at times! I’m sure I could learn a great deal more from your wife than she would learn from me.
LikeLike
Dave, love those ligatures! inspirational as always.
LikeLiked by 1 person
As always…. A GREAT story… along with the GREAT work that comes from your heart and hands! Thank you for sharing something wonderful at the end of a rather bizarre year – yet filled with wonder and blessings…! Happy NEW Year…!!!!!
LikeLiked by 1 person
You’re one of the good guys Dave. Nice work as usual.
LikeLiked by 1 person
Wonderful work, Dave. I love the lettercarving. That bench will last a long, long time. Greetings from the UK.and best wishes to all for a much better 2021.
LikeLiked by 1 person
Very nice work.
LikeLiked by 1 person
I am amazed at how good the bench and the lettering looks Dave. What a treasure for the library and the person being honored.
Tad
LikeLiked by 1 person
Absolutely wonderful craftsmanship……beautiful.
LikeLiked by 1 person
It’s wonderful on so many levels. The form is beautifully balanced. The tenon and mortise details are terrific. And the lettering. I’m a sucker for your carved lettering and choice of words. Bravo!
LikeLiked by 1 person
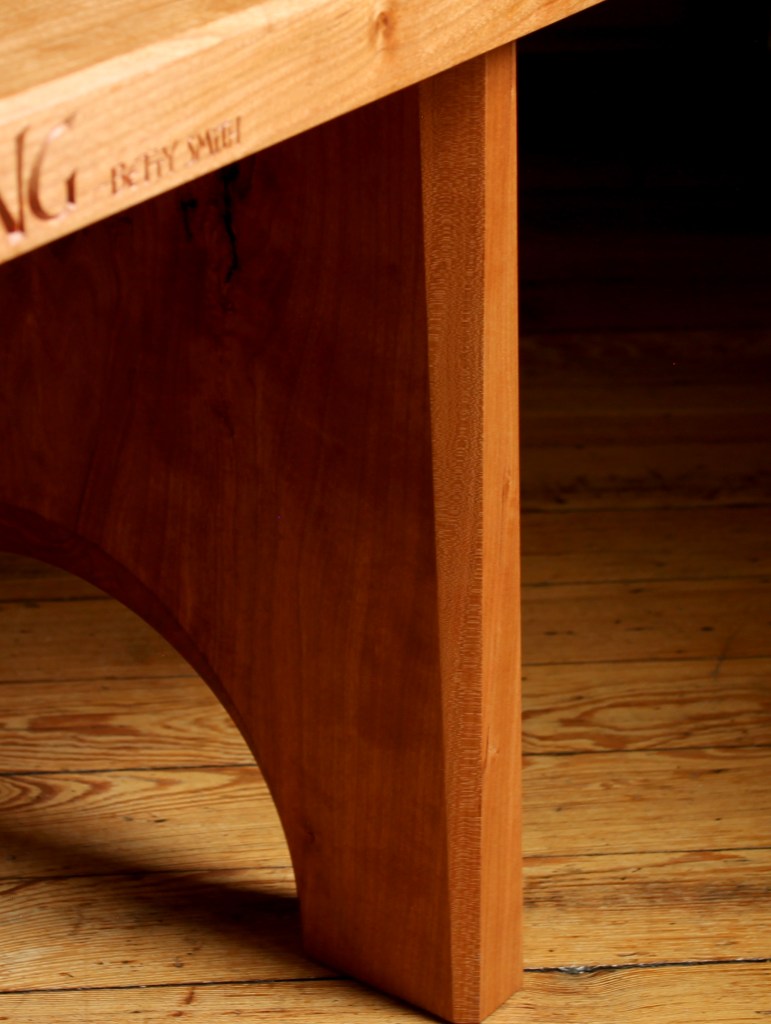
Dave I love this bench it’s beautiful ..can you tell me about the joint connecting the brace to the legs…I like how all the joints come together at once
LikeLike
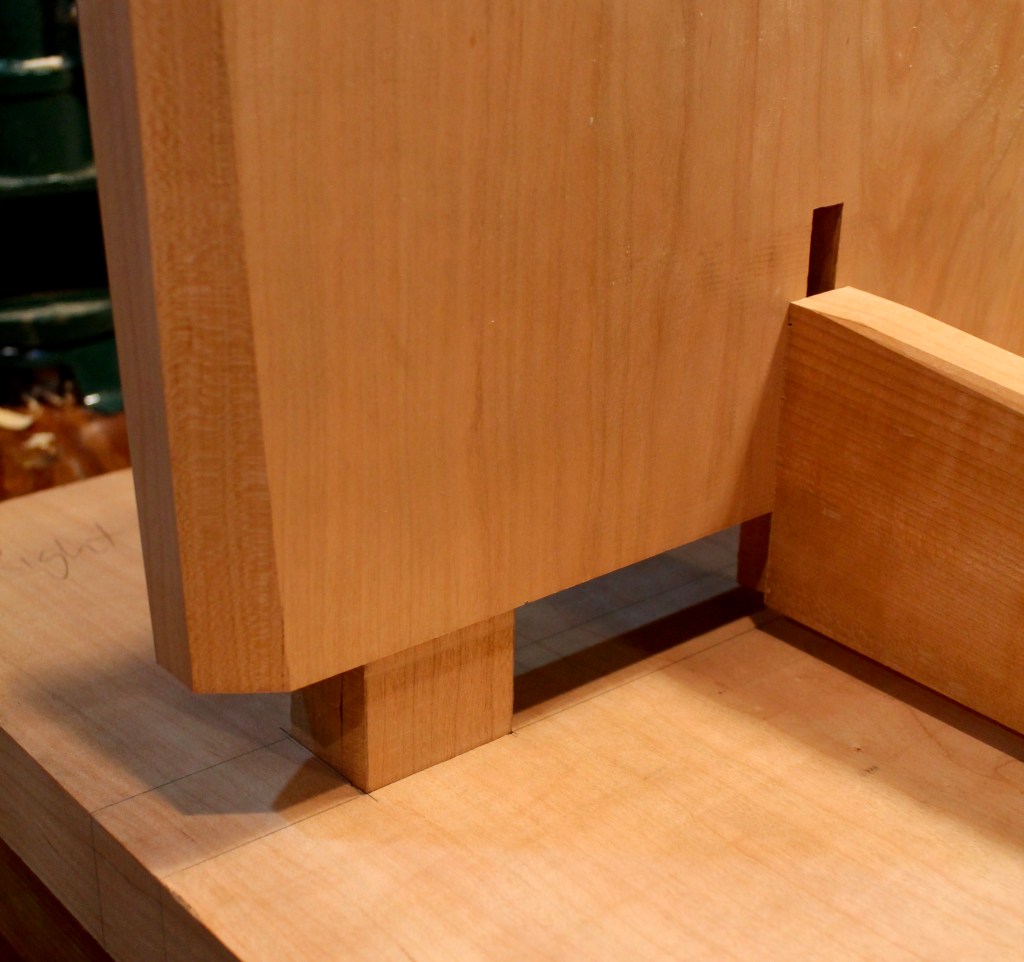
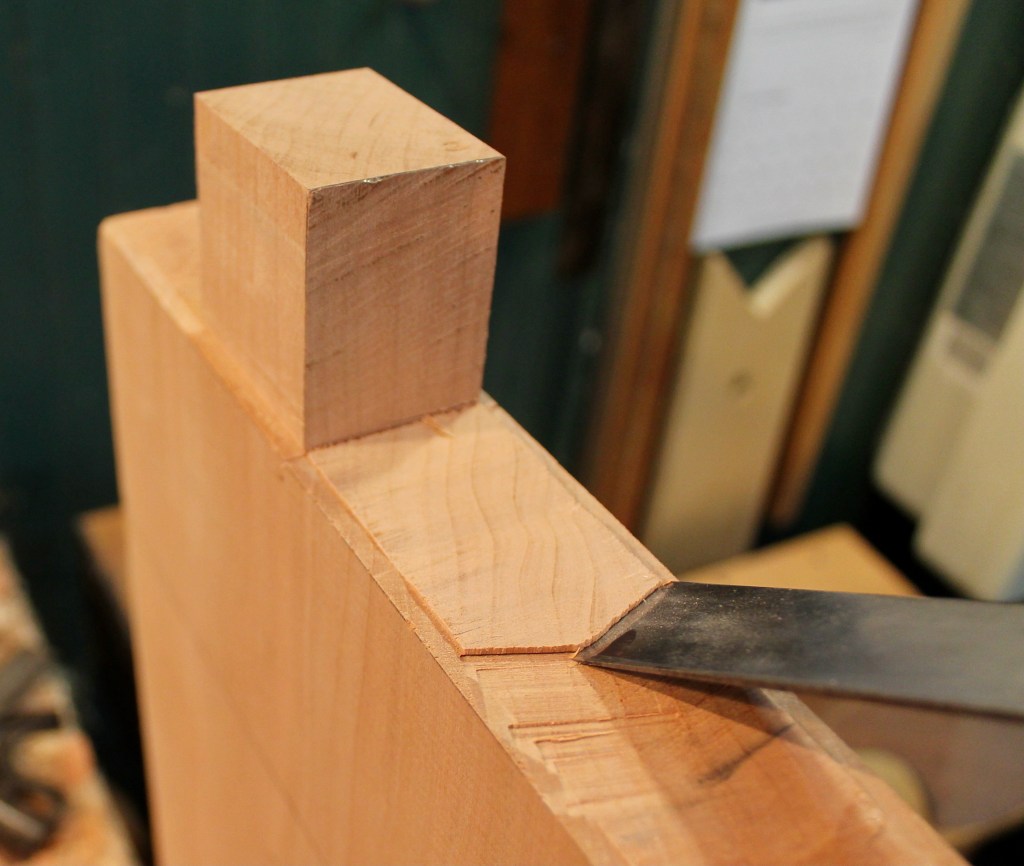
Thanks, Robert. That is a dovetail joint, a short sliding dovetail I guess. I didn’t want a stretcher lower down, but I wanted there to be more resistance to racking beyond just the mortise and tenon joints of the legs to seat. So the dovetail pulls the shoulders of the stretcher tight to the leg, assuring that the legs remain at 90 degrees to the top. I like how it came together, but the stretcher length has to be precise in order for the four tenons of the legs to line up together. In fact, I made that stretcher/brace twice. The first time, the length between the shoulders was just about 1/16 of an inch too short because I went about it in a stupid way. For the second (successful) attempt, I put the leg tenons halfway into their mortises, then put marked the exact length between the legs directly onto the stretcher board. That worked out.
LikeLike
You may have been delinquent but my opinion is that the library came out on that deal.
An oak pew I sat on years ago in a Romanesque cathedral in France years ago comes oddly to mind. Love endures.
LikeLiked by 1 person
Super crisp lettering, as always Dave :). Is the unusual flat fishtail gouge used for cleaning the bottom of the V-troughs?
I’m impressed by the design and carpentry of the bench itself. Interesting to read of your thoughtful use of a sliding dovetail to hold the stretcher and prevent racking. A couple of other options that occur to me: the “tusk tenon” much used by the arts and crafts movement, which uses a visible, removable wedge to hold the tenon tightly in place; the other is the wedged tenon used by Paul Sellers to secure the backs of his drawers – and because it looks good! 😀
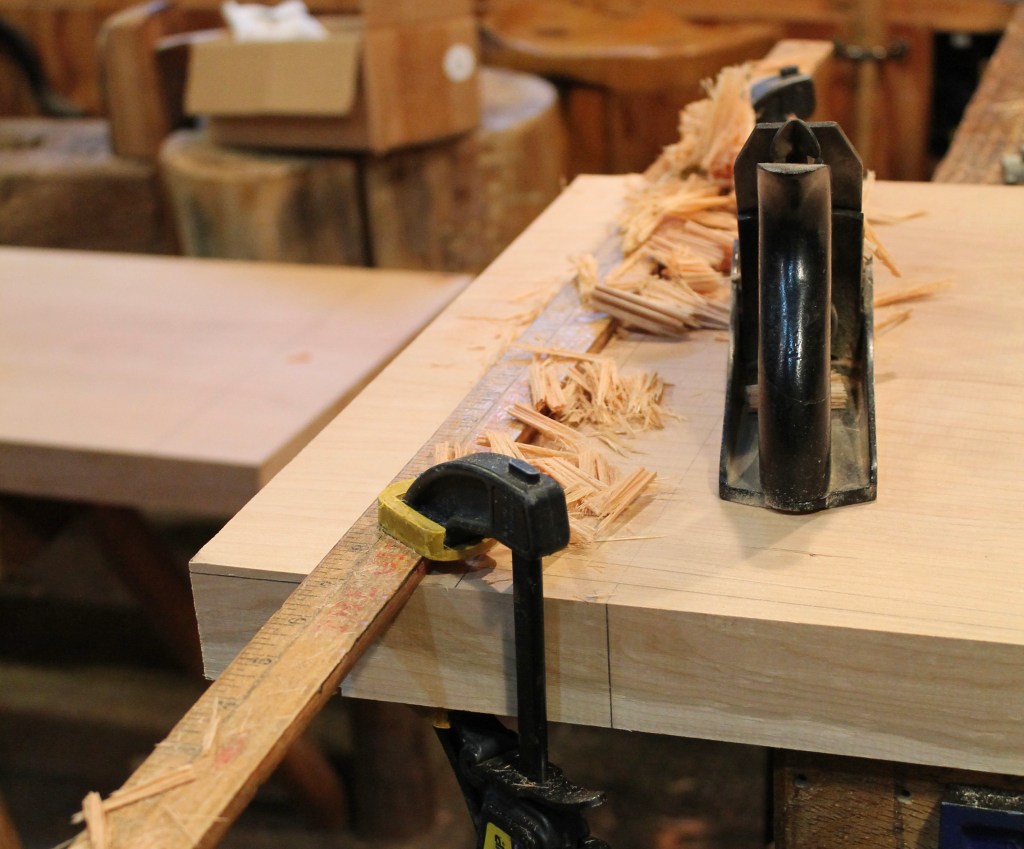
Interesting too to see you used a wooden rebate plane. I have 2 of those but have yet to use them to cut a rebate. How did you keep is straighr. Did you clamp some wood in place to act as a guide, or start the rebate (BrE)/ rabbet (AmE) with a chisel, or just follow a pencil line?
LikeLike
Very few of the elements are truly straight in this case, so a straight chisel (fishtail or otherwise) isn’t very useful for cleaning the bottom of the V. But in lettering examples where there are more straight, parallel walls, that would be a good technique. I picked up that fishtail chisel not long ago and was just sort of trying it out to trim the ends of the letters. Worked fine, but I used the knife for most of it.
I do like the tusk tenon, but with a stretcher so high up, any through tenon would have left a little section of short grain above it. Probably would have worked, though. Definitely a good option if the stretcher were lower on the legs. Thanks.
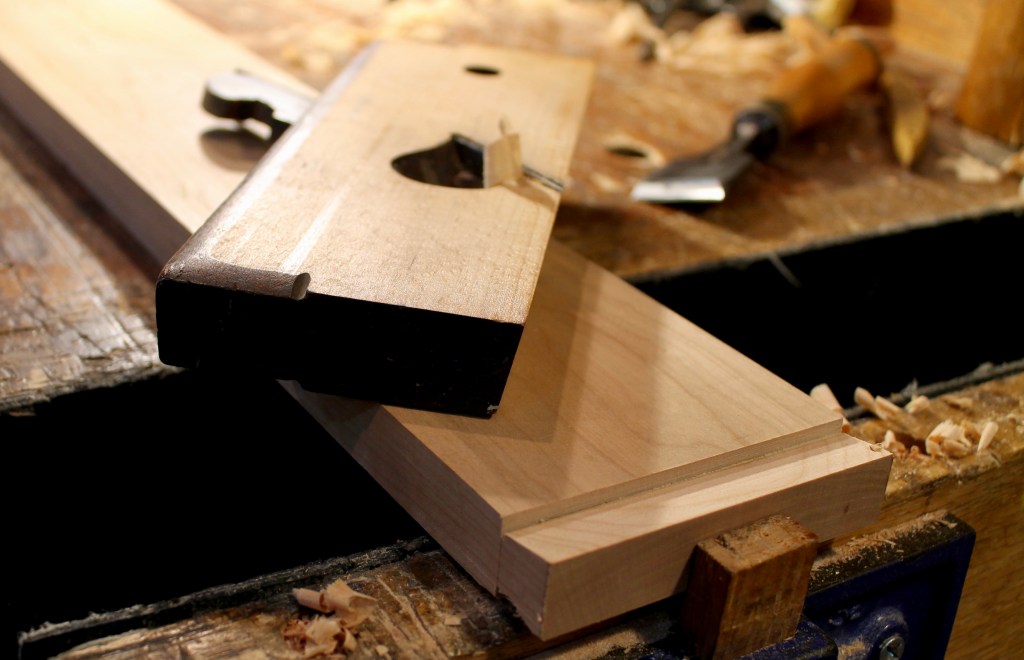
The wooden rebate/rabbet plane is now a dovetail plane. A few years ago, I was making a cabinet with wide shelves joined to the sides with tapered sliding dovetails. They make dedicated planes for cutting the male portion of sliding dovetails with nickers and a fence, but I had an old rabbet plane around. It was warped and in bad condition, but I planed the warp out of the side and planed the sole to an angle, rather than 90 degrees. If you look at the photo, you can see that it is angled at about 10 degrees. I scored the shoulder with a knife, cut the shoulder with a saw, removed much of the material with a chisel, then finished it with the plane, checking the fit in the socket in the legs along the way. The socket and dovetail are actually very slightly tapered from top to bottom so that the joint tightens up more as it goes in.
LikeLike
Very nice work Dave. I know about being delinquent in returning books to the library. Two questions: what finish did you use and can you tell us where you acquired the fishtail chisel? Looks to be about one inch or so. Thanks. Happy New Year to you and your family.
LikeLike
Thanks, Bob. I used several coats of “Concentrated Finishing Oil” from Heritage Natural Finishes https://www.heritagenaturalfinishes.com/SearchResults.asp?Cat=32 It is a mix of pure tung oil, aged linseed oil, beeswax, pine rosin, and citrus solvent (orange oil). No heavy metal drying agents. Even for furniture, I try to stay away from anything with mineral spirits, other harmful solvents, or heavy metals, mainly for my own health while applying. Works great, and can be retreated at any time with another application. So bring on the dings and scratches. I plan on rubbing a little more on now and then over the years. The library is a five minute walk down the road.
I bought that fishtail chisel as part of a group of carving tools, I think on ebay. The tools were all marked J. O. Lindner in the steel. I think they might be from around 1900 and may have been in Grand Rapids, but there seems to be very limited information about them online. Not being a tool collector, I don’t have many books with lists of toolmakers and such, but maybe someone will know more about them. Anyway, it doesn’t seem like there are many of their tools available. I had never heard of them, but I liked the look of the tools. The fit and finish of the one’s I have, especially the shaping of the handles, is wonderful.
LikeLike
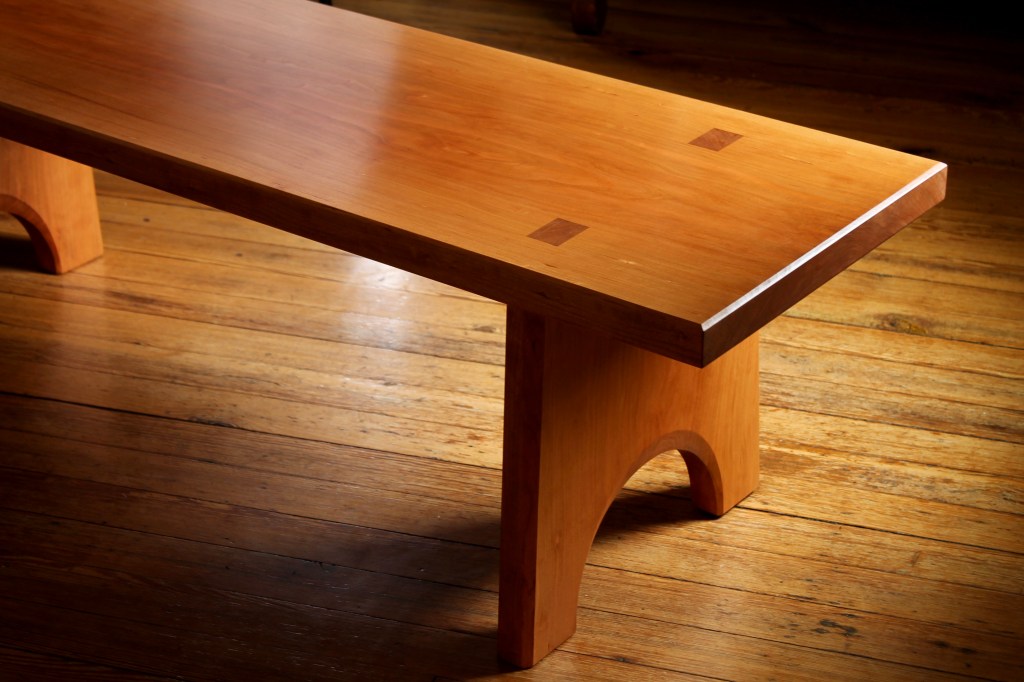
Spectacular bench David, I can’t even comprehend how you accomplish the letter carving in such clean detail, amazing. Could you have assembled the legs and stretcher first, then marked the thru tenons from the bottom, but maybe if things weren’t dead square transferring lines to the top would be a problem (sorry thinking out loud… well thinking in prose). Thanks for sharing your beautiful work.
LikeLike
That’s a good idea, John. Would work fine, but the tenons make such a strong visual statement on the upper surface (They are wedged, by the way, but with cherry also), I wanted to make sure the mortises were exactly where I wanted them. Your thinking in prose is perfect, because the marking of the mortises on the upper and lower surfaces was quite exacting to make sure I would be chopping the mortise walls at 90 degrees. Now that I’ve done it, the key is marking the length of the stretcher directly from the legs after the mortises have been cut. Then it all goes together nicely. Thanks for your insight. This creative problem solving is much of the fun.
LikeLike
Dave–you are always a blessing and inspiration. Thanks.
LikeLike
I love the lively stance of the bench. Can you explain how you laid out the arch and it’s chamfer? Maybe it’s just the angle but doesn’t look like a circle and looks too tight a curve to have been traced on a batten.
LikeLike
Thanks, Paul. The main cutout is indeed simply a semicircle laid out with a compass directly onto the wood. But the large chamfer is, I think, the key to giving it a sense of lift. The outer edge of the chamfer is a parabola, in effect, that I just sketched by eye. I laid it out on some cardboard, then traced that pattern onto both sides of both legs above the semicircle. You could also achieve the same thing by drawing an ellipse onto cardboard to the width and height desired, (here is a post on that: https://davidffisher.com/2015/01/10/ellipse-layout/ ) then using half of the ellipse as your pattern.
I’ve added a photo to the slideshow now that shows my layout lines in pencil on the legs, including the freely drawn marks on the underside of the arch. Note that on the underside the chamfer is wider at the center and tapers toward the feet. I created the chamfer by removing the material between the pencil lines with a spokeshave.
LikeLike
Thanks David. I’m just now noticing that the tapered chamfers on the corners of the legs are adding a lot. Your suffl always sings.
LikeLike
Suffl = stuff
LikeLike
Nice.
LikeLike
Beautiful as always Dave. Just for the record. In my shop the font is called “Fisher’s.” My attempts to imitate still look more like they were chewed by a talented beaver, but your example continues to be my inspiration! 🙂
LikeLiked by 2 people
I LOVE your work!! This is a beautiful piece,
LikeLike
Thanks, Aunt Karen. I appreciate your opinion, biased or not!
LikeLike