
If you’re going to make round bowls, why not use a lathe? Well, because I’m chicken. There’s something about a twenty pound chunk of wood spinning around at five hundred rpm that makes me not want to poke it with a bar of steel. I like my chunks of wood to sit still in front of me.
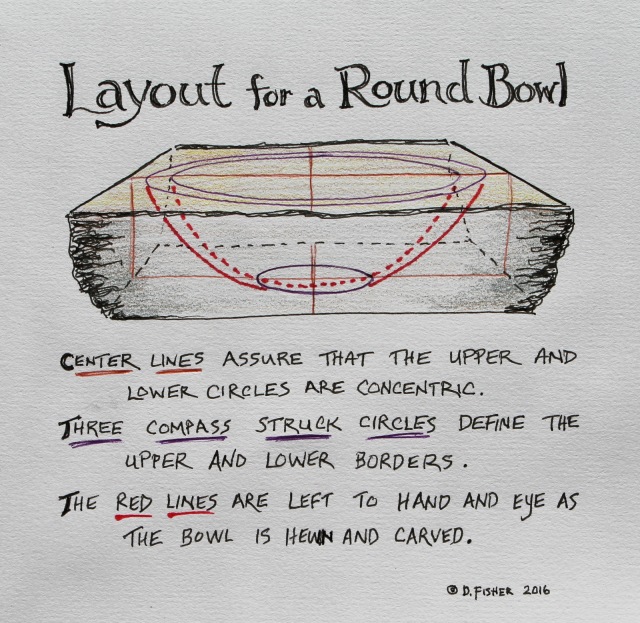
There may be other reasons, but the simple fact is that round bowls can be made without a lathe, so go ahead. The layout couldn’t be more simple, and the adze work is straightforward as well.
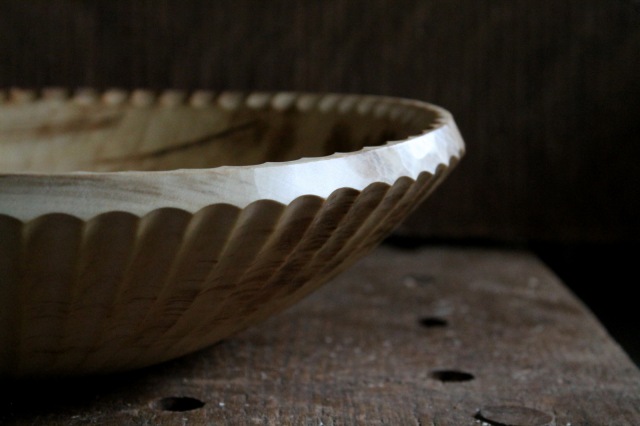
Not long ago, I wrote a post about carving the flutes on the maple bowl in the top photo. Here are some photos of the finished bowl.


After hollowing the inside and hewing the outside, I usually turn to a spokeshave on round bowls to fare the outer surface. By holding the bowl up at arms length, symmetry issues are easily seen. I run my hands over the surface often as well. Fingertips can read dips and bumps that the eye may miss. And what you do miss is okay too; the bowl will move anyway.
Roundish Maple Bowl
The movement green wood goes through as it dries is more evident in round bowls than oblong bowls with bilateral symmetry. The rim will not be completely flat after drying; it will likely be crowned a bit along the central axis running with the grain. And the bowl will shrink to a slight oval as it shrinks more across the grain. This maple bowl, for example ended up 14 1/2″ long with the grain and 14″ across the grain. But maybe perfectly flat rims and perfect circles aren’t necessary — certainly not always. It’s nice to have a bowl that let’s its hair down once in awhile.
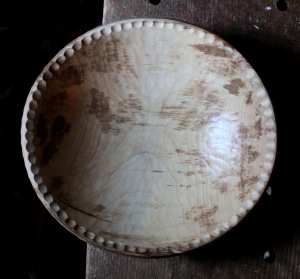
My carved round cereal bowl has been serving me well. It’s about seven inches across, not including the little handles.
Some of the round bowls I’ve carved over the years can be viewed on the gallery page of my website.

Stunning work. Lovely illustration. Can we look forward to a book filled with your drawings and photographs?
LikeLike
Actually, I think about that. I’m naive I suppose; I know it is a lot of work, but I think I would enjoy it. I like the idea of the creative possibilities. Of course, I don’t know the first thing about publishing and that whole end of things, but that might be interesting to explore as well. Maybe someday.
LikeLiked by 2 people
That bowl is simply spectacular with that fluted detail and I love how it carried over to the rim on the inside. I have been eagerly awaiting the finish on this since the teaser post a few weeks ago. Just spectacular!
LikeLike
Thank you so much for inspiring me. I currently have a bowl blank sitting in a tub of water awaiting my adze. I’m really looking forward to making bowls this way and have found that your blog posts are very helpful.
LikeLike
Thanks, Marilyn. Good luck with the bowl blank — and don’t forget to take it out of the water before you start swinging! If the wood is green, you can alternatively just keep it in a plastic bag to keep the moisture in.
LikeLiked by 1 person
I don’t usually laugh out loud when I read, but I couldn’t help it with this line: “There’s something about a twenty pound chunk of wood spinning around at five hundred rpm that makes me not want to poke it with a bar of steel.”
It sounds pretty reasonable when you put it that way! Craftspeople tend to revert to whatever methods they find comfortable and enjoyable, I notice. I got my start in woodworking through turning, so it seems I find every opportunity I can to do the grunt work on the lathe: hollowing kuksas, shrinkpots, etc. before finishing them with knives and gouges.
LikeLike
By the way, I went to sign up for your hands-on workshop at Greenwood Fest this morning and it was already sold out! Whew, that was quick. Oh well, I’ll see you around elsewhere that weekend.
LikeLike
Yep, for someone who is familiar with turning and already has a lathe set up that is capable of doing the work, that makes sense. Of course, that is if you’re in the workshop. It’s a lot harder to throw a lathe into a pack.
Sorry you didn’t make it into the hands-on workshop, but there will be lots of other time to get together. I’ll look forward to it. Should be a wonderful weekend. Plus there might be something else brewing for later in the summer.
LikeLike
That fluted bowl is spectacular. Do you use an adze on bowls as small as the cereal bowl you have pictured, or is one like that all gouge work?
LikeLike
For a cereal bowl, I will use an adze to hog away some material, but it’s not really necessary. You could go straight to a gouge and mallet. The size of that cereal bowl is pretty ideal for me — easy to hold in the hand, but still large enough to hold a reasonable amount. The two top circles are roughly at 6 1/2 and 7 inches, the bottom circle is 2 1/2 inches. The height is about two inches, but deeper would be fine as well.
LikeLiked by 1 person
Awesome. Thanks for the measurements. My adze should be arriving any day now and a new cereal bowl might be the perfect first project!
LikeLike
Pingback: Your Daily Bowl | David Fisher, Carving Explorations
Hi David. I am very impressed with all your work so much so that I would like to emulate your style.
I am a joiner/cabinetmaker by trade but I find much of the work repartious & I find this kind of working with wood not so.
I am currently working on a salad bowl out of London plane. I wish I had an Adze but for the cost so gouge & mallet is the go.
This is a very strange wood to work as there seems to be no particular direction in the grain & I was wondering if you have used this wood before & your thoughts on it.
I love your flute work on this round bowl which has given me the idea on how to finish this salad bowl for my wife. Photos to follow. Yours Dave
LikeLike
Dave, I haven’t worked with London Plane, but I have worked with American Sycamore. London Plane is a hybrid relative, and I think it shares many of the same properties. The grain is usually interlocked, somewhat like elm, so it can be a challenge to cut the grain cleanly, especially when it is green. After drying, the grain won’t present as much of a challenge. It is particularly interesting on the quartered face, with lots of shimmering ray fleck. Best wishes for your wife’s salad bowl.
LikeLike
Pingback: Send Off Shaving Bowl | David Fisher, Carving Explorations
That bowl is gorgeous! A smaller version of that could make an awesome shaving soap dish (just read your latest post: https://davidffisherblog.wordpress.com/2017/08/17/send-off-shaving-bowl/#comments 🙂 ). Would love to have seen you make that one (a good design for a video 😉 – especially the finishing decoration).
LikeLike
Do you have any video of that? I’d love to find out more details.
LikeLike
A video of making the bowl in this blog post?
LikeLike
Dave I also come from woodturning for the last 20 years and woodturners rough turn a bowl from green wood and after it moves and dries they are able to finish it. Would that work for carving?
LikeLike
Absolutely, Kent. In fact, that is pretty much what is done in just about every case. Whether bowl, spoon, shrink pot, etc. the piece is roughed out when green then, typically, the final surface carving is done after drying.
LikeLike
Pingback: ‘He Saw the Light,’ by Ed Rumsey | Rude Mechanicals Press Blog
Pingback: ‘He Saw the Light,’ by Ed Rumsey – woodworkhelp
Pingback: A Burl and a Box | David Fisher, Carving Explorations
Pingback: Round Walnut Bowl Underway | David Fisher, Carving Explorations